Tarok
-
Posts
240 -
Joined
-
Last visited
-
Days Won
5
Everything posted by Tarok
-
That’s awesome mate! Sent from my iPhone using Tapatalk
-
Warmer weather and school holidays off meant a few more hours at the bench than usual. Managed to get some primer filler onto the bucket. Really highlighted how much sanding I need to do. Managed to score a Sheev’s Emporium shirt and pair of Steven Walker pants from someone on ST Fam. Sent from my iPhone using Tapatalk
- 1 reply
-
- 1
-

-
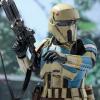
Let’s just caveat this thread with the following: I’m not known for lightning fast costume builds. My TK took almost 2 years to complete. Lol! But... I thought I’d kick it nonetheless. Instead of posting stuff I don’t have yet, I’ll just post what I have [emoji4] I’ll be presenting this as a ST Captain, keeping it consistent with my IO staff officer uniform. I also really love the colour scheme. Whilst I know it was inspired by the German Airforce in Northern Africa, it reminds me of many of the Commonwealth camo schemes of the same period. Helmet: SFv2. Printed at 105% by TDK Props. Shirt: sheev’s Emporium Pants: Steven Walker Sent from my iPhone using Tapatalk
- 1 reply
-
- 3
-
-
Stop being such a tease! [emoji12] Sent from my iPhone using Tapatalk
-
Wow! That’s cracking, Paul! You mentioned the stepped weathering in the rear shin above, funnily that was the first thing I noticed about the thins in this pic [emoji4] Once again, love the cohesive look of your finish and weathering. Too often I’ve seen STs look like they’ve climbed out a grease pit, and not a sandy beach. Does this mean the files are done? Sent from my iPhone using Tapatalk
-
Looks fantastic, Paul. Just the right amount of weathering! Sent from my iPhone using Tapatalk
-
Lol, I guess I better head over there and check out the comments [emoji1] Sent from my iPhone using Tapatalk
-
That’s a really interesting find, Paul. I’d just assumed it appeared lighter due to the weathering techniques used by the prop team, and the natural light washout caused by the Maldives beach and ocean. Any recommendations for a colour? Sent from my iPhone using Tapatalk
-
Really enjoying following your build. I don’t have a PatrolTrooper planned (never say never), but so many great tips here. Definitely doing the fibreglass tape builders joint tape trick. So much better than trying to position fibreglass mat. Neat boot trick. Question though: how will you pull the zipper down again? Slide the cord down between the armour and boot? Sent from my iPhone using Tapatalk
-
One can tell these were supplied by the same Scariff armoury [emoji6] fantastic side by side. Every time I look at your costume parts I notice something new (to me). Today is no different. I’ve never really given the blast shield bracket much though, but today I can’t help but notice how different the Anovos version is from the SFv2. Sean’s is more like a wedge or a spacer, whereas the Anovos seems to be longer, rests on the rim, attaching to the helmet at the top only and with 2 prongs to the shield. Sent from my iPhone using Tapatalk
-
As I said elsewhere (or imagined I did lol), looks fantastic, Paul. [emoji1303] Sent from my iPhone using Tapatalk
-
I saw the other photo you put up on Facey of the assembled shin too. Paul, I’m blown away by the finish you’ve achieved with the printed shin parts. Seriously, they look cast they’re that smooth. I’m actually rather jealous [emoji23] wish I could get that with a project I’m working on. Sent from my iPhone using Tapatalk
-
Looking fantastic, Paul. Really struggling to differentiate between your work and the movie stuff [emoji4] Sent from my iPhone using Tapatalk
-
Looks great, Paul [emoji1303] Sent from my iPhone using Tapatalk
-
Thanks Paul. I really don’t know how I missed that conversation before. So interesting! I’m sure I’m not the first to suggest that, looking at the bottom set of photos, it just looks like the adhesive has pulled loose. But the fact that it’s repeatable, together with the screen capture of the TK’s biceps clearly indicates as you have identified: it’s a clamshell design. Fantastic pickup! Sent from my iPhone using Tapatalk
-
[emoji4] Clearly I missed that convo [emoji1] as always, amazed by the effort and research you’ve put into this. Top notch, mate. Sent from my iPhone using Tapatalk
-
I hope the CRL team are on standby to make amendments once your kit is released [emoji1] The side-by-side comparison between open and closed biceps is interesting (to me anyway). Of note is how the taper changes. Personally I think I prefer the closed. I think I missed a few of the discussions about open vs closed. I’m curious how you identified the open bicep and how you established that it wasn’t a wardrobe failure, but that wardrobe had actually issued 2 different types of bicep (how does that even happen?) The camera angles, lighting etc in the “real” vs kit photo certainly does fool the eye (or maybe I’m getting old-er [emoji23]). From the posted angles it looks like your cover strips are wider, and the swoop of the screen part is different. I know it’s not the case, just an idle observation. Sent from my iPhone using Tapatalk
-
Wow... just... wow!! Mate, your attention to detail is phenomenal. I know... I’ve said it before [emoji23][emoji23] Sent from my iPhone using Tapatalk
-
Cool. I’ve seen his patterns but haven’t seen any prints. Nice to see one produced. [emoji4][emoji1303] Sent from my iPhone using Tapatalk
-
Looking great Paul! I know you mentioned you have doubts about the colour of the original Orca Bay Boots, but wow! yours look great with those weathered shins! Sent from my iPhone using Tapatalk
-
Nice! Who did you get the bucket from? Sent from my iPhone using Tapatalk
-
Love that ingrained dirt look [emoji1303] Sent from my iPhone using Tapatalk
-
Speechless... [emoji15] Sent from my iPhone using Tapatalk
-
Very nice mate. Does the armour have the brown undercoat as well? Or simply black? (Looks the latter to me) I notice you have a bit of chipping and rippling on the lower right ab section (bottom left in photo) across both the black and beige. Is this by design? Sent from my iPhone using Tapatalk
-
As always, thanks for the info, Paul. I probably have read the snap post on FB, I'll have to go back and double check. You really do need to get onto publishing Mr Paul's Comprehensive Guide to costuming the Shoretrooper [emoji1] Sent from my iPad using Tapatalk