

cheesewhoopy
-
Posts
420 -
Joined
-
Last visited
-
Days Won
13
Everything posted by cheesewhoopy
-
New rubies scout trooper helmet
cheesewhoopy replied to cheesewhoopy's topic in ROTJ Biker Scout Armor/Helmet
Thanks guys! I'll be sure to keep this updated. Sent from my iPhone using Tapatalk -
Ok after an event I did last weekend, looking at pictures I knew I needed to give this one more shot. Here is my final result. I also made a new cummerbund because I found a material that looked more accurate. Sent from my iPhone using Tapatalk
-
Ughhh I want this so bad, but $350 is a lot for a kit. Decisions, Decisions. Sent from my iPhone using Tapatalk
-
Zacharias ID81511 submission photos
cheesewhoopy replied to Zacharias's topic in ROTJ Biker Scout WIP
Now that's how you build a scout! Looks like your biceps are falling down. I had that problem too and used Velcro to fix it. Other than that you look legit man! Sent from my iPhone using Tapatalk -
New rubies scout trooper helmet
cheesewhoopy replied to cheesewhoopy's topic in ROTJ Biker Scout Armor/Helmet
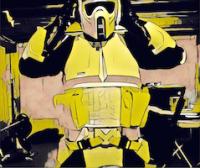
*UPDATE* Ok so I like having projects to work on and decided to fix this helmet up since I already had all the stuff to do it from other projects. Just figured I'd share my progress. I know you guys werent feeling this helmet, but I saw potential in it and I think it's coming along! First I made it about 3/4" longer by using some plastic. Also cut out the snout area and put new plastic there as well. Then I used apoxie sculpt to fill in the seems and sculpt the bottom of the snout as well as inside the helmet area. I also resculpted the lense area to be smaller. Now I am currently sandy the apoxie and filling in any areas that need work. Let me know what you guys think. Sent from my iPhone using Tapatalk -
I had actually thought about putting it in the back hump as well, but ultimately decided not to because I was afraid people wouldn't be able to tell I was talking to them. Sent from my iPhone using Tapatalk
-
I put the headset on and the wire goes underneath the mandarin collar, comes out the small opening on the upper chest where it buttons, under the flak vest, under the bund, under the belt then under the box and plugs in. Then when I put my balaclava on that covers whatever is left. Sent from my iPhone using Tapatalk
-
I tried putting my amp in one of my pouches, but the weight kept making them sag. I tried putting it in the chest, but it was actually pushing the chest out and that bothered me. So I thought about it and came up with this. I made a loop with leftover nylon webbing, put it inside the drop box and it fits perfect! It doesn't pull the belt down at all or push the box out ( I ran around to test it) and it gives good sound quality too even though it's at my waste. Anyway just wanted to share in case anyone else was looking for a good place to put an amp. Sent from my iPhone using Tapatalk
-
New rubies scout trooper helmet
cheesewhoopy replied to cheesewhoopy's topic in ROTJ Biker Scout Armor/Helmet
Lol yeah it does. I curved the visor to make it look a little better, but like Mickey pointed out unfortunate the lense takes away from the look. Sent from my iPhone using Tapatalk -
New rubies scout trooper helmet
cheesewhoopy replied to cheesewhoopy's topic in ROTJ Biker Scout Armor/Helmet
Haha I didn't think it was that bad! Other than the squareness of the visor it's got a pretty good shape to it. The eye cut out is a bit big too. For a cheap helmet, especially rubies I thought it wasn't half bad. -
New rubies scout trooper helmet
cheesewhoopy replied to cheesewhoopy's topic in ROTJ Biker Scout Armor/Helmet
Sorry for the quality, but here's some photos with armor on Studio Creations on the left, Rubies on the right Sent from my iPhone using Tapatalk -
I found this for really cheap and got it just for the heck of it. I'm honestly really surprised with how it looks. If the visor was a bit rounder on the top it would be a pretty good helmet. I'm surprised they went so far as to add the chin cup. Anyway just wanted to post some pics and see what you guys thought because I didn't even know this existed. Sent from my iPhone using Tapatalk
-
Hard to tell from just that photo, but looks like you're on the right track so far. Try bringing the shoulder bells closer to the chest and back bridge, about 1" away. You should also round off the corners of the shoulder bells. Keep up that good work! Sent from my iPhone using Tapatalk
-
Oh wow seeing them side by side I totally didn't realize the WTF chest was that much bigger! I actually think given my body size, I wouldn't be able to pull off Strider's chest, as beautiful as it is. I guess I lucked out with WTF in that sense. Sent from my iPhone using Tapatalk
-
What do you think of this mock up on the left? Just drew it in black to see how it would look. Sent from my iPhone using Tapatalk
-
I suited up with everything on to see how it looked. It's not perfect, but I do think it looks better than before. Sent from my iPhone using Tapatalk
-
You're totally right, it's too straight on the sides now. I think for now I'll clean all the edges up and leave it be. Don't want to cut anymore and make it look worse. Maybe I should've left it be. Dam my obsessive nature with this costume! Sent from my iPhone using Tapatalk
-
The more I look at my chest and look at screen grabs/ really accurate armor I realized mine just wasn't quite right so I did some cutting. Wanted to get some opinions on if it looks better and what could be done to make it even better (if possible). Here are my reference photos: Left is before, Right is after Left before, Right After I still feel like something is off. Maybe the part below the neck could be cut down? Sent from my iPhone using Tapatalk
-
My memory fails me! My bad. I guess in my excitement I thought I saw that. There's a pretty good chance I will end up changing mine now. Sent from my iPhone using Tapatalk
-
I did mine like this with two anchors. To me it made the most logical sense. It's easy to adjust and swap out with a new zip tie if you want to change the fit. When I was at celebration I took a look at the scout on display and thought it was done the same way. Also in this classic photo we use as reference, when I look at it I definitely see a looped zip tie. My eyes could just be imagining it, but it definitely appears that way. Sent from my iPhone using Tapatalk
-
😂😂 perfect analogy Sent from my iPhone using Tapatalk
-
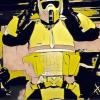
If you want to look like they look standing on the Death Star then don't weather it. If you want to look like you've been stationed on Endor then I highly recommend going for the screen accurate weathering look. It's as simple as doing a light coat from far away with black spray paint, then going in close and doing black spots in random places on the armor. Add some scratches in the paint with steel wool or sand paper or your finger nail, anything can work and boom you will look like you stepped of set in the red wood forest. Here's a couple photos of my weathering. Sent from my iPhone using Tapatalk
-
Congrats! Sent from my iPhone using Tapatalk
-
Thanks everyone! Now I just need to one day get my hands on a lone wolf or RS helmet and some original boots and I think I will finally be 100% satisfied! Sent from my iPhone using Tapatalk
-
Depending one what you used to weather it initially, It could be taken off. Rubbing alcohol will do the trick if you used acrylic paint. As for how I did mine, I stood back like 3 feet or so and did a light mist over all of the armor just so it wasn't shiny white. Then I went in closer for the black spots and used some sand paper to add small scratches and a shish kabob stick to do the bigger scratches. People also use steel wool which gives good results. You just have to do it kind of quickly and randomly, can't over think it. If you look for Strider's armor build thread he posted a video on how to do it, it's very handy. Sent from my iPhone using Tapatalk
