Retrofire
-
Posts
3,693 -
Joined
-
Last visited
-
Days Won
135
Everything posted by Retrofire
-
Hey Marcel we got some great Shoretrooper Armorers that can help you with this. Hi @ScaryGuy @Minimo and @KOtrooper can you help this recruit with this armor question? Many thanks!
-

RIP Ira Keeler, June 22, 1940 - April 15, 2021
Retrofire replied to BikerScout007's topic in Announcements
Buckets off to a giant in the industry! -
Hi Risa! Here are some good build threads to look through. Wishing you the best of luck with your build and don’t hesitate to reach out with any questions. We’re here to help you be successful! And
-
Tusken Raider turned Biker Scout
Retrofire replied to Cat's topic in Scout Trooper: "The Mandalorian" WIP
Hey Cat glad to see you back at it! Hope the semester is going well for you. I can see what you saying regarding sizing but you’ll want to tread lightly when thinking about modifying measurements in the costume requirements. I would very much recommend that you reach out to your GML there in the FL garrison before committing. -
Congrats Pathfinder!
-
Congrats Pathfinder! Make sure you update your 501st profile and post up in the Access Forum for Pathfinder access. http://forum.501stpathfinders.com/index.php?/forum/162-access-requests/
-
Excellent work Lancer! Well done!
-
As @Chopper as mentioned go in short controlled bursts so you don’t build up heat due to friction. If it seems as if it’s getting too warm stop and wait for it to cool before tackling it again.
-
TB-71411 Lancer Deployment Request (APPROVED)
Retrofire replied to jwnikita's topic in Lancer Deployment Request
Outstanding work Jill! All those changes look great to us! As a final step we would like to get a last set of photos with you in your updated gear. They would repeat the first set in your first post with front, back, right/left sides. Just one more step to the finish trooper! -
Mysterious Stranger's Scout Trooper WIP
Retrofire replied to Mysterious Stranger's topic in ROTJ Biker Scout WIP
Looks nice. Typically that sag is caused by the weight of the blaster in the boot holster. It can be alleviated by attaching a loop of strapping inside the boot that wraps around your leg. You may be able to use a paint pen or some white shoe polish to clean up that area where the vinyl came off. A magic eraser can also clean up the holster area and any minor scuffs on the armor. Looks like you’re off to a good start. I’d like to also recommend that you keep your GML in the loop from time to time to make sure the approval process goes smooth. Also there is a great resource available for scouts in the SCG called the Advanced Recon Team (ART) Scout Team Six. Our DL is on that team and you can reach out to them via FB if you are interested. We’re here to help you be successful so keep up the great work and reach out if you need anything! -
Best of luck on your submission Keith! Looking forward to hearing of your approval in the coming days.
-
RS Props Full Commission is good enough for Basic Approval?
Retrofire replied to josiff's topic in Getting Started
Hi Joe. I would recommend highly that you pull the CRL and also reach out to your garrison GMLs there in the DSG. You’ll want to make sure with them that there will be no speed bumps as well before you pull the trigger on your purchase. https://databank.501st.com/databank/Costuming:TB_Scout_trooper -
Hi Matt. The pic makes it a little difficult to size the cap height. Can you snap another shot a little further out so we can see the whole helmet? Also check out the helmet comparison thread. There are a series of shots of the KS lid from different angle that may also help.
-
Welcome onboard Pathfinders! Good luck in all you do!
-
@M.J Can you help Sabrina with fitting the chest/Back armor?
-
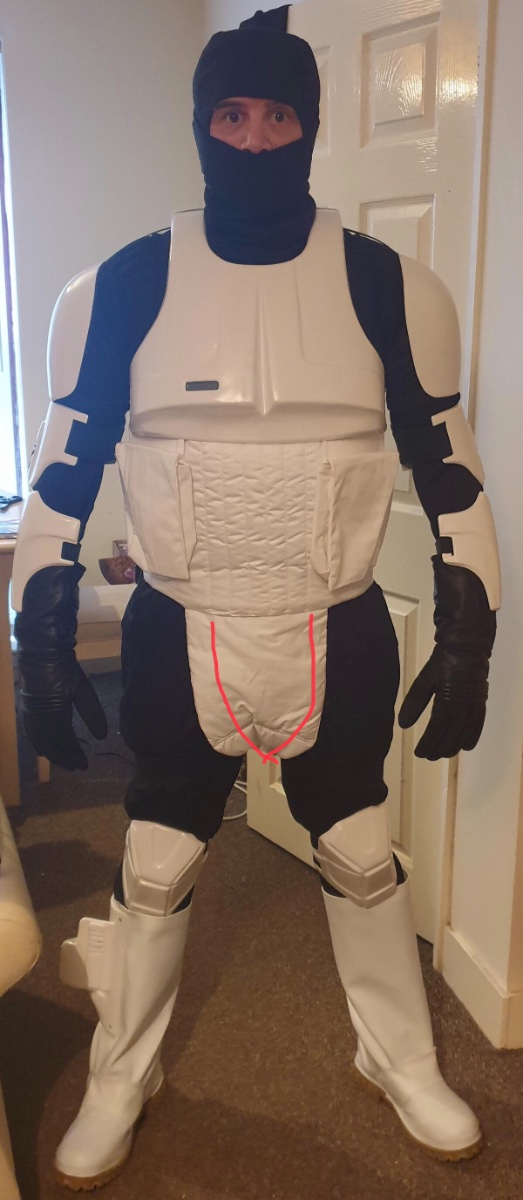
The boxes are looking better there Phil and most of this looks really like fitment stuff to me. Dressing this costume is like dressing in top hat and tails for the Ascot in that there are so many parts😃. What I’m seeing and @Chopper chime in here too is that your bund is slipping down below your chest armor and that’s “wonking” the look. So pop off your belt and chest armor and let’s focus on the vest and bund. The vest is fine so that’s good. Give yourself a little slack on the cod strap and now pull your bund up level with your chest pectorals somewhere around the middle take a deep breath and connect the Velcro. Cod should be hanging kinda loosely. Now sit the cod flat on your front and just snug up the strap not tight just snug. Now put on your chest armor. The tops of the pouch flaps should ride at the bottom of the chest armor. Now put on your belt and bump it up against the bottom of the bund and tighten it up. Phil I think you’re right there. Just need to adjust and tighten up a few things. Dressing is a learned skill that all of us have to get down when we first start.
-
As a formal GML you kinda need the application first before you start reviewing to verify the candidates information. You also can’t “approve” the costume since they aren’t in the membership database yet. Some GMLs are fine with getting both at the same time but it’s best to sign up for the Garrison forums and PM them as to how they wish to handle the process. Every Garrison can be different. I wish you the best of luck with your submission!
-
That mane though! It's amazing! That should be a CRL requirement😆
-
Hey Keith. It's not ideal but thinking about it your cod will cover this area so it shouldn't be an issue for basic. I think you're correct when you mentioned to sew them first then attach them to the flight suit. I agree that it would be the way to go the next time around. It might not be an issue for Lancer but I'll defer to @Chopper as he knows this armor much more in depth than I. The mandarin collar looks great though so no issues there. Overall you're doing great so keep it up! Looking forward to seeing you suit up!
-
That suit up is looking good Phil! Yeah once you get those ties in place it should pull those shoulders in. The cod is a bit wider and could use some trimming. I’ve tried to etch in about where it should be but tablets are finicky. I would also pull the bund up as much as you can to get the cod to sit flatter against you. It’s getting pulled under by your cod strap so give yourself a little breathing space there. Just a thought for the cod, before you consider making another one, maybe reach out to Chef there in the UKG. He’s very experienced with the Scout and the soft goods and I bet he can give you some pointers on how best to address narrowing it down. He built several pieces of my Scout soft goods as well as my Endor Commando so he knows his way around a needle and thread. You are looking great so far!

-
With the IB parts take some extra time to research the sizing of the soft goods if they come in “standard” sizes. Everyone’s body is a bit different and it may not fit your form. The soft goods really make this costume and it really is the majority of the armor and look. You can always tailor them to fit after but just want to encourage you to take a close look at the sizing charts to be sure you’re getting everything you need. We’re always here for you so shoot us questions and if you want to take a shot at doing yourself we can help there too.
-
Great work on the holster and mount Jeremy. You really went that extra mile and made it totally custom. All the blasters will droop the boot so you're certainly not alone there. Once you got your tootsies in it will sit nice and straight. You're going to suit up?!? That's Awesome! Make sure to get some pics as we love to see the first suit up! Here's a little primer on the method. Hopefully it's of use to you: Flightsuit Knee Armor Boots Vest/Cummerbund Chest Armor Belt From there you can work the remaining pieces as you see fit. #5 and #6 can be interchangeable and that's just how I do it. Looking forward to see you suited!
-
Keith you should be very proud on that helmet finish. It really is beautiful and I'm looking forward to seeing what you do with your next one. Nice work man and kudos to you for keeping the CRL close at hand! Use that as your checklist and if you have any questions at all reach out to us. We're here to make you successful!
-
Nice work on those bridges Phil! Looking forward to seeing that tank go on! Keep it up you’re doing great!
-
Congrats Lancer!