

Shyrax
-
Posts
204 -
Joined
-
Last visited
Everything posted by Shyrax
-
One it is then. Unfortunately the new belt isn't as long as the old one so the straps I had attached to it are too short. Of course, JoAnn's and Hancock do not have it either. Ordering more...
-
Belt came in today. Question... Should the webbing be connected to each end with 1 or 2 rivets? I was using 2 on the old belt but the new one comes predrilled for 1.
-
Just the belt. Should be here in a couple days.
-
I ended up painting them all one color including the thread. I chose a tan that I could carry up onto the vinyl to simulate walking in mud if needed.
-
Boots done. Belt has been shipped.
-
I was thinking of weathering it all anyway. I will probably just go ahead and weather over the rivets so you can't see them like Marcel suggested. Unfortunately, I have already sent the money for the new belt. Oh well, I will just have 2. Will pick up some polish or paint to cover the boot threads this weekend. As far as weathering goes, I want to be able to clean it all off and go clean whenever I feel like it. It was suggested that I use hairspray. Basically spray the area with hairspray, rub the herbs/spices/grass/dirt/whatever on the area, and then cover with another coat of hairspray. Easy to wash off when I want to. Anyone ever done this?
-
Pics... New stickers: Shortened bridges: Lowered trim: Tighter legs: (Tight as I can get them and still have the ability to sit down. Originally a TK so this is very important to me.) The tripod is in my wife's car and she is not here. The only good way I found to take the leg pics was sitting down. Sorry. Heard back from MC few minutes ago. New belt ordered. Link to bigger pics if needed: http://s175.photobucket.com/albums/w158/pettyjason/lancer/resub/
-
New stickers arrived and applied them today. Only thing left is the belt. Haven't heard back from MC. If still nothing by Sat, I will start modding my current one. Will post pics of the fixed pieces probably later tonight.
-
Updates: 1) Stickers: ordered 2) Bridges: shortened 3) Boot trim: lowered 4) Belt: Contacted MC for a one piece. Have not heard back yet. Until I hear back, I may just go ahead and alter the one I have. Can't make up my mind if I want to glue the overlap that is already there or to cut off the excess and make a butt joint with a strip on the back for both to be glued to. Seems like it would be easy to break though. 5) Legs: tightened
-
Thanks Marcel and Andy, Updates: 1) New stickers ordered Thursday. 2) New bridges will be sewn tonight. 3) Will be dropping the front trim of the boot probably tomorrow. 4) Not sure what I am going to do about the belt yet. I guess I will either have to drill out the rivets, use the cement I used on my TK to glue those ends back together, and then find something to fill the old rivet holes or I will have to just buy a new one. 5) Will probably sew the legs up tonight since I will already have the sewing machine out. By the time the stickers arrive (hopefully within the week), I plan to have everything else ready for resubmission pics.
-
Sorry for the misunderstanding. Just so I am clear... In the pic below, the blue lines show the amount of cloth that covers up the top edges of the chest and back pieces. The red line shows the distance of the gap between the ends of the pieces. You are wanting me to shorten the blue areas, correct. Not have as much cloth covering the end of the armor. If I am still missing your point, I apologize again. Long day at work, my brain is fried.
-
First off, please don't think I am trying to argue with you, I am only trying to have the armor look its best on me. Just a quick photochop of what shortening the bridge would look like. Granted, this is an old photo and I do wear my belt higher now. I copied the chest and back and raised them following the natural curves of my body to give the impression of what you would see. My general impression of these 2 pieces are that the bottoms of them should be even with the webbing going straight across. If we raise just the front, the angle it would sit out at would cause the webbing to have to be at an angle downward toward the back. If we raised just the back, the webbing would be angled downward toward the front and I would have a big gap between my back and the armor since it is molded to fit in a certain position on your back. If we raised both, the webbing would be straight, but it would be almost in my arm pit. Raising either of the pieces would also cause a great deal of real estate between the bottom of my pouches and my belt. I would have to have pouches a foot long to get the look of them touching the belt. That would just not look anything like correct. Just my 2 cents. If it is ruled that I need to shorten the bridges, so be it. I will shorten them. Thanks for hearing me out.
-
Thanks for the response. I'll respond to each of your statements... 1) Decals: will order new from trooperbay 2) Cloth bridges: the problem with the bridges stems from me being fat and having a long torso. When I first built the armor I had a smaller bridge and the armor just doesn't sit right on me with my gut and man boobs. It looks like the front sits up around my throat like it is trying to choke me. I will sew up some 2" if that is what is required, but the overall look (on my body type) is much better as it is now. It is the difference in looking at me and seeing a big trooper instead of a fat trooper. 3) Boot trim: WIll do. 4) Belt: I will look for a tutorial and get right on it. If there is nothing out there, please send me instructs on what needs to be done. 5) Baggy legs: will see what I can do.
-
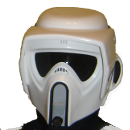
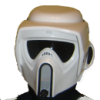
Larger versions of all the proceeding pics plus some extras not shown here are on photobucket at: http://photobucket.com/shyrax_lancer First off, pics of the individual parts... KS helmet MC snout (flash makes it look a little lighter colored than it actually is) chin cup 3M style covers no mesh in the ears inside painted black Selfmade boots from tutorial with cut soles TD with new greeblie and extra elastic added to the knees Selfmade cummerbund 7 stiches forming 6 raised strips curve instead of chevron LSFU vest back hump one rivet on top middle (per tutorial) one rivet on bottom circle painted white red strip 6 rank stripes For the grand finale... Things not shown in these pics but are in the album on photobucket: LSFU flightsuit with suede crotch, suede but flap, and elastic around the legs. SA gloves with suede fingers and thumbs Let me know what you guys think.
-
Forcesensitive's LW build thread has some good pics. You can see the slits cut in both sides of the helmet for the elastic and in further pics, how it is attached. Basically from the chin cup the elastic on each side goes up and out through the top slits and then back in the bottom slits. The extra elastic on each end is then rolled up and stapled so it can't come back out. (At least that is how my eyes see it from this thread and others.)
-
Got the chin cup on the lid and the extra elastic on the knees. Instead of taking pics, I played SWTOR. Hope to take pics tonight. My helmet is a KS. Had to cut little slits in it for the elastic to go through. I had no idea how to connet the thing either. Found a couple posts on here with pics from people's builds that has the chin cup. Just did a search for "chin". I will look through again and see if I can find the post I was looking at.
-
Chin cup came in today. Thanks. Now to cut slits and install it. Still need to add the extra elastic to the knees. Should be taking my Lancer pics tonight. WOOHOO
-
Email sent.
-
Was reading through the Lancer requirements one last time before submitting my pics and realized that I never picked up a chin cup for my KS helmet. Does anyone sell just the cup? Thanks in advance.
-
Links aren't working for me.
-
Congratulations Marcel Prag! Your New Detachment Leader
Shyrax replied to Witness's topic in Announcements
Congrats, Marcel! -
I was planning on taking my pics for Lancer submission this weekend. Question is, should I hold off until the new CRLs are finalized or go ahead and make the needed changes later.
-
thanks
-
Got my approval today. My car tag is no longer a lie. WOOHOO.
-
Submission pics sent. Fingers crossed.
