

lonewolf
-
Posts
670 -
Joined
-
Last visited
-
Days Won
34
Everything posted by lonewolf
-
Thermal detonator greeblie, new pics
lonewolf replied to lonewolf's topic in ROTJ Biker Scout Armor/Helmet
Yes, the half on the left. -
Thermal detonator greeblie, new pics
lonewolf replied to lonewolf's topic in ROTJ Biker Scout Armor/Helmet
The Biker Scout greeblie is also the same part as the top part of the Pesky Rebel Commando's lapel detail. Possibly Tamiya tank kit part? -
Thermal detonator greeblie, new pics
lonewolf replied to lonewolf's topic in ROTJ Biker Scout Armor/Helmet
Guys it is the wee top third part of his greeblie. I don't want to post the actual pic. -
The top part is the same as the latest pics from the Blu Ray bonus disc of the Biker Scout thermal Detonator greeble. The round part is the same as MC part, so we are half right. It looks right, the two squarish shapes match well with the screen grabs we already have., I think the thermal detonator is on upside down on the Biker Scout display piece but it is this "found"part.
-
Sorry Dave.
-
You could maybe use cutting compound or slighty less abrasive T Cut to see if the paint could be buffed back to white.If it is a CB? the filler/resin may be the cause and then it is fading from the basecoat. A complete respray would then need to be done.
-
It is very strong, the only incident was a punch to the back of my head whilst wearing my second version, a small crack in the filler was all that happened, the glued parts were still solid. Using ABS glue is the key I think as it welds the two parts together.
-
-
-
Thanks for all the encouragment and costructive comments guys, this thread has gone on forever! The lid is now of a good enough quality to offer, the main problem is the assembly , as the originals seemed to have as well judging by the different versions still available to study.
-
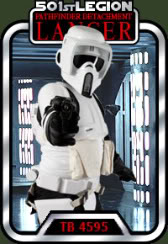
Is it just me, or did your chest plate just talk?
lonewolf replied to CCBacara's topic in ROTJ Biker Scout Armor/Helmet
I put the speaker in the back hump, it then appears to be a radio back pack with the wee tank topper etc. -
I don't know why or how the original looks black on the inner parts, maybe light and shadow. A very cheap way to acquire grey tubing is to have a wee look at your local dump where the old vacuum cleaners are stored, at least I found a perfect size and shade there. You could spray the tube you have. Even try to copy the original one.
-
I have scaled the boot sole to a size 9 UK , size 10 US, if it works as well as I hope it does this sole could possibly work with sizes 8 to 11 donor boots. Getting the size cut onto the boot was quite a challenge for my friend, and was really only because I am a git to please!
-
Latest test cut, this is an actual sized sole, some tweaks to do but I think it will be superb when it is finished. Yes it would have been easier if I had an original boot to cast.
-
This is maybe not new information but I believe the Biker Scout belt is the same material as the ROTJ Stormtrooper belt. There are some great close up pics of the Stormtrooper belts, looks the same as the Biker Scout. The construction is the same as well with one rivet placed centrally at the edge of the plastic belt to hold the two pieces together. The velcro joining method is the same as well. Were these costumes built by the same guys? In the same shop? Was the ROTJ Stormtrooper suit vacformed in pinseal/haircell ABS? Like the Biker Scout armour?
-
- 1
-

-
I didn't gauge the distance with the drop boxes, above mid thigh approx. and straight around the thigh, no drooping.
-
At the minute I hope to do a size 9UK/10 US for myself. The above version is about 18" long!
-
The better quality stuff can be bought in a Haberdashery shop or a DIY shop.
-
I am trying to make a mold for an accurate boot sole, unfortunately I don't have an original pair of boot to cast from. A good friend has cut out a first attempt of the sole details, a lot more work to do on this project , it may never work out but it is going to be fun trying.
-
Anything between 1.5" and 2" is fine, I put a small stitch at the sides as well to avoid the straps from hanging badly and from ever having to adjust them.
-
The good quality industrial strength velcro will not come off, the glue is very good and the hook and loop is very strong. A wee bit of advice,most guys know about it, always point the rough side away from you, so the soft side will rub on your flakvest etc. The Biker Scout armour is a lot easier to put together than a Stormtrooper armour. Snaps are not really needed on the Biker Scout kit, I only used snaps on my shoulder bells for ease of dressing. If you are buying snaps use outdoor/camping , non rusting type, 15mm I think.
-
The colour of the jointing piece is white, I think, this is one piece that has not had the shade/off white/beige etc discussed yet. Go with white unless you can see a screengrab pic that tells you any different.
-
The original Biker Scouts used the "t strap" method to hold the shoulder bells, There are various ways to join the chest and back pieces together, velcro, snaps etc. The difficult bit is the jointing cover, it is in a bad place for the T Strap. I think maybe the strap could be behind the joining cover so as not to interfere with it. Some screen caps show the joint strip a little forward of the centre. Regarding the jointing material, I have used 1.5" white elastic, stitched in a loop to tightly wrap this part. Too wide a piece just looks wrong imo.
-
You need a square hole bit, over here in Ireland they are beside the tins of tartan paint! Seriously now, I use a fine flat file and lots of patience! I hate to see the 3M speedglas bolts being cut, good luck.
-
Can you cut a hole in the lid the same diameter as the shank of the black nut diameter, this should allow the bolt to reach. I always cut the visor hole in the square shape of the rear of the grey bolt, keeps the bolt neat and gives the bolt a bit more length.Sorry if none of this makes any sense. The bolt thread is the same as UK numberplate bolts, you could use the plastic nut from these if it helps. I am not sure if they are the same as American license plate bolts.