LadyFalke Posted April 6, 2024 Posted April 6, 2024 Hello everyone, I have wanted to build a Scout for some time but a few weeks ago it was finally time to start my build. I want to try for Lancer in the long run, so I have already invested a lot of time in my research. This also not my first cosplay, I have some Mandos, two officers and a Clone Trooper. But the Scout is very different from everything I have build so far. I am very small with only 5'4". And I like sewing so I try to make all my soft parts my self. I have alredy started with my boots, pictures will follow in the future, my base boots were recommended by a fellow scout and I have also seen them here on the forum before as a good base. I have also ordered an armor kit from RWA and will order a helmet from Ironmotion. The reason that I am starting my Wip now, are the modifications of my flightsuit. I have bought some real suede as required for Lancer. As this was quite expensive, I want to be 100% sure that my patches are correct before I start cutting the suede. It would be great if you could tell me, if I need to change anything of my pattern. I tried to follow reference pictures as much as possible, but they do look different every time and it's hard to see with the black on black. This hideous orange colour should at least help with that 😅 The two white stripes on the front picture mark the top and bottom edge of my patella for reference. I have only noticed that the bottom edge of my butt flap is askew after I already changed back to my normal clothes. I would say the left side is definitly to long, but I am not sure if the right side is still too long. Like the orange fabric the elastic is also only attached with some stichtes by hand. So I can easily adjust the length if necessary. The width of the elastic is exactly 5 cm. I look forward to your feedback! 1 Quote
Chopper Posted April 6, 2024 Posted April 6, 2024 Hiya, thanks for checking in. Here's what I can see -- Back side of the riding patch looks fine. Front side should be more rounded at the top. This is typically recommended so you don't have right angles showing from the sides of the codpiece. See marks in attached photo. Butt flap is too long and slightly too wide. See marks in attached photo for approximate adjustment. For additional reference, you might want to read these threads, if you haven't already: https://forum.501stpathfinders.com/topic/19967-soft-parts-best-practices/ https://forum.501stpathfinders.com/topic/19259-undersuit-mods/ Please let us know if you have additional questions. 3 Quote
zediyeti Posted April 7, 2024 Posted April 7, 2024 Hey! I'm a short scout, and I found a lot of help in reviewing the WIPs of others around my height. Here's mine, if it is of any help! You know how mandos love those WIPs... I also made my own soft parts, which I think I detailed a bit in here. If you haven't found them already, there are some other great WIPs from people our height on here that I have bookmarked Quote
LadyFalke Posted April 7, 2024 Author Posted April 7, 2024 Thank you for your fast and helpful feedback. I have looked at those two topics when I made the patterns and they helped a lot. I can easily make the recommended adjustments. Thank you for showing me your Wip, it is great to see that you can for sure make an awesome Ewok-sized Scout. I look forward to continue with my build! Quote
Monumendalorian Posted April 22, 2024 Posted April 22, 2024 On 4/6/2024 at 9:13 PM, LadyFalke said: I have alredy started with my boots, pictures will follow in the future, my base boots were recommended by a fellow scout and I have also seen them here on the forum before as a good base. Oooooh, I'd really like to see your boots. They'll probably be my project for whitsunday or even Fronleichnam, when there'll be some days off of work in a row, otherwise it'll take me a while to get back to my scout anyway. Quote
LadyFalke Posted April 23, 2024 Author Posted April 23, 2024 These are my boots after I have cut the pattern into the soles. They are from Kappa. 3 Quote
OnkelPaschulke Posted April 23, 2024 Posted April 23, 2024 Ahhhhh... Kappa Love... 😄 Nice clean outs there! Starting the WIP was the right decision. You'll find a lot of helpful people here. Have fun with your build. 1 Quote
LadyFalke Posted May 21, 2024 Author Posted May 21, 2024 My armor arrived last week and I have already started to trim some pieces. I'd like to start with my vest next week. Therefore, I have started with the chest, the back, one shoulder and one bicep. I attached everything to myself to see, if I need to downsize any plates, as that would affect the pattern of my vest. First question: Is the position of the chest and back correct? If yes, I will adjust the shoulder straps accordingly. I am happy that I can fit the bicep and shoulder on my upper arm with a little gap in between, where the vest will end. However, my biceps plates now sits very close to my elbow, as you can see here: It would be great if I could move my biceps up a bit. I have compared my pictures with the CRL model and also some reference pictures and I should be able to trim my shoulder a bit without destroying my proportions. I would like to trim 0.5 cm at the top and at the sides and 1-1.5 cm at the bottom. I have drawn a line to show how I intend to trim. I think that my gap between the shoulder strap and shoulder bell is really good right now. I intend to move the shoulder up after trimming the top, to not make the gap between the plates larger. Do you think that this plan will work? Quote
Retrofire Posted May 23, 2024 Posted May 23, 2024 On 5/21/2024 at 1:07 PM, LadyFalke said: First question: Is the position of the chest and back correct? If yes, I will adjust the shoulder straps accordingly. Hi Kirsten! Your chest/back armor is looking to be in the proper position. One thing to keep in mind is that you'll have a vest and part of the cummerbund under them so make sure you don't trim it just to fit over your flightsuit. I agree that your shoulder bells will need to be trimmed to fit you and that will help shift the biceps higher on your arm. When you trim be sure to take it in small increments checking the fit as you go along. It's easy to remove material but very hard to put it back if you go too far with a cut. Your trim lines are looking about right to start with. @M.J @KOtrooper I'd like to get your assessment as well. I think you're doing a great job so far so keep up the great work and please let us know if you need anything! 3 Quote
M.J Posted May 24, 2024 Posted May 24, 2024 Hi ya Kirsten, Oh this brings me back, it can be quite a mine field fitting armor to a smaller frame. I agree with Retrofire, before cutting and moulding start on the vest and Cummerbund, these will change the fitting of the armour. Your front chest piece looks good the back piece is a smidge low, the back neck line is a little low than one would want and you can see there are not yet matching. Though before adjustments, get those soft parts up and running. I concur with the bell, it is a tad large and the arm piece, I like how you've marked it out, go by the old saying "less is more" don't be afraid to mould it in, if you haven't done it before I would suggest hot water, mould the arm parts to your body only so slightly. 2 Quote
KOtrooper Posted May 24, 2024 Posted May 24, 2024 Hey Kerstin - after you work on the undershirt and cummerbund, I would move onto the strapping of the chest and back armor. The fit and feel of it changes quite a bit when you get it firmly strapped under the arms. That will help you to then build out the shoulder bells and biceps. The cummerbund is supposed to sit on top of the belt and the belt is "supposed" to be around your belly button. When I did that though, my bund looked stupid small. I cheat my belt down on my hips in order to get a more proportional look for the bund. Hope that helps. 1 Quote
LadyFalke Posted May 24, 2024 Author Posted May 24, 2024 Thank you for all the feedback! I wanted to resize the shoulder bells before doing the vest to ensure the length of the arms is correct in relation to the shoulder bells. But I can also do it the other way around, make the vest and resize the shoulder bells to fit. 1 Quote
LadyFalke Posted June 28, 2024 Author Posted June 28, 2024 I have worked a lot on my scout over the last few weeks. Today I tried all the pieces together, to get a feel for how they fit together. Everything is sitting a bit wonky at the moment and is attached with a lot of tape. I hope that you can still more or less judge my progress. My most important questions are: 1. Is the vertical position of my pockets okay? I know that they are asymetrical in their horizontal position and I will determine the correct position with some measuring tape. 2. Are the dimensions of my diaper correct? I have not finished sewing them, the cresent detail will for sure come, when I know that the dimensions are fine. 3. Do you have any tips to prevent the diaper from developing folds? I have some real problems with that Of course I am happy with any other feedback that you can provide. Here are my pictures and I am sorry about the bad lightning. I didn't notice how bad it was until I looked at them on my laptop. I will for sure try to get some better pictures the next time. Quote
Chopper Posted June 28, 2024 Posted June 28, 2024 The width of your cod looks okay. The best way to keep the cod from developing folds it to add some foam or buckram fabric to the inside. Your front armor looks fine, but I think you should work on bringing your back armor up about 5cm. Can you lower your belt any further before it starts to feel uncomfortable? That might help with how your pouches are hanging. Quote
LadyFalke Posted June 29, 2024 Author Posted June 29, 2024 Thank you for your help! I have moved my backplate up a little bit and formed the shoulder straps accordingly. I can not move it up any more, otherwise I would'nt be able to lower my arms. The lower tape marks where the backplate sat yesterday. My mother has already some ideas how we can fill the cod to make it stiffer withour restricting my movement. And I will try to lower the belt, but not today. Today is the hottest day of the year so far, so I don't really want to wear my whole outfit today. Quote
LadyFalke Posted December 2, 2024 Author Posted December 2, 2024 I can't believe that I have not posted in almost 6 months. But don't be afraid, I have not given up my Scout. I have worked on it and I sould be able to finish it within the next month. All the individual armor pieces are finished and also weathered. I just need to work on the attachment. I have also build, painted and weathered the helmet. But I wanted to let you check the weathering before I continue working on it. I'm unsure if my helmet is overweathered compared to the armor. I know the lightning is not the best, but it's the best I can do with the grey winter weather. The helmet is also still wet, but I needed to take the pictures before it gets dark outside. 1 Quote
Retrofire Posted December 8, 2024 Posted December 8, 2024 Well done. Less is more when it comes to weathering and you've achieved that. You should be proud trooper! Quote
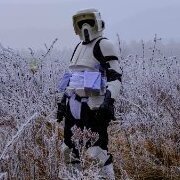
LadyFalke Posted January 13 Author Posted January 13 I have just received the E-mail form my GMOs that my Scout was approved! TB-21049 reporting for duty! Thank you for your help during my build. I plan to try for Lancer in the long run, but for now I just want to test the armor on some troops. 2 Quote
OnkelPaschulke Posted January 14 Posted January 14 Congrats and welcome to the ranks of the treehuggers... 😄 I've just finished your picture set for the international database (your friendly GWL 😉) 1 Quote
Aradun Posted January 14 Posted January 14 Awesome! Congrats and welcome to the PFD as a fellow scout! Very smart of you to wait until you have a few troops under your belt before applying for Lancer. That’ll give you a chance to make any tweaks and adjustments needed to polish off the fit before you apply. Well done! Quote
TreeHuggerMatt Posted January 14 Posted January 14 Congrats trooper! two rules. watch out for trees and shoot all murderer bears on sight! Quote

Recommended Posts
Join the conversation
You can post now and register later. If you have an account, sign in now to post with your account.