Jediwannabe Posted February 10 Author Share Posted February 10 3 Quote Link to comment Share on other sites More sharing options...
Aradun Posted February 10 Share Posted February 10 Everything looks great! Keep up the great work! 1 Quote Link to comment Share on other sites More sharing options...
Jediwannabe Posted February 15 Author Share Posted February 15 I just purchased the KriptonTop cummerbund, off-white pouches, and cod. Although it may be possible to modify the cummerbund I got from KeepTroopimg, it seemed like it needed a lot of work so…one step closer. I’ve also been poking around to see what sort of activities the group has been up to. I’m eager to get out there once accepted 🙂 Quote Link to comment Share on other sites More sharing options...
Retrofire Posted February 17 Share Posted February 17 That's great to hear Chris. If you're on the Garrison boards you might be able to have an opportunity to shadow some troopers on a troop if your Garrison command staff is ok with it. It's a great way to meet troopers and see the process. Keep up the great work! 1 Quote Link to comment Share on other sites More sharing options...
Jediwannabe Posted February 17 Author Share Posted February 17 3 minutes ago, Retrofire said: That's great to hear Chris. If you're on the Garrison boards you might be able to have an opportunity to shadow some troopers on a troop if your Garrison command staff is ok with it. It's a great way to meet troopers and see the process. Keep up the great work! Thanks for the info. I don't believe I'm on the garrison board yet but I will investigate. 🙂 Quote Link to comment Share on other sites More sharing options...
Jediwannabe Posted February 26 Author Share Posted February 26 RS Prop Masters helmet kit arrived this week so the next phase begins. 2 Quote Link to comment Share on other sites More sharing options...
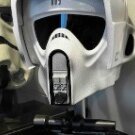
Jediwannabe Posted March 2 Author Share Posted March 2 I've been working on my RS helmet kit. The RS build video notes that the kit comes with pencil marks but it didn't so I've been struggling to determine how far to sand the main shell halves. There is a very faint line in the plastic that I can see in some areas but it's not pronounced enough to confidently cut the entire helmet. I'm also concerned with the visor that has almost no visible cut line. Anyone have advice? I've been comparing it to the EFX Legend helmet I own but I know that they made mistakes in the visor trimming. The space between the two back vents on the EFX is 60mm while RS says it's 70mm. I did see that the Lancer Build Tutorial has some measurements and there is also a post with images of a screen used helmet with some measurements but neither note this spacing. BTW, the pencil marks in my images are just guesses that I've made. I'm trying not to make uneven gaps but it is challenging. Quote Link to comment Share on other sites More sharing options...
Retrofire Posted March 2 Share Posted March 2 Based on the pictures I'm not sure that I would be sanding any more on the shell halves. @BikerScout007 or @Chopper do you have any advice for this trooper? 1 Quote Link to comment Share on other sites More sharing options...
BikerScout007 Posted March 2 Share Posted March 2 Alas, I have no experience with this type of build. I've been trooping in the same RS Props Dickey Beer Edition helmet since 2015, and those came built. But fortunately, we do have a member of RS that pops in here regularly. Let me tag him and see if he can offer any advice @CatfoodRob? Any advice for our friend? 2 Quote Link to comment Share on other sites More sharing options...
CatfoodRob Posted March 3 Share Posted March 3 Go with the pencil lines that the helmet came with they’re dead on . Also watch rs props YouTube videos featuring rob building one of these . Inside the helmet you can also see the original mould marks as an extra indication . The visor builds itself once the helmet half’s are decided upon , the faceplate dictates the visor . personally, having built a few of these , I would never order a kit scout helmet ! lol that was your big mistake . Always order a built helmet with your kit ( advice here for future builders) But, when they are finished they are a true sight to behold . when you eventually finish the build, you join an exclusive screen accuracy club and will have a great felling of achievement. 1 Quote Link to comment Share on other sites More sharing options...
Jediwannabe Posted March 3 Author Share Posted March 3 Just now, CatfoodRob said: Go with the pencil lines , they’re dead on . Also watch rs props YouTube videos featuring rob building one of these . personally, having built a few of these , I would never order a kit scout helmet ! lol that was your big mistake . Always order a built helmet with your kit ( advice here for future builders) But, when they are finished they are a true sight to behold . when you eventually finish the build, you join an exclusive screen accuracy club and will have a great felling of achievement. Hi Rob, unfortunately, my helmet came without pencil lines so the lines in the photos are just guess I've been making. The RS video also says to follow the lines and then skips over most of the cutting. Simon mentions a stencil in the video. Might you be able to share a pdf of the stencil so I can see where to cut? Quote Link to comment Share on other sites More sharing options...
CatfoodRob Posted March 3 Share Posted March 3 The stencil they use is a vac formed shaped cover that sits over the helmet half’s and dictates the pencil lines . The stencil is slipped over the helmet half and a pencil line is drawn around the shell indicating cut marks . I thought the scout helmets were sent out with pencil marks . withour rs pencil marks, you should be able to see the original mould marks inside the helmet half’s . This is an accurate as the pencil lines . The two half’s never fit together exactly , start at the back and tweak the front . at the studio they use plastic weld ( it melts the plastic and hardens quickly ) for glueing in the inner support strips , and use abs slurry ( off cuts of abs melted in plastic weld glue ) as a filler for the outer seams . After sanding that a fine car filler is used to fill scratch marks from the sanding . it takes the best part of 6-8 hours to get a helmet kit ready for paint . 3 Quote Link to comment Share on other sites More sharing options...
Jediwannabe Posted March 3 Author Share Posted March 3 1 minute ago, CatfoodRob said: The stencil they use is a vac formed shaped cover that sits over the helmet half’s and dictates the pencil lines . The stencil is slipped over the helmet half and a pencil line is drawn around the shell indicating cut marks . I thought the scout helmets were sent out with pencil marks . withour rs pencil marks, you should be able to see the original mould marks inside the helmet half’s . This is an accurate as the pencil lines . The two half’s never fit together exactly , start at the back and tweak the front . at the studio they use plastic weld ( it melts the plastic and hardens quickly ) for glueing in the inner support strips , and use abs slurry ( off cuts of abs melted in plastic weld glue ) as a filler for the outer seams . After sanding that a fine car filler is used to fill scratch marks from the sanding . it takes the best part of 6-8 hours to get a helmet kit ready for paint . I can see some of the vac formed lines but a lot are not visible at all. I appreciate your input. I'll keep working at it. Thanks. 🙂 Quote Link to comment Share on other sites More sharing options...
Jediwannabe Posted March 25 Author Share Posted March 25 I’m still here guys. Work has been a distraction but I am hoping to get back to the build soon. The RS helmet kit has been very challenging but I’m still hopeful to get a good result. 1 Quote Link to comment Share on other sites More sharing options...
Dart Posted March 25 Share Posted March 25 No problemo, Chris. Take your time and get it right. I'm also still working through my RS helmet build. 1 Quote Link to comment Share on other sites More sharing options...
Aradun Posted March 26 Share Posted March 26 Not sure if you’ve seen the RS video series for the scout helmet build. Here’s part 1: Quote Link to comment Share on other sites More sharing options...
Jediwannabe Posted March 27 Author Share Posted March 27 4 hours ago, Aradun said: Not sure if you’ve seen the RS video series for the scout helmet build. Here’s part 1: Yes, thanks! I’ve been following these videos and they are very helpful but my kit came without the pencil marks that are mentioned to be on the parts so I’m struggling quite a bit. I do hope RS finishes making this series of tutorials. I found their TK instructions to be super helpful. Quote Link to comment Share on other sites More sharing options...
Jediwannabe Posted May 1 Author Share Posted May 1 Hello all, I am working on attaching the cod piece to the suit. I know that ballers attach it to the flak vest but mine is too short. It seems that the next best option would be to attach it to the jumpsuit with 2 strips of velcro (allowing a break for the zipper). I can't tell if it's currently sitting high enough. Any thoughts? Quote Link to comment Share on other sites More sharing options...
Chopper Posted May 1 Share Posted May 1 Hi Chris, I think you should move it up maybe another inch. ideally, the whole cod should lay flat on the front of your body. Quote Link to comment Share on other sites More sharing options...
Jediwannabe Posted May 2 Author Share Posted May 2 4 hours ago, Chopper said: Hi Chris, I think you should move it up maybe another inch. ideally, the whole cod should lay flat on the front of your body. Hi Corey, Thanks for the feedback! I'll do as you've recommended. 🙂 Quote Link to comment Share on other sites More sharing options...
Jediwannabe Posted May 7 Author Share Posted May 7 Ok, so I've sewn a velcro strip directly to the jumpsuit. It separates at the zipper. It is very easy when putting on as it mainly just stays on the jumpsuit. It is also very comfortable when worn. Here are two pics from a test fit I did today. I feel like my body armor and soft parts are complete and ready for feedback so I will need to focus on finishing the RS helmet kit so I can submit. I'm wearing my EFX Legend in the photo, which I don't plan on trooping in. Quote Link to comment Share on other sites More sharing options...
Chopper Posted May 8 Share Posted May 8 You're like 95% of the way there. Turn your biceps out, so they're facing at a 90 degree angle. Forearm armor should be at about a 45 degree angle and extend over the glove. Pull your bund up maybe an inch. It can help to add some velcro to the flak vest, so it won't sag down. Your belt should also come up accordingly. Ideally the top edge should sit just below your navel. That's all I can see from the photo you posted. 2 Quote Link to comment Share on other sites More sharing options...
Jediwannabe Posted May 8 Author Share Posted May 8 Super helpful feedback! Thank you @Chopper! 1 Quote Link to comment Share on other sites More sharing options...

Recommended Posts
Join the conversation
You can post now and register later. If you have an account, sign in now to post with your account.