JollyRajR Posted February 16, 2022 Share Posted February 16, 2022 Beginning stages here folks.. But, a little bird chirped in my ear and I have poor impulse control.. 🙃 Gathered so far: Alpinestars boots Most of an Imperial Surplus kit.. TLJ Black Series helmet for modding Geeky Pink gasket set Pretty sure I've got boots and gloves from other troopers.. Rough'd in the armor with trimming.. Progress speeds and slows depending on my school workload.. Lately? Been behind the 8-ball..) doh! RajTN-92688 2 1 Quote Link to comment Share on other sites More sharing options...
BikerScout007 Posted February 16, 2022 Share Posted February 16, 2022 About time! Quote Link to comment Share on other sites More sharing options...
Mikey Posted February 19, 2022 Share Posted February 19, 2022 I’m gonna follow this thread. I’m in the middle of a TLJ FOTK. Based on the work in progress once I’m done with that I may be able to share parts between the two costumes. Sent from my iPhone using Tapatalk Pro Quote Link to comment Share on other sites More sharing options...
JollyRajR Posted April 9, 2022 Author Share Posted April 9, 2022 Progress has been a bit slow due to being quite busy for school... Buuuuut, it's spring break time! Hallelujah! Maybe some headway.. Many thanks to @MrPoopie for detailing out the boots.. Some thoughts on the boots: Removing the big plastic AlpineStars logo on the shin part isn't necessary because the leather underneath is cut from the factory.. No gain to be had there.. If it needs to be shaped to remove interference, it'll probably be done with a dremel or an angle grinder.. (swatting a fly with a howitzer? yes!) Paint was 3 bottles of Angelus Leather Acrylic Paint White (Amazon link: https://www.amazon.com/gp/product/B0196T961O/) and 1 bottle of the shiny top coat from them.. Angelus 610 High Gloss Acrylic Finisher White (Amazon link: https://www.amazon.com/gp/product/B018R47K94/) If you enjoyed using white out on stuff as a kid, apparently this stuff is for you! First coat: Second and maybe third coat: Final look: An album will be kept here: https://www.flickr.com/photos/57785272@N00/albums/72177720297979765 Next on the docket: Perhaps getting some off-the-shelf pants that can be modified to be Treadie Pants so we can at least get a level 1 version of this outfit.. And, finding someone with experience putting together an FOTK so I have some clue how this armor comes together! LOL. 3 1 Quote Link to comment Share on other sites More sharing options...
Aradun Posted April 10, 2022 Share Posted April 10, 2022 MrPoopie showed the boots on Zoom today. They look amazing! Well done. Quote Link to comment Share on other sites More sharing options...
MrPoopie Posted August 10, 2022 Share Posted August 10, 2022 Uploading photos of Raj's build. Mostly finished parts. Full resolution pics at Flickr. 1 Quote Link to comment Share on other sites More sharing options...
MrPoopie Posted August 10, 2022 Share Posted August 10, 2022 2 1 Quote Link to comment Share on other sites More sharing options...
Aradun Posted August 11, 2022 Share Posted August 11, 2022 WOW!!! I can’t wait to see Raj suited up in this. Looks amazing. Great work on the armor pieces and soft parts. Quote Link to comment Share on other sites More sharing options...
MrPoopie Posted August 11, 2022 Share Posted August 11, 2022 More Parts. Updated chest with decal. 2 Quote Link to comment Share on other sites More sharing options...
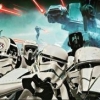
MrPoopie Posted August 11, 2022 Share Posted August 11, 2022 Test suit up. Definitely some things to still sort out but it was a pretty good suit up and things fit pretty good. The main area of concern is getting the chets to sit properly. 4 Quote Link to comment Share on other sites More sharing options...
MrPoopie Posted August 11, 2022 Share Posted August 11, 2022 Lastly, the Money Shot. 2 Quote Link to comment Share on other sites More sharing options...
Dart Posted August 11, 2022 Share Posted August 11, 2022 Looks great! Raj's chest logo is a little bit bigger than the original and his shin straps seem to be on the wrong side (white clasps are on the outside, right?), but other than those tiny details, looks really well done! 2 Quote Link to comment Share on other sites More sharing options...
MrPoopie Posted August 12, 2022 Share Posted August 12, 2022 22 hours ago, Dart said: Looks great! Raj's chest logo is a little bit bigger than the original and his shin straps seem to be on the wrong side (white clasps are on the outside, right?), but other than those tiny details, looks really well done! There's a running list of about a dozen things that we noticed will suiting him up that need fixing/adjusting. Both of those are on the list but I definitely appreciate critiques and more sets of eyes on this thing. The straps were just a stupid mistake on my part at 9:30pm after a very long day. 1 1 Quote Link to comment Share on other sites More sharing options...
BikerScout007 Posted August 12, 2022 Share Posted August 12, 2022 9 minutes ago, MrPoopie said: There's a running list of about a dozen things that we noticed will suiting him up that need fixing/adjusting. Both of those are on the list but I definitely appreciate critiques and more sets of eyes on this thing. The straps were just a stupid mistake on my part at 9:30pm after a very long day. Also watch the green fabric on the floor. It's covering part of his boots. Looks really good! I'm glad we persuaded Raj to do this Quote Link to comment Share on other sites More sharing options...
MrPoopie Posted August 12, 2022 Share Posted August 12, 2022 1 minute ago, BikerScout007 said: Also watch the green fabric on the floor. It's covering part of his boots. Looks really good! I'm glad we persuaded Raj to do this Yeah, rush job to get these photos taken. I'll be more careful next time. Hopefully I'll have another helper with me. We're recruiting someone who's built several FOTK kits to help with the final fitting and adjustments. I think it looks really good so far though and Raj has done a great job. 2 1 Quote Link to comment Share on other sites More sharing options...
BikerScout007 Posted August 12, 2022 Share Posted August 12, 2022 You guys have done an EXCELLENT job with this one. Really excited to bring it to the finish line. I will start cropping your photos for the CRL and let you know if I need anything 1 Quote Link to comment Share on other sites More sharing options...
MrPoopie Posted August 12, 2022 Share Posted August 12, 2022 LIst of things that need fixing/adjusting. Shin straps are swapped and should have the clip on the outside Cod might be a TFA cod and should be a TLJ cod, Justin reed pointed this out and the TLJ is more flat Bicep velcro Shoulder attachments (straps or velcro) Helmet pad Suspenders for pants Pants should be slightly tighter and may need t o be taken in a bit, also need stirrups Waist pushed up farther Soft velcro on back of belt boxes Hook velcro on waist zipper section Rear of neck needs to be cut out a bit more Yoke under arms in front needs to be trimmed down slightly to match Chest curve Better velcro alignment for Chest Check cracks on Forearms Possible waist additional shims Knee ribs should be 9 not 11, probably make the new ones from ABS Helmet vents are black and should be white 2 Quote Link to comment Share on other sites More sharing options...
JollyRajR Posted August 17, 2022 Author Share Posted August 17, 2022 School back in session so I had to put aside the box o' goodies.. But, starting to chip away at a few things conceptually.. TLJ cod piece on the way from KB Props.. Chatting with Geeky Pink regarding getting a bespoke set of disco pants (imagine that said with a proper English accent.. heh.. bespoke..) Lots of little fixes planned.. The pictures Justin posted are sort of the "wiring under the boards" pics.. There are a few things I know I'd do differently, but I was under the deadline of finishing this first round before school started back up.. (took pics Wednesday, staff meeting was the next day.. oof.. close....) Paint used is from Lowe's: Rustoleum Universal Bonding Primer ("StopsRust") in light grey. (usually 2 light coats.. some pieces were covered in 1) Then, at least 2 days of drying time for most parts.. Followed by a very light 400 grit sanding for adhesion.. Rustoleum Automotive Gloss White Enamel (5 coats minimum, maybe 6 or even 7 if I lost count.. This kit does have lots of small bits..) and Gloss Black.. The kit was almost entirely seamed with Bob Smith Industries thin superglue and baking soda.. Lots of sanding.. Use a real vapor-protecting set of filters on your respirator--I made the mistake of trusting P-100 filters would suffice but those fumes can really get ya.. But I digress.. Harbor Freight to the rescue with some very robustly backed sandpaper (think something like a fabric backing.. easy enough to rip, but not likely to easily rip) in 80, 120, and 240 grit.. (wish they did something finer than 240! this sandpaper is pretty decent longevity wise.. The roll is like 4 inches by 25 feet (!!).. More progress as thing settle in and after I find out lead time for the pants.. 5 Quote Link to comment Share on other sites More sharing options...

Recommended Posts
Join the conversation
You can post now and register later. If you have an account, sign in now to post with your account.