

OnkelPaschulke
-
Posts
369 -
Joined
-
Last visited
-
Days Won
6
Everything posted by OnkelPaschulke
-
WIP wannabe Lancer by OnkelPaschulke
OnkelPaschulke replied to OnkelPaschulke's topic in ROTJ Biker Scout WIP
Edited the first post. Gathered some more softparts. Finally found some good fabric for the cod piece and the cumberbound. Didn't had that much time to work on this project because of my job. Now I've got two weeks of and I'm of to the mediterranean sea for some well earned days of and after that I'll continue the build. -
First Bucket Ever Completed!
OnkelPaschulke replied to EC-17 Holdout Blaster's topic in ROTJ Biker Scout Armor/Helmet
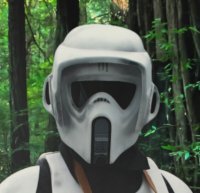
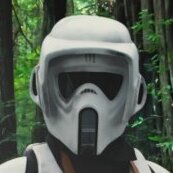
Nice looking helmet! It might be because of the lightning but the white in the back of the helmet looks sligthly different from the visor. Especially in the last picture. Gesendet von iPhone mit Tapatalk -
ROTJ Biker Scout WIP (first build)
OnkelPaschulke replied to Hiker Scout's topic in ROTJ Biker Scout WIP
Looking good Chris! Just started with carving the soles and than on to the next BB just like you. Gesendet von iPhone mit Tapatalk -
WIP wannabe Lancer by OnkelPaschulke
OnkelPaschulke replied to OnkelPaschulke's topic in ROTJ Biker Scout WIP
2. These Boots are made for walking - Part 1.1 I started with cutting out the first sole. I didn't expect it to be such a time consuming process. Still need to clean up cutted parts with sanding paper. The rim arround the boot is really annoying because it is not the same on the different sides of the boot. On the inside the upper part is sticking out, in the bag it's pretty even and on the outside of the boot it's the lower part which is sticking out. We'll see... 😁 -
WIP wannabe Lancer by OnkelPaschulke
OnkelPaschulke replied to OnkelPaschulke's topic in ROTJ Biker Scout WIP
Sounds reasonable. Cutting the bumps shouldn't be a problem. The rim is another thing because it's no simple rim actually. The lower part of the sole is a little bit thicker and this creates the edge but maybe I can sand it down carefully. -
WIP wannabe Lancer by OnkelPaschulke
OnkelPaschulke replied to OnkelPaschulke's topic in ROTJ Biker Scout WIP
2. These Boots are made for walking - Part 1 Ok, after spending the whole day outside mowing, digging holes for wifey to put plants inside I finally found some time to think about the boots. It was kind of hard to find matching boots with a single tone sole. At least it was hard for me. I spent days looking through different pages and found nothing. Than I told my wife what I'm looking for and 15 minutes later I had these wonderful boots. She's really good in finding clothes and stuff online. I wonder why?! 😂 So I sat down tonight and tried to draw the carvings on one boot and I want to show you guys the results before cutting the sole and it's not right. I like the pattern in general but I'm little unsure what to do with the little bumps on top of it and how deep to cut inside. The edge arround the boot is about 3mm wide. I hope I can describe it properly in english. Should it cut / flatten all these bumps or should I leave them on top. And how deep should I cut into the sole. I made a drawing to show what I mean. I would prefer the red one. Cutting all the way up and into the sole 3mm deep to get nice cutouts. I hope you get what I mean. I'm planing to make a template with my 3D printer for my skalpel for the deepth and angles of the cuts but before printing them I need to know if the pattern is ok this way. 😁 -
WIP wannabe Lancer by OnkelPaschulke
OnkelPaschulke replied to OnkelPaschulke's topic in ROTJ Biker Scout WIP
Thanks Dennis! -
WIP wannabe Lancer by OnkelPaschulke
OnkelPaschulke replied to OnkelPaschulke's topic in ROTJ Biker Scout WIP
1. Making the Pew Pew - aka EC-17 - Part 2 Well, some days later I'd say that this little bad boy is finished. I skipped the plan of recreating too much of the damage because I'll make another one for my display collection later on. The nozzle and the capacitor is still removable because I might ad magnets to keep the blaster inside the holster. I forgot to take pictures with the tape measure but it is 8 inches long, 4,5 inches high and about 3,2 inches wide. I used a brown base color and gave it another round of 1000 grid sandpaper. There are still some printing lines but overall I'm satisfied with the result so far. I used a satin black spray paint with structure pigments to get a nice surface which is not just simple flat black. After the paint had dryed for two days and because I didn't had that much time I did the weathering yesterday. I mixed some water with black and brown acrylic color to give the whole thing a little wash but the results weren't that outstanding as I expected them to be. But nevertheless I imagine the the black looks a little bit more used. I did some dry brushing to the edges but as I said I decided not to exaggerate the whole process. Tomorrow I'll seal the blaster with a varnish and that's it for this part. I think it should fit all the CRL requirements: EC-17 Hold-out Blaster Flat or semi-gloss black. (check) Blaster does not have any visible trigger. (check) Blaster is lightly weathered. (check) OPTIONAL Level two certification (if applicable): Scope eyepiece has stepped circular grooves like the original. (check) Scope has no actual lens. (check) No decals representing cross hairs or similar. (check) That's it for today. Tomorrow I'll start with the boots and there will definately some questions regarding the carvings... 😅 Cheers -
WIP wannabe Lancer by OnkelPaschulke
OnkelPaschulke replied to OnkelPaschulke's topic in ROTJ Biker Scout WIP
1. Making the Pew Pew - aka EC-17 - Part 1 Well, as I said the whole Scout Project came to my mind all over sudden because of the helmet and now it really started. 😂 I got the 3D Files from 3d-props.com. I've already got an E11 Bapty printed by them and than upgraded by myself. Now that I got myself a 3D printer I decided to print the blaster on my own. The files offer the option to add some electronics for light an sound effects but this is something I'm planing to do in the future because the are no triggers allowed and the muzzle needs to be closed. Maybe I'll do it just for fun. I've got myself an Ender 3 V2 for my birthday this year and I'm kind of new in the 3D printing. One important lesson I've already learned. Don't buy cheap filament! I've already had some major tantrums because of the printer but now I've figured out the main mistake. As you can see the blaster consists of 3 major parts and the rest are some small parts and everything is assamble with glue or screws. I' ve printed the files using the standard profiles for my Ender with a 0,2mm layer heights. The grip took most of the time because in the middle of the first print the printer dediced to go on without filament because it got stuck in the bowden tube... Some cursing and ranting later the second print succeded. I finished printing all the parts on friday and after that it was time to sand down the print lines. After some rough sanding from 120 to 800 grid sandpaper I used some sprayfiller on the parts in my little spray booth. The parts than spent some time in my "Groschen Mallorca" or "Assi Toaster" - some german expressions for a sunbed - but some ironic expressions... 😂 After drying I added some wood putty for some major gaps even though there weren't that much big gaps. After everything dryed it was time for some more sanding. The biggest gap was where the trigger was supposed to be. I took a piece of scrap plastic and roughly fitted it inside and than added some putty. I could have closed it digitaly but totaly forgot about it... After more sanding I could assamble the scope with the body using a 30mm brass screw. The mount for the scope sits very tight inside the body. Some e6000 should fix it to body. The top mount was screws to the bottom using some brass screws. The capacitor and the trigger guard were screwd to the grip as well. After that the grip was screwed and glued with e6000 to the body and that was it for assambling for today... That's it for today. I sprayed the whole blaster with another round of primer and now it's hanging lazy underneath some UV lights in the booth. More to come with the next post. -
The Ultimate Armor Comparison Thread!
OnkelPaschulke replied to BikerScout007's topic in ROTJ Biker Scout Armor/Helmet
Thanks a lot! Should fit my Blaster Gesendet von iPhone mit Tapatalk -
The Ultimate Armor Comparison Thread!
OnkelPaschulke replied to BikerScout007's topic in ROTJ Biker Scout Armor/Helmet
Can some please give me the dimensions for the holster of a SC armor? The width in particular. Just to see if the blaster I'm printing at the moment would fit in or not. I've not recieved the armor yet... 😉 -
WIP wannabe Lancer by OnkelPaschulke
OnkelPaschulke replied to OnkelPaschulke's topic in ROTJ Biker Scout WIP
Hello there, already saw your WIP here and that you used the same title as in the MEPD... Absolutely recognizable😄 Mothers are amazing even though she is continuing to tell me to grow up... 😂 -
WIP wannabe Lancer by OnkelPaschulke
OnkelPaschulke replied to OnkelPaschulke's topic in ROTJ Biker Scout WIP
No problem at all! ;-) -
WIP wannabe Lancer by OnkelPaschulke
OnkelPaschulke replied to OnkelPaschulke's topic in ROTJ Biker Scout WIP
Thanks for all the kind words! I'll surely post a lot of questions during the build. And there's a first one right away... As I said, I want to start with the blaster. The CRL says that the "Blaster is lightly weathered" and as I was skipping through the WIP I got the feeling that the blasters where flat black most of the time. But I really like the used look and I want to weather the armor and the softparts anyway. So would it be ok if I try to replicate the used look of the EC-17 shown in the scoutopedia or would it be too much? I mean with all the chips and chunks and holes? Just asking befor tearing my finished print appart... 😄 And @M.Jit's Arne not a very common male name in Australia 😉 -
Hi guys, I thought before I continue with spaming other peoples threads with my questions I should start my own WIP. First because I almost got all necessary parts, second a WIP keeps the pressure up to go on with the build and third it's great to practise my english a bit. But because of my work I might not be able to update this thread every day but at least I want to try it regularly. I want to try not to jump that much between the different parts and maybe finish one part completely after going on to the next and than linking the parts in the first post. I know that's kind of hard expecially at the the end when the fixing and adjusting begins. I'm kind of new to all this costuming and prop building. Last year I fullfilled a childhood dream and bought myself a RS Sandtrooper commission. Mainly because I wanted to have it fast and thought to myself that I really would be upset if I did something wrong while building it. So the armor arrived clean and I weathered it myself. After finishing the weathering I joined the ranks of the 501st september last year and became a deployed PO at the MEPD short after. But now I've got infected and wanted to go on with the next costume. In the meantime (thanks to COVID) I bought a Snowtrooper helmet, a Din Djarin helmet and a Darth Vader helmet just for display reasons. And than RS offered the helmet kits and I got one. And just after they didn't offered it anymore I decided to become a Scout... and of course I'm aiming for lancer... 😅 After reading loads of information in very interesting WIP and other tutorials I started gathering the parts and I'm about to start. Here are the parts I already have or which I want to buy or still need to be finished. I want to start with the blaster to get into the groove and after that going on to the softparts, starting with the boots and jumpsuit and than go on with the armor parts. I want to do most of the softparts on my own. My mother is helping me with the pouches because she's so much into sewing but I want to at least try it with the rest of the parts. If I'm getting to frustrated I might change my mind. We'll see... 😂 Hardware: Helmet: RS - just recieved the package - Check Armor: SC - after getting the conformation that it would match the RS Helmet - Check Blaster: Printed with my own printer using the files by 3d-props.com - Check Software: Jumpsuit: Helly Hansen WW Sheffield Overall - Check Gloves: Wampa Wear - Check Boots: Part 1, 2, 3, 4 Kappa Kombo Hicking Shoes - Check Balaclava: Got one from work - Check Fabrics for pouches: Got some off white duck cloth and some white duck cloth but I'm going with the off white first - Check Fabrics for cummerbound/cod/vest: Still looking for some good fabric - Check Vinyl: Got some vinyl for the boots but it's to thin and already got feedback from the review team that the graining is to heavy - Check Suede: Finding some matching suede in germany was kind of hard but I found a shop not ordered yet - Check Pouches: Mom 😂 - finished, not in my hands yet Cummerbund / Cod / Vest: Self made - not even started... Velcro / Strapping for the soft and hard parts: Already got all the necessary parts according to the CRL - Check Ok, I guess that's it with the parts. The grip of the blaster will be ready at the weekend and than I'm good to go with the first part. That's it for now. I'm excited! 😁 Cheers!
-
Well that‘s almost my size… thanks! Gesendet von iPhone mit Tapatalk
-
Btw what are your specs? In that picture it Looks like you‘re about my size (1,80m, 5“10, 5“11) I might be wrong… ;-) Gesendet von iPhone mit Tapatalk
-
Phew! :-D Gesendet von iPhone mit Tapatalk
-
I bought myself a RS helmet kit just for fun to have a biker helmet and all over sudden I found myself going all in for the scout. Unfortunately they don‘t offer the armor kit at the moment. Do you Guyana think it would be a problem having a RS helmet and a SC armor? Gesendet von iPhone mit Tapatalk
-
Biker Scout Boots Tutorial
OnkelPaschulke replied to cheesewhoopy's topic in ROTJ Biker Scout Soft Parts
That's the problem with buying the stuff online... the pictures are often misleading... 😒 -
Biker Scout Boots Tutorial
OnkelPaschulke replied to cheesewhoopy's topic in ROTJ Biker Scout Soft Parts
Today I recieved some Vinyl and I'm a little bit unsure If it's thick enough especially for the bootleg in terms of stability. Does the structure look ok to you guys? -
Awsome! Just recieved my vinyl and today the boots will arrive. I‘ll start a WIP soon, too. This thread is full of usefull tips. :-D Gesendet von iPhone mit Tapatalk
-
Inspiring WIP! Gesendet von iPhone mit Tapatalk
-
BikerScout007's RS Props Armor Build
OnkelPaschulke replied to BikerScout007's topic in ROTJ Biker Scout WIP
I Should have ordered not just the helmet… :-D Gesendet von iPhone mit Tapatalk -
Another source for 3D files is https://www.3d-props.com/3d-files/ec-17/ Don‘t know how the fitting is because I don‘t have the armor parts yet. Just finished printing the small parts. I‘ll do the bigger parts during the next week. I will two versions. One with electronics just for the fun of it and the other one matching the CRL. No trigger, closed Barrel and the matching modifications of the scope. Gesendet von iPhone mit Tapatalk

