

Omaha Joe
-
Posts
158 -
Joined
-
Last visited
-
Days Won
8
Everything posted by Omaha Joe
-
it won’t be shiny and white for long..! In fact it’ll be dirtier than my Scout as soon as I get it finished and painted and weathered... I’m goin’ full TD Sandtrooper 👍🏼
-
No, I haven’t turned to the Dark Side, and no I’m not cheating (ok maybe a little cheating to some) on my first love of becoming a TB RotJ Scout Trooper, but having caught the bug to build Imperial armor kits while still in a holding pattern awaiting necessary components to finish my Scout, I felt the need to satisfy the creative appetite... I realize this is not the place to post such blasphemous builds and forgive me for doing so, but I needed an update fix..! ...so here’s how I’ve filled my “Scout build” downtime #TBinTDclothing
-
Congratulations Dennis..!! ...and I second @Retrofire with all your hard work and attention to detail paying off!!
-
The bottom black portion you’re seeing is the hook velcro and the black strip above it is the elastic for the chin cup. The corresponding loop velcro is on the inside of the faceplate. I initially had a full strip of hook and loop (the same length as the hook and elastic combined is now) but I realized I didn’t need that much velcro to keep my visor closed tightly, and trimming it down made it easier to lift the visor when I need to.
-
That’s GREAT, Dennis!! and what a fitting homage to your Father..! Here’s to him and to your soon-to-be Lancer status!! Cheers 👍🏼
-
That’s great, Dennis!! I was just thumbin’ through your WIP today in fact, wondering if there was an update..! Congrats Brother!!!
-
Nice work, Cole!! I also jumped on the ‘quarantine special’ with the SC helmet and armor and I’m really impressed with everything so far - matter of fact, a lot of your WIP photos, as well as your troubleshooting techniques are along the exact same lines as mine 👍🏼 Just puttin’ it out there because we have the same kit, but good on you for cutting out the ear holes as that’s a Lancer spec anyway. Also I opted to add a hard hat liner inside instead of padding but only because I figured that would allow for less heat build-up and make wearing it for several hours more bearable. I went in a little different order than you as far as the rest of the build, I got the kit and began assembling the armor first and then ordered the flight suit and flak vest... Got a good start on the pouches, codpiece, etc., but have to wait til the flight suit arrives before finishing the armor with the proper trimming and fitting. I’ll definitely be keeping an eye on your WIP and if you have any questions about the SC kit, I might be able to at least offer up the ways I tackled some of those obstacles 👍🏼
-
got my shoulder bells temporarily connected to the shoulder bridge; waiting on flight suit and vest for final placement but got a couple pics in the meantime
-
not much of an update, but an update nonetheless... chin cup installed, as well as a little velcro (ooops, I mean “hook n’ loop fastener“ 🤭 👀) to the inside edge where the visor/faceplate meets the bucket...
-
 Excellent work Christina..! Here’s to nominating your finished Mandalorian Scout build for the CRL example when completed!! Me, watching this thread:
 -
I used a 1” dremel cutting disk first to take off the majority of the engine/mic tip, then continued with the dremel sanding drum, the key being ‘slow n’ steady, little by little’... ...and the paint I used is Rust-Oleum Satin Protective Enamel in ‘Coastal Gray’ which I also used to color-match my helmet bolts 👍🏼
-
after allowing everything to dry, it was simply a matter of gluing (E6000) the new engine/mic to the backplate. As of now, I have the wiring inside the helmet taped to the inside of the snout (just so it’s out of the way and won’t snag). I will update when I get the battery pack installed and the wiring configured inside; the outside is completed.
-
At this point I decided while I was at it to repaint the recessed area black before sanding the entire backplate down, preparing it for a fresh coat of grey. The new engine portion (just the engine, NOT the black on the mic) was also painted to match. *note Ukswrath does not endorse this, and the way I understand it, actually advises against any painting of the audio equipment portion of the greeblie as it’s done at your own risk
-
So I’m not sure to what degree this falls into the category of “tutorial”, as I’ve learned with other parts of my build there far more than one way to skin a cat (or Scout bucket in this case), but here are the steps I took to swap out my Studio Creations snout greeblie with Ukswrath’s Biker Scout Helmet Audio System: *note I have heard that different helmet manufacturers have different ways of attaching their engine/mic portion of the greeblie to the backplate; one in particular with a screw to make this far easier than with chipping away with power tools. *also note I have not yet installed/configured the battery pack/wiring inside the helmet, this is simply the swapping of the engine/mic portion of the greeblie. I started by trimming off what I could of the existing engine/mic portion with a dremel cutting attachment, leaving the original backplate fastened to the recessed area. I then switched to a dremel sanding drum to take the remaining raised areas down before finishing with sandpaper. yes this was nerve-racking and not without a handful of adult words in the process. I then positioned the new audio engine/mic portion, marked and drilled a hole through the backplate and the recessed snout area of the faceplate, allowing the necessary wiring coming from the back of the new mic to go through to the inside of the helmet.
-
Excellent advice, Gentlemen, thank you to both of you..! Agreed that acquiring the proper tools and materials would be well worth the effort for the cleanest possible finished product 👍🏼
-
You’re right Dennis, I’m gonna have to detach the engine/mic portion of my existing snout to affix the wired version, a process not without several degrees of anxiety..! (“I just got this bucket back together, I’m not gonna let somethin’ tear it apart!!”) From what I understand, the audio systems are sold as the engine/mic piece alone to account for the differences in parts sizes (length of the greeblie’s backplate and snout recess areas) from the different helmet manufacturers, but I was aware of that when I ordered it. Two schools of thought though: 1) I could try and slice off my existing engine/mic piece, sand the backplate down, drill out a hole for the wiring, carefully E6000 the new piece on, and voila..! but I think that’ll be easier said than done, especially trying to get a straight cut from the right, left, and top edge as it’s already set in the recess... or 2) I might just try my hand at resin-casting my own greeblie backplate using the existing one as a template and strip the old one off completely, minimizing the trauma of a complete F up should the original backplate snap in the process. The thing looks like a simple oversized tongue depressor anyway, how hard can it be, right..?! Either way I’m going to have to swap out the two and believe me, I already have a replacement snout greeblie on order in case my first attempt goes dreadfully amok... I will definitely update with whichever procedure gets the job done as accurately and effectively as possible 👍🏼
-
BIG shout out to Ukswrath’s Scout Helmet Audio System that arrived yesterday!!! Looks and sounds AWESOME!!! Will be following the installation instructions to a T, but with a little nip ‘n tuck and a matching paint job, I just cranked my bucket up a notch..! (pun intended)
-
aaaahh, gotcha 👍🏼 thanks for the info
-
just had a question out of curiosity... apologies in advance if this has been previously covered or addressed (I searched to no avail), but I noticed in the MotM Exhibit photo what appears to be a red rectangular decal to the left of the tank topper greeblie as you would look down on it. I know this is the only photo I could find where that item is present, and I know I haven’t come across anything about it in the CRL or any other screenshot, WIP, or deployment request photos of the tank. like I said, just asking out of curiosity because any time that photo pops up I kinda wonder if I’m just seein’ things and it’s some sort of shadow-like anomaly either from the photo itself or reflection off the display glass..?

-
ok now THAT is awesome on so many levels!!!
-
Drawing a little inspiration from my unopened collectibles!! For some reason as a 6/7 year old kid I had the wherewithal to put these aside and not open them! And as childish as it may sound, I’m as giddy now to be building my own Scout armor, as I was standing wide-eyed in any toy store’s Star Wars section in the late 70s/early 80s... #stillakidatheart
-
I’ll leave the finer adjustment details to the pros who know what they’re talkin’ about, but wow that is lookin’ good Dennis!! Well done! 👍🏼
-
Thank you!! I had step-by-step professional guidance..! 👆🏼 😄
-
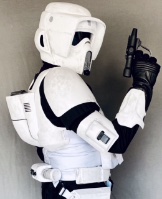
bit the bullet and added some wear ‘n tear to the boots
-
Great pointers Dennis, thank you! Will post in my WIP when I take that deep breath and make it happen!! 😁

