

Sgt.Bilko
-
Posts
97 -
Joined
-
Last visited
-
Days Won
4
Everything posted by Sgt.Bilko
-

Sgt. Bilko’s Mando Scout Build
Sgt.Bilko replied to Sgt.Bilko's topic in Scout Trooper: "The Mandalorian" WIP
Sewing the suit. Armor attachment with strapping and Velcro. Moving to the chest side straps and back tank. RS Props helmet is on its way! Sent from my iPhone using Tapatalk -
Sgt. Bilko’s Mando Scout Build
Sgt.Bilko replied to Sgt.Bilko's topic in Scout Trooper: "The Mandalorian" WIP
Chest workout. Snaps and straps. Sent from my iPhone using Tapatalk -
Sgt. Bilko’s Mando Scout Build
Sgt.Bilko replied to Sgt.Bilko's topic in Scout Trooper: "The Mandalorian" WIP
Continuing the strapping and sewing. Is this gap worth closing? I’m ready to trim to fit closer to the body before adding strapping. Sent from my iPhone using Tapatalk -
Sgt. Bilko’s Mando Scout Build
Sgt.Bilko replied to Sgt.Bilko's topic in Scout Trooper: "The Mandalorian" WIP
Greeblie and sewing efforts tonight. Rinse and repeat. Sent from my iPhone using Tapatalk -
Sgt. Bilko’s Mando Scout Build
Sgt.Bilko replied to Sgt.Bilko's topic in Scout Trooper: "The Mandalorian" WIP
Dry fit. Comments welcome. Sent from my iPhone using Tapatalk -
Sgt. Bilko’s Mando Scout Build
Sgt.Bilko replied to Sgt.Bilko's topic in Scout Trooper: "The Mandalorian" WIP
Added the ABS reinforcement with new rivet. Had to use medium length 1/8” for the added depth. Sent from my iPhone using Tapatalk -
Sgt. Bilko’s Mando Scout Build
Sgt.Bilko replied to Sgt.Bilko's topic in Scout Trooper: "The Mandalorian" WIP
Rivets removed. One of my favorite tools ever are these micro shear flush cutters. Very strong and precise. No drilling or damage. Just wear safety glasses, as the rivet head can fly! Sent from my iPhone using Tapatalk -
Sgt. Bilko’s Mando Scout Build
Sgt.Bilko replied to Sgt.Bilko's topic in Scout Trooper: "The Mandalorian" WIP
Roger that. This was my main concern. The instructions that came with my armor have this orientation (below). Strapping under and under. Whereas the CRL has under and over. The CRL pic was clear, but didn't explain the discrepancy. I'll go with the CRL pic in this case. -
Sgt. Bilko’s Mando Scout Build
Sgt.Bilko replied to Sgt.Bilko's topic in Scout Trooper: "The Mandalorian" WIP
Not too late. I can take my electrical cutters and remove the rivets. I’ve got a box of 1/8” on the shelf to redo with reinforced piece of ABS. Thanks for the tip, trooping can be rough on armor. Thanks for the high res picture, much easier to see the buckle orientation Sent from my iPhone using Tapatalk -
Sgt. Bilko’s Mando Scout Build
Sgt.Bilko replied to Sgt.Bilko's topic in Scout Trooper: "The Mandalorian" WIP
Belt assembly today. Following MonCal and Mickeys instructions, so the belt is slightly more of a hybrid outcome. For example, buckle close instead of Velcro. Question for the team. First pic is my drop box buckle. I’ve tried zooming in on the crl and several builds. Are the orientation of the drop box buckles correct in my first go? I’m holding off on sewing before getting confirmation. Also, any general statements on the belt are appreciated. Sent from my iPhone using Tapatalk -
Sgt. Bilko’s Mando Scout Build
Sgt.Bilko replied to Sgt.Bilko's topic in Scout Trooper: "The Mandalorian" WIP
Final product from tea bath. Results look really good. Starting to get dirty Sent from my iPhone using Tapatalk -
Sgt. Bilko’s Mando Scout Build
Sgt.Bilko replied to Sgt.Bilko's topic in Scout Trooper: "The Mandalorian" WIP
And a super fast delivery from WampaWear. Gloves and Flightsuit. Great quality and fit. I may remove the glove liner, so I don’t overheat in summer. Sent from my iPhone using Tapatalk -
Sgt. Bilko’s Mando Scout Build
Sgt.Bilko replied to Sgt.Bilko's topic in Scout Trooper: "The Mandalorian" WIP
Busy after work session tonight. Performed the Christina Earl Grey wash on my white soft parts. Recipe: 3ish gallons of hot water, 4 T Bags with a 15 minute steep. I soaked the nylon strapping for 15 min, cloth strapping 1 min and the KriptonTop cummerbund for 5 min one side and 5 min extra after flipping around. Smells great and so far looks great! Kudos to @TKZombie . Sent from my iPhone using Tapatalk -
Sgt. Bilko’s Mando Scout Build
Sgt.Bilko replied to Sgt.Bilko's topic in Scout Trooper: "The Mandalorian" WIP
Printed out a new TD greeblie and did some assembly tonight. Move along… Sent from my iPhone using Tapatalk -
Exactly what I was looking for, thank you sir! I'll PM you separately from here.
-
Sgt. Bilko’s Mando Scout Build
Sgt.Bilko replied to Sgt.Bilko's topic in Scout Trooper: "The Mandalorian" WIP
Thanks Corey for taking the time to explain this. I have a good path forward now. Best, Scott -
Wayne and Jacqui's Mando Scout Trooper Build
Sgt.Bilko replied to UCFWayne's topic in Scout Trooper: "The Mandalorian" WIP
Hi Wayne, these greeblies look clean. I plan to print MPs for mine as well and use Automotive primer for print lines. What process / product do you use to clean up prints? Great progress, I'm closely following your build and taking notes for mine. -
Thanks for the lead Dennis. I received these speakers and added to this simple, but effective class D amp for my bucket. All should fit inside with no wires external. I posted a quick video in my build here: Mandalorian Bucket Electronics I'm putting this aside to focus on armor, but I plan to enclose this in a custom 3D enclosure and possibly loop some Mando clips from my MP3 player through the AUX input. An additional question, do you have a part number for the snout speaker? Best, Scott
-
Sgt. Bilko’s Mando Scout Build
Sgt.Bilko replied to Sgt.Bilko's topic in Scout Trooper: "The Mandalorian" WIP
Thanks for the quick reply Chopper. I found this video from Mickey B. on YouTube. Very helpful tutorial that I've been referencing (along with RS). https://www.youtube.com/watch?v=GnipWxolqdU Around 58:30 Mickey describes the variation on the greeblies for the TD. I'll send a quick note to MonCal and get their opinion. I've encountered similar debates on the E-11D in the past. Sometimes it can be a matter of variation with onscreen props or even suiting up differently (things upside down, etc.). Separately, I've already received MPs 3D files and will print out a version with the capacitor on the right and mount the greeblie on the long side of the TD. Thanks again! -
Sgt. Bilko’s Mando Scout Build
Sgt.Bilko replied to Sgt.Bilko's topic in Scout Trooper: "The Mandalorian" WIP
Shifting focus to armor, starting with the TD. I noticed my greeblie has the capacitor on the left, whereas the CRL shows on the right. I’ve seen reference photos with the capacitor on the left. Can't really tell from the reference photos on the forum. Does it matter? Sent with my kit: Reference photo: CRL: Sent from my iPhone using Tapatalk -
Sgt. Bilko’s Mando Scout Build
Sgt.Bilko replied to Sgt.Bilko's topic in Scout Trooper: "The Mandalorian" WIP
Final act before the end of vacation…helmet electronics. Here, I’ve created a cooling and sound system powered individually by the push buttons (will make a 3d print bracket mount later) through a single Li-Ion battery pack. The sound is generated from a class D amp with mic and Aux input. The battery is charged from the amp board via onboard charging circuit using USB C port. Sent from my iPhone using Tapatalk -
Sgt. Bilko’s Mando Scout Build
Sgt.Bilko replied to Sgt.Bilko's topic in Scout Trooper: "The Mandalorian" WIP
Removed quite a bit of weathering, save a few spots. Sent from my iPhone using Tapatalk -
Sgt. Bilko’s Mando Scout Build
Sgt.Bilko replied to Sgt.Bilko's topic in Scout Trooper: "The Mandalorian" WIP
Noted. Thanks for the feedback. Sent from my iPhone using Tapatalk -
Sgt. Bilko’s Mando Scout Build
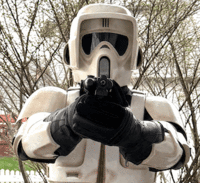
Sgt.Bilko replied to Sgt.Bilko's topic in Scout Trooper: "The Mandalorian" WIP
Wrapped up the blaster. Assembled, painted and weathered. Ball bearings and magnet are installed. Fits nicely in the holster. Sent from my iPhone using Tapatalk -
Sgt. Bilko’s Mando Scout Build
Sgt.Bilko replied to Sgt.Bilko's topic in Scout Trooper: "The Mandalorian" WIP
Continuing on the blaster during holiday break. Primed and painted the blaster and then shifted focus to the guard. For MPs 3D 100% model 1/8”x1/2” flat aluminum worked well. Bent on the vice and set countersunk screw holes (#6 sink drill bit). Sent from my iPhone using Tapatalk

