

JBar
-
Posts
129 -
Joined
-
Last visited
-
Days Won
4
Everything posted by JBar
-
I'm at a bit of a standstill while I figure out how to use my sewing machine. Lots of youtube is involved. My goal for the weekend is to finish the boots and sew the suede into my flightsuit. I have the time just not the skills yet. I had to take a break from youtube and I finished my gun case for my dlt 19x. I had to router out the inside for the rifle to fit. It doesn't look pretty, but it is very snug and shouln't get damaged during transport.
-
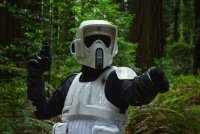
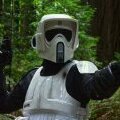
Thanks! I have the same problem. I live where there are no other scouts to compare armor with. From my research, sc looked to be perfect for people who are in the medium to small sizes like me. Here are some quick reference photos if it helps: I rarely take pictures of myself, so I didn't realize I've gained some weight now that I'm married haha. Here is a reference pic from my last troop. I'm the little pilot lol. Then again, the other pilots did seem taller than most.
-
Here is the exact tutorial: http://forum.bikerscout.net/index.php?showtopic=903 What I did was pin the vinyl down then would take turns stretching out a side and re pinning. I heated up the vinyl each time. It was easy to do with a heat gun. It gets very stretchy so it isn't too hard. Always leave the pins in where the toe is though. Just stretch the sides. Also, one everything cooled over night I took out the pins on the sides and very very quickly glued the vinyl down and repinned one more time.
-
Next part, Boots! I'm literally just following the tutorial in the soft parts sticky tutorial. I'll add more to this post and I go. Here it is so far:
-
Ok big helmet update. The "Gloo" finally cured and everything is pretty much put together. I painted the rest of the inside of the helmet with some black paint. I also hot glued the visor into the faceplate. I was going to make a fancier way to insert the lense, but it was shaped so well that just a little hot glue is holding it well in place. The snout greeblie was spray painted grey and I masked off the respirator part. The front of the faceplate where the snout is placed was carefully painted black. Looks like years of painting miniatures was finally put to use! I also glued in some putty behind the snout greeblie so that it wouldn't wiggle around the faceplate with just the screw put in through the back. Here is the back of the faceplate where the screw goes into the greeblie. Then I put the faceplate on the main part and twisted in the nut and washer. The left side of the helmet doesn't quite fit as snug as the right side. Some work with the heatgun helped, but I don't want to risk warping. I think I'll either add some velcro or even some sort of latch in order to keep the faceplate secure to the helmet. I also have to add the decals, weather it, and possibly paint the metal side bolts if required. I still have to do a little resarch. I'm wondering if all the sticker decals are required or can I just paint some of them on? I don't want my helmet to look like it has stickers. Maybe I can find a way to blend them into the helmet.
-
I wish I could say I did more, but I'm being really patient and following the glue instructions to "wait 24 hours" for it to cure before proceeding. Patience is hard haha. So I left the hole that is drilled into the main part of the helmet at a 1/4" bit. However, I drilled a 9/32" bit into the visor and faceplate to make it just big enough to fit the metal hinge bolts all the way through. Now they are secure with the square part of the bolt. This leaves the rest of the bolt to fit and pivot into the 1/4" hole on the other piece of the helmet. I think I'm safe to start gluing the visor against the faceplate on the top and sides. While drying I cut out the ear holes. I still have to clean them up to be as accurate as I can make them.
-
More helmet progress: So I've searched far and wide for an sc helmet tutorial. I got some help when I emailed sc. I've never done this before, and I don't have any references, but I hope to show as much as I can to help the next person. I hope I'm doing this right, so far so good! First I used ABS cement that I found at Home Depot. This stuff is unlike anything I've ever used. BE CAREFUL not to let it go anywhere but where you want it. Not only does it glue, it also fuses like acid into the plastic. It dries in minutes though! I glued the back end then once dry clamped each side and did the same. This first part was easy, I drilled a small pilot hole into the middle of the indent, then a second pass with a 1/4" bit. I clamped the visor to the faceplate so that I could get a good alignment on the two pieces. The clamp really helped. I spent nearly an hour aligning everything. Take your time here. A few extra minutes can save hours of a mistake. I made sure that the top of the faceplate stayed underneath the visor. I'll probably glue this after a dry fit. I marked a spot to drill into the faceplate from where the hole was in the visor. I then drilled the faceplate holes. I repeated the same process for the last piece of the helmet Also, I learned this trick from building my tie helmet. I boiled a big pot of water and dipped my visor into it for just a second. While hot, I pressed the visor against the faceplate as it cooled. I did this a couple times and now it's a perfect fit. I've heard horror stories of melting plastic with a heat gun. However boiling water seemed to do the trick, and nothing is warped. Just be patient with it. I'm still working on getting a larger drill bit to fully plug the holes with the metal discs. I'll post pictures soon.
-
I did a cut out of the lens area. I still have to smoothen it out some. Before I do, does anything think I should sand out more? I've heard that SC helmets usually have a small eyepiece, but I also don't want to cut out too much.
-
Helmet - SC Armor - SC Undersuit - Red Kap and custom sewing by me Vest - WIP by me Cummerbund - Chef or Marcel Pouches - Chef or Marcel Boots - WIP Kmart work boot and marine vinyl Gloves- Wampa Wear Blaster - 3d printed
-
Ok, here I go, after months of researching I finally ordered all my parts and a ton of stuff arrived in the mail today! It's like Christmas! I'm still not exactly sure where all the parts go, so I may have outlined my armor wrong haha. I have a horrible camera so I'll try to get the best photos I can for now. I'Il be the only scout here in Montana so the forums are all I've got to base my research off of. I'm so thankful for all the posts I've read and help I've had here. I got to go to Salt Lake Comic Con and I'm thankful for some of the tips I received. It was my only chance to look at real scout armor. Anyone out there feel free to critique or ask questions! I ordered the full sc kit for the helmet and armor. I'm 5'5" 150lb so I needed an overall smaller armor and helmet set which is why I went with sc. The flight suit is from Red Kap Twill Action size 38 regular and fits me just fine. The boots are ordered from Kmart, Texas Steer Men's Soft Toe Work Boot size 9. The scout blaster is 3d printed from a friend. Lots of sanding and priming! I used the exact tutorial from a guy on youtube called Happy Trooper. It's a great tutorial for a cheap dlt 19. I added the scope to make it a DLT 19X.
-
 Silly question but what causes the bund to camel toe? I'm going to make my own and I'm not very experienced with sewing. Good job so far by the way!
 -
Thanks for the link! I didn't see that one. If I could find another helmet that would be a similar size, I might just get the SC armor. I'll keep looking into smaller helmet options.
-
I'm not sure if I should call them the "eyes" or "lenses," but I had a question about the shape of the eyes on the SC helmet. I've been doing lots of research and it looks like SC would be best for me since I'm small and on a budget. However, there seem to be a lot of people who trim their eyepiece on the SC helmet. Would I be correct in thinking that the SC helmet has what looks like a smaller lens opening than most helmets? If so, is there a template or some sort of reference on how to widen the lens area without overdoing it? It would be a bummer to goof up the eyes during a trim, if it's even needed.
-
For about $70 total, I was able to download "Trooper Talk" and get all the hardware for a very customizable comm system. Here is my youtube videos testing it. You can find more info in the youtube descriptions
-
As a shorter person, it looks like I'll be getting an SC kit soon too. Let us know how it turns out.
