JBar
-
Posts
129 -
Joined
-
Last visited
-
Days Won
4
Everything posted by JBar
-
Approved!!!
-
Approved! I sent off the pictures and the GML said I'm good to go. Next up is lancer, but I'll need a break for now. Thanks for all the help here everyone!!!
-
Great to hear! I'll send some pics to my GML. Just in time for the Last Jedi.
-
I fixed the back TD so that the cummerbund doesn't hang below it. Also I got a Husky 25 gal tote from Home Depot. It's very durable and fits everything.
-
Ok here are some fixes. I adjusted the velcro on the boxes to make them more level (with more time I could probably get them even better). I also adjusted the TD so that the cummerbund doesn't fall below it. Also the bolts are now grey.
-
Ahh, I forgot about painting the bolts. I'll lower the belt in the back, I see that now. Is the arched cod sew line too high up? I can always restitch it to be lower. Also, how did I do on the spacing with the pockets on the chest armor?
-
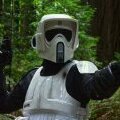
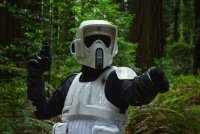
Well, here I go! About two months of work and I'm finally ready to apply to be a scout! For all you trooper experts out there, let me know if there is anything I need to fix or change before I send in the pictures. Thanks everyone for all the help along the way. You people here rock! Will this scratch built DLT 19X be approvable?
-
I'll be putting up submission photos in another post, but here are a few.
-
Here is a closeup of the helmet padding. I got lucky and saw a seat cushion sitting in the middle of the road so I jumped out and picket it up. I cut up a piece of it and used it for some helmet padding. I sewed some velcro to the back so I can take it in and out of the helmet to wash. The seat cushion has a nice comfy cover to it too. I also used some of the foam to stuff in my pockets. I followed the tutorial pinned on the soft parts of the forum. I'm really bad at following sewing directions, but somehow I ended up with a vest that seems to work. I put new snaps in place for my shoulder bells. I glued in some velcro to the back of my chest armor. Wampa Wear gloves (get one size larger than you'd normally go. I got large and they fit great). They even have a little zipper pocket in them which is cool
-
So for the last 4 days I've done nothing but sewing. I just finished my vest. I'll post pictures on how I made the vest once I get the 2" velcro for the back. I also got size large Wampa Wear gloves and I really like them. People were right, I'm glad I got large, which is one size bigger than I normally wear. Anyway, for now here are my pre-submission photos! Let me know what should be adjusted. Also, is this DLT-19X approvable? I made it out of wood and PVC. Also, since the vest doesn't have the back attached yet, it was kinda flopping all over the place, which made my shoulder bells fall down a bit. (looks like a belt loop got twisted around, I'll fix that)
-
Thanks everyone! I'm just waiting for gloves and to make the vest. I'll get pictures of the riding patch and mud flap I sewed on soon. Cummerbund came in the mail today! Marcel from the forums did a great job. I'm so happy I didn't have to sew this myself. I'll fill the pouches with shaped cardboard or something. The pouches have velcro that can be attached to the back of the chest armor. Knowing me, I'll probably add some straps with snaps to hold the cummerbund to the back of the chest armor. Maybe I'll just use more velcro, we'll see. I also finished the thermal detonator. For now I'm just using the sc tube but I think I'll eventually upgrade to lancer status and I'll have to switch out the tube. That ok because first of all, I drilled a hole for the rivet and I slipped and it came out the other end. I also messed up on the rivets and used some that were too big and now the plastic is slightly torn, resulting in the clips being loose, but they will work for now. The clips are awesome and I got them from Knife Kits I also took a massage ball and pressed it into the heated end caps to make them concave in case I go lancer. As I've said before, take your time heating, if you get the plastic too hot it will warp. The caps were glued to the end of the ribbed tube. Also, get a really long zip tie to attach the tube. Mine was barely long enough.
-
Update, I ended up using the standard SC stickers and I'm actually pretty impressed. They adhere very well and don't stick out noticeably at all. I'm happy with the results.
-
Ok, I think I figured it out, so what I realized is that when you put on the suit, the collar doesn't "v shape" so much and it's much easier than I thought to sew on the collar. I ended up sewing two pieces of leftover pocket together for the flap, then I sewed that flush along the collar. I used two pieces so that the back piece could have some velcro on it so that the stitches wouldn't show through the front. I sewed the velcro on the flap before sewing the two flap pieces together. Hooray! At least I think so. Hopefully this is an acceptable way to do things.
-
I added a little boot strap to help keep the holster up. I riveted a loop around the plastic brace and them used a snap to hold together the larger strap. I also added in the mandarin collar to the suit. I just used leftover pocket fabric sewed two halves of a flap together then joined them along the unfolded collar. I made sure to sew some velcro to only one side of the flap before sewing the two halves so that no thread shows in the front.
-
It's been hard to make a current WIP post because I've just been doing little odds and ends work here and there when I have time. Since my last post looks like I added all decals on the armor, glued all the black greeblies down, and sewn a "mandarin" collar onto my flight suit. All I did was make a flap from leftover pocket material and added some velcro. These aren't the best pictures (I didn't have my wife over to take them on her nice camera), but I'm hoping things are looking proportional enough for now. The gloves are temporary tie pilot gloves until the Wamp Wear ones come in. Obviously I also don't have the cumberbund or vest yet. That will be a weekend project.
-
I've made a little progress, but I think I'm still doing something wrong. In the tutorials I see that people are unstinting some part of the collar, but I can't figure out what. I made a flap out of one of the pockets and I'm not sure how to line it up. Option 1: sew it straight across, but it leaves a see through gap below and doesn't line up with the top of the collar Option 2: sew it in line with the top of the collar but then it doesn't wrap around the neck without being bunched up I'm sure I'm missing something, but can't figure out what it is.
-
Thanks! I'll probably look into hand sewing. I've never done it before so it will probably be good for me.
-
Ok cool, good to know. Were those decals like what you get from a model or miniature kit where they are water transfer? Because they look very flush against the armor. Would the sc stickers be too thick or am I just overthinking it?
-
I've looked around and I'm not too sure what the best method is to put on the decals for my helmet, chest armor, tank, etc. My sc kit came with some stickers which I can use, but I saw that Panda Trooper used sign vinyl for the tank and grey chest decal. I've also seen some people use paint on various parts. I don't mind using stickers, but should I be worried about a "toy" look to the armor using stickers?
-
So I found this great tutorial but I had some further questions: http://forum.bikerscout.net/index.php?showtopic=16810 1st: Are there more pictures about how the collar was fixed? I appreciate the tutorial, but I can't wrap my head around how the collar was modified. I don't want to cut or sew anything until I know for sure what I'm doing. 2nd: How do most people sew on the suede along the thighs. I'm new to sewing so I wasn't sure if people use a sewing machine or hand sew. I just figured out how to use a sewing machine but I don't see how I can sew on the suede without sewing it to the backside of the suit. I can try to google whatever hand sewing method was used and try it myself.
-
Blaster/holster complete! I again used Pandatrooper's method of magnetizing the blaster handle. I bought some 1/2" by 1/8" steel cup holds from K & J Magnets (NSC82) as well as some 1/2" by 1/8" axially magnetized magnets (D82). The cup holds help strengthen the magnets and provide a hole for them to be riveted into some scrap plastic. I layered more plastic on top of the riveted magnets/cups until it was flush with some holes I drilled in the holster. 5/32" rivets did the trick for me. Lots of hotglue to glue the magnets in Thanks to Retrofire for giving me a pro tip before I riveted the holster to the boot. You'll see some leftover scrap from my shoulder armor that I used as a brace to rivet the holster to the boot. It also will prevent the vinyl from tearing. I used 1/8" rivets. Make sure the scrap plastic is tight against the vinyl and holster. I tore off the guard to my 3d printed blaster and replaced it with a tie plate I had ling around. It was a perfect sized replacement. I had to fill the holes of the metal with welder's putty then covered each side with black electrical tape before repainting. Magnet test https://www.youtube.com/watch?v=5JiE-qojDCQ
-
Do you mean scrap strips of plastic or vinyl? Just curious on how that helps the holster from falling out? Do the strips go between the rivets or through them?
-
Huge update! For the most part, I have the hard armor finished up. I'm still waiting on some rare earth magnets to arrive to finish the boot holster and the thermal detonator. I'm building this with possible lancer status in mind in the future, so I used the correct width of straps for the armor according to the CRL. You'll see here I used a ton of snaps. For each snap I used the same method as I did with the chest armor. I also put snap ends in my flightsuit to hold the armor onto. It took a lot of trial and error and measuring. (I also made a mistake and I'll have to put that top shoulder snap on my vest instead, I haven't made that yet) For the shoulders, using a dremyle, I trimmed off about 3/4 of an inch from the bottom on the shoulder armor. I very carefully used a heat gun to warm up the armor while squeezing them with my hand so that they would better cup my shoulders. Straps are 1/2" *This is next one is not my picture, it's one from Pandatrooper's build which I used. However, I only shaved off up to 4" high and slightly less than 1/2" deep since my shoulder armor was already trimmed down to match my smaller size* The upper arm piece fit my arm well enough that I didn't need to use the heat gun. Straps are 1 1/2". The forearm also needed a heat gun to curve it around my arm. Strap is 1". I made the shoulder, upper arm, all line up down the side of the flightsuit. I also rounded off any edges of the armor so that it didn't have sharp angles. The knee caps have a 5/8" top strap and 1/2" bottom strap. (I forgot to get a picture, I'll need to add one here) Here is the test fit, it looks good to my but I'm no expert. I need to add another snap so that the upper arm armor doesn't flare out at the bottom. Also looks like I forgot to snap down my knee caps which is why they are low. The belt was one of the trickier things to make because of all the sizing I had to do. As you can probably tell, I prefer snaps over velcro, but here I used a big clip to hold everything together. I basically just used my dremel cutting wheel to cut slices into the armor for the webbing to go through. I got the by the yard webbing online from Jontay. It's 1 1/2" white cotton (3 yards, including enough for the sides of the chest armor) and 2" for the back strap (1 yard). The buckles are from Strapworks online with the respective sizes. Again, you'll see where I put lots of snaps, and when the back buckle is snapped together, the belt fits perfectly. I may add the two rivets on the sides of the belt if I go lancer status. I greatly trimmed down the edges of the belt and glued them together with more abs adhesive. I tried to get the boxes (not the drop boxes) as close together as I could. I'm kind of a small guy, so like I said, I had a lot of cutting to do since the SC belt armor comes with some extra plastic on the ends for larger people. I had to heat up the belt buckle tabs and curve them inward so that when I glued the three belt pieces together, they would form around my waist. If you want a better belt tutorial, visit Pandatrooper's, who I've referenced before: http://forum.bikersc...opic=9781&st=40 I used snaps whereas he used velcro. Here it is snapped together And unsnapped And some test pictures. Looks like the boxes are supposed to hang 1-2" from the belt which I did. The 4 buckles are just looped through and the back buckle is secured with some sewing.
-
Thanks everyone! I'm glad this is going ok so far. Ok, here is a "snap" update...literally. I didn't want everything held together by hot glue and velcro, so I went with a snap build. It's funny I literally had a dream about how to put this together using snaps, and so far it has worked! So first, I glued the black greeblie onto the tank I apparently forgot to take a picture of the other side, but here is a piece of abs plastic that I riveted into the back armor side (I messed up the first time and put the plastic in too high). I used a 3/16" rivet. By the way, if you don't have a pop rivet gun, get one! They are amazing. Anyway, I used a heat gun and what you see here is the back side of an "L" shaped piece of plastic. There is a ledge on the other side that is glued to the top underside of the tank. (This one pic is not mine, this is from Pandatrooper's build. This is what I replicated. I forgot this picture.) As you can see, the part sticking out is meant to be used as a place to rivet the top of the tank down to. However, my rivet didn't quite line up so I just hot glued the ledge to the underside of the tank and it's holding together well. And the bottom is riveted in with a 1/8" rivet I used 5/32" rivets that worked perfectly for some snaps I got at Joanne's. Here is how I riveted them to some plastic. I used these female ends to hot glue to the inside of the armor so that I could attach the straps. I probably went through 20 rivets until I figured out how to do this right. The side straps are white 1 1/2" cotton webbing I got from Jontay Webbing. The top black straps are actually loop velcro with the loops facing the ground. I'm going to use that strip to later attach shoulder armor and the white 1 1/2" cotton straps that cover the connection between the front and back plates. Here is one side snapped together. I left some room on the bottom to fit in more adjustment snaps in case I ever gain or lose weight. Some fitting pictures. I should mention that I carefully and lightly heated the ends of the armor under my armpit and shaped them in a more inward way to better fit my body.
-
I've never assembled any armor kit or helmet before. However I'm pretty experienced building miniatures, but this was a much larger task. I thought it actually came together nicely so overall yeah I'd say it was easy enough. Still took a couple hours. You just don't want to rush it at all. Measure 3 times before drilling or gluing anything. Definitely looks much easier than the "authentic" helmet builds out there with a split down the middle. PM incoming for a pdf instructions I have of it. Furthermore, I was finally able to finish the boots! I still need to add the blaster holster. I'm also thinking of adding a velcro strap near the top of the boot to hold it tight on my leg. It literally took me all weekend straight to learn how to sew. Lots of mistakes were made along the way but it turned out pretty good in the end.