


Dauitsch
-
Posts
101 -
Joined
-
Last visited
-
Days Won
1
Everything posted by Dauitsch
-
getting awesomly there Bro!!! Cant wait for autmn when we will have our Wolfpack Armor, team show-off : )))
-
they are riveted onto the tube...
-
The version seen in Panda´s WIP is the version screen used and also its the version most (if not all) Lancers have . Of course you cant remove them by having so but anyways, why would you ...that was about the webbing being one piece just put through the clips! As you can see on the MoM model and also on the BR shots, the webbing that goes to the box is always single layer (on belt and box) and there is no stitching at all. So Bottom Line is that the version with having it simply put into the slots and fixed inside (glued or Velcro) is best choice...
-
Trim lines on KS helmet
Dauitsch replied to Filipinosfinest's topic in ROTJ Biker Scout Armor/Helmet
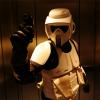
Here is a picture of my recently apped KS bucket with focus on the mask, maybe it helps... -
I am not aware of any so far but I can show you what I did... Firstly my collar was looking like yours as you can see on its unmodified shot... As you can see, the collar was folded downwards and it had the common corners on each side, what I did: - I just unfolded it so that it stood upwards - Removed the corners with a clear and straight cut .. now you have it standing but it still has a "shaped" form around the neck but you want to have it the same width all around and a bit more narrow than it was before Therefor you cut off the edge stitching and bring the whole collar into a straight shape by folding outside and inside of the collar until it has the desired shape (ironing will help to keep the shape). Now you will have to sew it again. As a next step, you take some material from the earlier removed pockets and create a small extension of the collar with the same width than your collar has (this extension should also be made of two layers with having the edge folded to the inside). Before you sew this piece, you should attach the velcro from the inside for closing the collar (doing so will prevent the stitching to be visible from outside. Once the extension was completely constructed you will sew it onto one side of your modified collar, on the other side of the collar you will also attach the velcro. Thats pretty much it and I hope the explanation was clear since I did unfortunately delete my detail shots of the construction already. Following picture is the final collar...
-
The suit itself looks ok but the collar will have to be a mandarin collar. Also you should remove the pockets. Doing so will give you enough material to convert the standard collar into a mandarin collar. Its actually not much work to modify this collar type to become mandarin Hope this helps
-
Hi Marc, welcome to the Pathfinders! Greetings from Neuss
-
Dauitsch´s Lancer Deployment Request (APPROVED)
Dauitsch replied to Dauitsch's topic in Lancer Deployment Request
Thanks again Jim! Standing by... -
Since I have been added as a Pathfinder to the ranks of the 501st. Legion (TB#10761) as of today, I would like to apply for Lancer status. See the following posting for my costume and some Lancer related detail shots... The complete picture libary of mine can be accessed within my picload folder under: https://pl.vc/1d5dbt all my pictures related to the Biker project including my 501st. submission photos are as well availableon my picload under: https://pl.vc/9aup7 So this should be it for now, please let me know in case anything is missing or needs further documentation. In terms of meassurements for elastics and stuff, I did of course stick to the CRL defined values. For further reference I did also publish my WIP within the German Garrison forum where it had been made sticky after I was asked by the Administrator to even extend it to serve as an officially featured "How To" which I am currently doing. have a look at: http://www.501st.de/...3453#post_33428 Looking forward to your opinions and judgment!
-
gues what..., this chap had just been approved
-
Hi Steve, I have seen your posting in the GG forum as well and now I think I got you point, Its actually not that tricky... For the pipes on the bund (and so the pipes on the vest´s arms) 1 inch seems to be a prefect width! Talking about the shape of the pouches, I would not go with a rectangular shape since they are only looking like being so on the screenshot because of them being bunched and stressed on the set. You should refer as well refer to our beloved mannequin from the costume book, the BR references and the MoM model who all have the square ones clearly visible... However, first of all I think you are wearing your belt a bit to low, it should rather sit above the hip-line rather than directly on it, this way you already come closer to a square space for the pouches but bear in mind that the bund shall not be sitting under the belt, it should rather be placed directly above it. In case you have Facebook, I suggest to look up the "Wolfpack Advanced Recon Team" group, its way more efficient to link there not just because we are living quite close together and I might be able to assist you with the pouches, anyway, I bet the pair I have a home spare is already perfectly fitting your needs
-
Totally true! Dont ask me how I understood he is about the TD and its fixing Oo. Thank you!!! And let me add: In this case, I would always use velcro for closing the belt, since the "parachute clip" makes affixing the TD again not very much easier
-
sry, I totally mixed up the forum, this can bedeleted actually :s
-
To affix the TD to the belt, you may use several options in the center and the more hidden they are, the better it is. As seen on the recent WIPs, magnets are an options, also velcro dots are an option or whatever you may think of. However, the screen used holders for the TD were indeed the black clips (known since they were clearly visible in the Blue Ray version of Jedi and also part of the MoM mannequin. Afaik, having the clips is not mandatory for getting basic aproval but they are defo mandatory for reaching Lancer status as per current CRL (lvl2). Reference of TD clips and dimensions... As an additional orientation you may have a look at my personal setup wich is a combination of both options in order to fit tight and to match the actual recomendations. Hope this helps!
-
jeah, same here dude! we shall have a real blast then...
-
Bought gloves from ebay. Are these basic approved?
Dauitsch replied to Kosejonas's topic in ROTJ Biker Scout Soft Parts
Those are the MFX ones from Germany, no worries they are the best ones you can get at all apart from the original Esprit gloves -
Thanks guys! - Bund/Pouches fixed to avoid gap at Armor straps (by adjusting pouch hangers and dressing Bund correctly) - Cod piece bunching fixed by loosen the strap and adjust correctly
-
Thanks Mickey! You are totally right with the pouch holders, the actual bund is quite wide enough but the chest piece in combination with the pouches is pressing it down then... Ill have that certainly improved until my basic went thorugh. Loosing the elastic a bit was exactly how I fixed the cod Will add my actual submission shots with more accurate adusted gear tomorrow to this thread...
-
Hi! ...its finally done and I am ready for 501st submission with my Biker build. Tomorrow is the photo session for my submission set and I cant wait to join in for real... Any kind of feedback from you guys would be much appreciated (btw. the slight camel toe incident is already fixed ) I also followed all CRL mentioned Lancer criteria since I aim to apply for it direcly after level 1 clearance, if anything does not fit this on first sight, please let me also know this would help me improve... Thanks for all the help and support I gained here until now!!!
-
Good point Joe, was thinking about this as well and will improve the areas in question...
-
Time for an update... even though I had not that much time yet to work on my weathering again, I can tell that I am more or less done with the Boots&Holster next to the Knees. After doing some tests and trials, I decided to compeletely refuse the rattlecanning. I will rather stick to sanding, newspapering and powder pigment for finishing (this way I can always reduce or extend the dark spots before it had been finally sealed with a light nebula of clearcoat). I think what I achieved in the following should already be the maximum of dirt and destruction the weathering should be showing but I really like it and its exactly my tase (a result of grinding alongside things and dealing with dirt such as engine oil and forest dirt of course).
-
When I started my journey to become a Scout, It was certainly clear that I will not become a nice and shiny-white toy soldier of the Death Star Parade but rather a dirty warrior serving on the fields of Endor. However when my build began to grow more and more, I have to confess that I had some quick thoughts about having it all white and shiny as if it would just have been produced but those were just thoughts and I will of course stick to the plan of weathering my kit (not necessarily copying the exact weathering of the Endor troops but having an individual pattern of the same taste, decent but not to much). To be honest I was quite afraid of starting up with it because of the chance to simply ruin my parts with paint or such but it really turned out different when I took all my braveness yesterday and just gave it a go... I would like to share my experiences and progress on the weathering here in order to catch your opinions and feedback. See the following first pictures for what I reached so far, of course I will update accordingly until the whole junk is done This was easily achieved with fine sanding paper and old newspaper, in the next step I will add a second layer of darker and some blackish spots by using black pigment powder on certain sanded areas... though I start slowly so it wont be overdone in the end. What do you think?
-
Welcome Ashley and best of luck/fun with your journey! I can tell, you are absolutely right in this place for a start and you even have already been directed to your local experts Same happened to me about 9 weeks ago when I impacted here to start enlisting... guess what? I am almost done after learning and relaizing a lot, next to the fact that I had the pleasure to already meet very cool people from different areas of the world. Even though it might look totally overwhelming and almost undoable on first spot, the things will become very clear quite soon and then everything makes sense all of the sudden^^ Greetings from good old Germany
-
Thanks Mickey ...well, somehow I knew that you would spot the zip-tie thing and even if I mentioned to Strider that there would be gazillions of other ways to make this part more convenient, the zip-ties HAD to be done to my satisfaction. I think I found a nice concept of connecting that area...
-
Thanks for the feedback guys, it helps a lot! Sure thing I will go for Lancer, actually my whole build is focused on reaching that state but I´ll spare the app until I am done with my LW bucket and the overall weathering ... Basic app is going on Air in a few days, once the riding patches were done.
