

Aliaz
-
Posts
788 -
Joined
-
Last visited
-
Days Won
15
Everything posted by Aliaz
-
Well here we go. Lightning is a bitch, really hard to see the riding patches and butt flap.
-
Finally got around to getting the tank attached to the back armor.
-
EBay is your friend.
-
Thanks for the tips. The pouches there are just being held up by being wedged under the chest armor, haven’t attached them properly yet but I will keep it in mind. Good point on the flight suit, I plan on putting some elastic straps on the bottom to prevent it from bunching up. Still have to add the riding patches/flap and attach the tank to the back armor and the holster to the boots before posting a pre-submission thread though. Was shooting for the TLJ premiere but I’ve kinda given up on that, I want to do it right and not just rush.
-
I’m no expert, but The thing that I noticed first is that your cumberbund is to short (or maybe has slipped down. You should not see black between the bund and chest/back armor. The flak vest arms look to long, they should end right below the shoulder bells, not go under the bicep armor. The bicep and forearm armor should be more to the side, not the back. Also one of them has slipped down abit.
-
Got a little friday feeling so decided to throw everything on now that the cumberbund is redone.
-
Some progress atleast. Happy with the pouches (maybe a bit wide) and bund (Although I forgot to add enough fabric for the overlap so my wife will have to put up with doing it again...) Going to be down to the wire to finish everything before the TLJ premiere.
-
I used the template from the Lancer build thread. we are pretty much the same height, and mine are just over 6†tall x 5†wide. My initial mockup was closer to 6†wide but it just looked to wide.
-
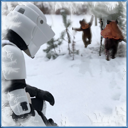
Havrix' pre-clearance pictures for basic approval
Aliaz replied to Havrix's topic in ROTJ Biker Scout WIP
Congratulations! -
Still have to finish the tank (put the topper on and rivet it in place) and the holster but other than that I feel pretty happy with the armor pieces. Just have to crack on with the bund, cod, pouches and riding patches/flap now. And some velcro on that Damn bicep armor. â€Honey, there are ewoks in the house!â€
-
Boots arrived today from chrisx909x, Very happy with them
-
That’s a good point. The wisdom keeps flowing from you chef, Thanks!
-
How should the buckles be aligned on the drop box straps? Just noticed I have them in different ways in the front so good thing I’m asking before I sew them to the back of the belt.
-
Chest/back armor pretty much done. Pretty happy with the slots I managed to cut. Still have to attach the drop box straps to the back of the belt. The cod piece template might be a little big? Waiting on my DVH tank topper but got the stripes done on the tank. Time to get started on the bund and pouches.
-
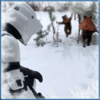
Havrix' pre-clearance pictures for basic approval
Aliaz replied to Havrix's topic in ROTJ Biker Scout WIP
you mean on the thermal detonator? That is the correct way. -
Yep, That’s the one.
-
i dont remember where I got them. It was pretty much the first thing I bought about a year ago, saw a link while lurking around the forum.
-
I’ll second that recommendation for both Chef armor and DVH blaster.
-
Very Nice!
-
Thanks.
-
thanks. How much should the cumberbund overlap under the chest armor? It should stop at the belt not go under it right? Finished my TD.
-
Another test: The bund is just mocked up with fabric. the pouch and cod paper (templates taken from the Lancer Build thread). And the pouch is obviously to small. Just trying to figure out the sizes. Pretty happy with how the chest/back armor sits, just need to get around to making the slots for the strapping. Drop boxes adjusted, moved the straps in the back closer to the middle. And my wife messed up while making a first attempt at a flak vest (arms to short and tight) , so she wants me to ask if the length of the arm on the T-shirt before she begins working on it again. Also is the entire chest indent painted grey or just the bottom of it and not the raised Sides?
-
Very impressive, congratulations!
-
Thanks, I’ll do the strapping first and see if I need to trim more after that. Belt is now riveted and velcro sewn on the belt, will adjust the drop boxes ans sew them to the belt aswell.
-
Yeah I messed up getting the rivet out (Tried to cut away the plastic washer so I could cut the rivet on the inside but that went wrong) and got a big crack/gash in the knee armor, so I’ll have to get a replacement. But the other knee armor is complete and riveted, so halfway atleast. That must be a trick of the light, it’s just ordinarie black elastic. Another little test fitting: The straps for the drop boxes are closer now than the last picture, might have adjusted to far and the are hanging a bit low. The back strap of the belt is Currently waiting for my wife to sew on velcro so just tape for now. :lol Realised I will need some velcro to keep the bicep armor up. Done a little trimming on the shoulder connection on the chest/back armor. Pretty happy with the back part but Should I do trim more from the chest part to eliminate the gap seen in the last picture. Or heat it a bit? Or is it fine like it is?
