

khazara
-
Posts
320 -
Joined
-
Last visited
-
Days Won
1
Everything posted by khazara
-
Outer Banks Biker Pre Clearance rasman06
khazara replied to rasman06's topic in ROTJ Biker Scout WIP
Congrats on the approval! Welcome to the Pathfinders! Sent from my iPad using Tapatalk -
Me? I love it. I've had a few small cracks appear on the edge of the squared-off brow/side piece framing the face, and had to replace the bolts for screen accuracy, but it's the perfect size for me and it's very light. Sent from my iPad using Tapatalk
-
In the Costume Reference guidelines there is a "Level 2" guideline for additional costume authenticity over and above the basic requirements. For the Pathfinders (the 501st biker scouts), this additional level is termed Lancer. Sent from my iPad using Tapatalk
-
I was surprised by that when I got my Altmanns too. They're very soft. Sent from my iPad using Tapatalk
-
I like what you did with the back of the detonator. So many things to finesse, yet nobody will even see! With the shoulder straps bridging the front/back armor, you'll want to add the "T-strap" to hold the shoulder bells on your shoulders. Sent from my iPad using Tapatalk
-
There's the common "T-Strap" method so that it attaches to the join of the front/back armor. One piece joining the front/back armor, and the "T" that runs out to your shoulder and connects to the inside of the shoulder bell.
-
Looking good! A few items: Tank topper needs the white circle and should have a backing washer behind the rivet http://www.501st.com/databank/File:TB_scout_back.jpeg Try adjusting the bend and/or the length of the shoulder joins to reduce/eliminate the gap between the armor and your back. Do you have the flak vest on? Sometimes the black material details dont show up on pics well due to the light reflecting off the bright white armor. Same with the suede riding patches; can't really see them. The material that joins the shoulders - can you rotate that around so we don't see the edges? Have the join of the material against the body instead. Almost there!
-
I have an Altmann and plan on going for Lancer at some point. I've already replaced my bolts with the 3M headband kit. The bolts were too short though so I had to do some engineering with some nuts and bolts to make it work. The ears are only painted on, so I believe these have to be opened up. Sent from my iPad using Tapatalk
-
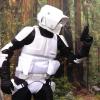
Thanks! I think both the chest armor and bicep placement was fixed for the forest pics. I like the thought of the invisible shirt crease from the shoulder, that's a great tip. Sent from my iPad using Tapatalk
-
Woohoo congrats! Sent from my iPad using Tapatalk
-
Thanks for the input! I haven't added Velcro yet to hold any of the armor except on the shoulders. Everything is elastic only here. Wanted to get expert feedback first before placing the holding Velcro on the suit. Sent from my iPhone using Tapatalk
-
Have you started work on your armor yet, or is that in the mail currently too? I had someone else make the armor, helmet, vest, pouches, cumberbund, and boots... but that doesn't mean the rest doesn't take a lot of work! It's taken me 3 months and many long nights. I learned to sew, for gosh sakes! Lots of velcro/strapping, sanding/cutting/forming the armor edges & webbing slots, riveting, and more. Adapting/creating the suede pattern and making sure both halves line up was a lot of time. I'm just saying it's a LOT of work to put together a Biker Scout accurately, even with commissioning those pieces from other sources. But it was also a lot of fun, a learning experience, and a very rewarding project. Make sure to follow the forum topic of Pandatrooper's build if you haven't already -- amazing tips and tricks!
-
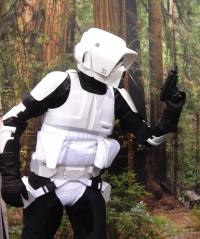
I did it! After 3 months of sewing, sanding, drilling, researching, gluing... I'm ready to have others view my work! These were taken yesterday. I'm very pleased with how everything turned out. Please check out my album and let me know what you think! http://imgur.com/a/HDLxf#0 What I've *really* been looking forward to is taking themed pics in a forest, so my gf and I quickly went out and took these too. Enjoy! (I did!) http://imgur.com/a/L34je Some modifications you may not immediately notice: - I replaced the standard bolts/clips on the Altmann helmet with the 3M authentic ones and modified/installed the accurate hard hat liner - formed a couple brackets inside the tank to place the rivets in screen-accurate locations - took in the suit legs considerably (1 cm at the hips increasing to 8cm at the bottom of the leg) for a more form-fitting look to avoid bunching up - heated & formed the shoulder straps for front/back armor and forearm pieces to better fit my body type - formed the belt pieces like Pandatrooper did in his WIP thread by heating & forming to form a rivetless belt - used craft foam to design a box-like shape to keep the pouches shapely I plan to apply for Lancer, just not quite yet. I'll have to carve out the ears from the helmet (it's just black paint currently), and I have the flat iron tool so I can create return edges like Pandatrooper did. Other adjustments I have to do are to round the corners of the armor underneath the arms, and add the chin cup. Will have in place by Celebration. Many thanks to Marcel for the support and the fantastic craftmanship on the cumberbund, pouches, and boots; jcarlson101 for the extra 1 3/8" elastic for the shoulders; Jeff at SC for the armor (and the extra pieces I had to order after I over-heated the main belt piece).
-
PM sent Sent from my iPad using Tapatalk
-
Lancer requirements are identified in the Costume Specs forum as well as the "Level 2" on the 501st site: http://www.501st.com/databank/Costuming:TB_Scout_trooper Sent from my iPad using Tapatalk
-
Aspiring TB'er here... Looks great. You're going for Lancer, yes? With those heel cuts and knee rivets and everything. Sent from my iPad using Tapatalk
-
That is a fantastic idea. I will likely do that! Sent from my iPhone using Tapatalk
-
So I just received the resin scout trooper blaster replica I ordered. The heft is nice - it weighs about 1lb 3 oz - and the size seems fine in my hand. But I think it looks too big when put in the SC boot holster. It doesn't appear to be a mold based on the Kenner toy. It measures about 8 3/4" from end of the scope to the tip of the barrel. The scope length is 7 1/2". http://imgur.com/a/NHJzd#4 What do you think?
-
I hope so, that's exactly the elastic I used! :-) Sent from my iPad using Tapatalk
-
Thanks so much Darth Voorhees but I actually *just* got a resin one off ebay. It seems there aren't many available sources right now! Sent from my iPad using Tapatalk
-
Great tip on the Container Store chest. Thanks! I picked one up too based on your suggestion. When I finish my TB build I want to line the container with foam and add a handle to the side, since it's wheeled on one end. Sent from my iPad using Tapatalk
-
I am also on the lookout for a blaster. Alas, DV is not taking any more orders prior to Celebration next month. I've seen people refer to a Hyperfirm blaster but it seems the website Sci-fire.com no longer exists. I also reached out to SlaveFive directly who used to make the Hyperfirm and confirmed he doesn't make them any longer. Sent from my iPad using Tapatalk
-
Probably because they're so hard to come by? I got my Altmann's just a couple months ago and I think it's fantastic. Modifying it now to accept the hard hat liner system & flat bolts. Should be done today! <wootwoot> Sent from my iPad using Tapatalk
-
Looking good! I'm in the process of making mine and these progress pics are a great help. Sent from my iPad using Tapatalk
-
Did you use the SC-provided tank striping or something different? Sent from my iPad using Tapatalk
