fett-bobafett
-
Posts
38 -
Joined
-
Last visited
Everything posted by fett-bobafett
-

Sculpting a GM from scratch...ground up
fett-bobafett replied to redkraytdragon's topic in Kashyyyk Trooper Armor/Helmet
I just want to say that I know Will and he IS anal LOL! He saw my start at my Aurra Sing costume and set out to design and make my pistols for me and every other person out there that needed an awesome set of pistols. He has helped me with several other projects and I can attest to his hard work and attention to detail. He is always open to suggestions for improvement as well. He will be making new shins for my husband and I for our KT's. -
No approval for me yet. No one has gotten back to my GML about my costume after I made the changes. I forgot about everyone trying to get costumes done for Halloween as I can't think past the balloon fiesta at the moment. I have family in town from Maryland and the balloon fiesta was canceled due to rain when we tried to go today. That leaves tomorrow morning as the last event for this balloon.
-
Thanks for posting the pics, Joe! Todd is approved. Does anyone know what number he is, in the BARQ approvals? Is he #18? He is CB-6864. I'm still waiting for the higher up folks to get back to my GML on critique vs. approval for my costume so I can hopefully troop the balloon fiesta as well. By the way, I lowered Todd's "A" boxes on cumberbund. Does anyone know how to get Plumber's goop off of fabric?
-
Here are some of my new pics. I cut down the shoulder bells, the biceps, and the forearm armor, as well as the shins. Being a 95-pound, 5'6" weakling, makes it hard to look tough in armor. I already padded my shoulders.
-
Here are Todd's pics: Knees have been cut down. Need more velcro to hold them in place better.
-
Comments welcome. We are trying to get approved to troop the AIBF this Saturday morning. I need a little more padding in my biceps. Here are my pics:
-
1/2 of Kashyyyk Couple Southwest
fett-bobafett replied to fett-bobafett's topic in Kashyyyk Trooper HQ
I have a few details to work out, such as adjusting the chest piece to the cumberbund, sewing the balaclava, etc. Any other critiques would be helpful. -
Well, here is one of us, my better half. Had a costume error with a stray piece of velcro found later on the right shoulder bell. The visor is green, but looks black. I have the reflective film on order. Trying to get mine done ASAP so we can troop Balloon Fiesta in ABQ.
-
Gloves, gloves, gloves...Kashyyyk, that is.
fett-bobafett replied to Grumpy's topic in Kashyyyk Trooper Soft Parts
Matt, those look awesome! I saw Joe's on Saturday. I'm all fired up again. PS I'm changing to the Kashyyyk Couple Southwest. (Hoping we'll get more couples involved!) --Colleen -
Gloves, gloves, gloves...Kashyyyk, that is.
fett-bobafett replied to Grumpy's topic in Kashyyyk Trooper Soft Parts
Looks great Matt! I'll get some measuring done and send you a pm, and still need to box up and mail the greeblies. -
Kashyyk Cummerbund*update* new pics 4/20/12
fett-bobafett replied to LadySewForUs's topic in Kashyyyk Trooper Soft Parts
Debbi, PM sent. Please re-email pic for measuring cumberbund to new email. Thanks! -
Gloves, gloves, gloves...Kashyyyk, that is.
fett-bobafett replied to Grumpy's topic in Kashyyyk Trooper Soft Parts
PM sent. -
Very funny Joe! Not a very good April Fool's Day for me. Spent all morning trying to change all my other accounts.
-
My apologies to anyone with my teacampfire@hotmail.com address. This account was hijacked and I'm in the process of getting it back. Please DO NOT OPEN any emails from me with this address. Meanwhile, I'm changing to my name email address. --Colleen
-
Kashyyk Cummerbund*update* new pics 4/20/12
fett-bobafett replied to LadySewForUs's topic in Kashyyyk Trooper Soft Parts
Paypal sent for 2 Kashyyyk cumberbunds. Haven't had time to do any measurements. Which ones do you need? Thanks, Colleen -
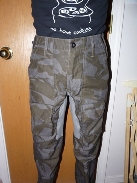
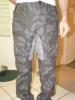
I deleted a few of my previous posts in order to free up some attachment space until I can get a photobucket account figured out. Here are the pants now:
-
Looking good on your build!
-
Looks good! And those are the same boots I picked! Please tell me where you got the materials for the lens in the helmet. Thanks, Colleen
-

-
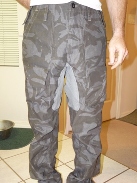
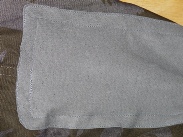
Made the "crotch patch" on both pairs of pants today. I'm using a "washable" medium gray suede/leather that my pal, Ruben at Tandy Leather, sold to me. I looked at all the reference pics and saw that the patch is a long rectangle. After eye-balling the pics further and taking into account my small frame, I made a pattern of 4 in x 19 in for me and 4 in x 17 in for Todd (my inseam is longer.) I made slightly rounded corners on the ends of the patch, with more rounding on the 'front' corners than the 'back' corners. 1. I pinned the areas on both pants to make sure how much of the patch I wanted to see in the front. 2. Also checked to see that the patch will hopefully be placed correctly to my (non-existent as yet) armor. The knee pads would have been very helpful in placing the length of the patch. 3. When I thought I had the right placement, I measured and marked, in Pencil, the "layout" of the edges of where the leather should go. A mark about every inch or so. **Be very careful and don't pin your leather to the pants. Also, know where you will be sewing as once you have punched a hole through leather, it is there forever.** Use a 'leather' needle for your sewing machine. Do a trial, stitching along a scrap piece of leather first, to make sure you get even stitches. When I did my trial, the sewing machine skipped a few times. So you try moving the tension adjustment dial one way, try stitching, if it doesn't stitch properly, try turning the dial the other way. I had to turn my dial down to "3." (usually it's on "5" for regular material.) 4. I then sewed the two 'Ends' of the leather across the bottom (by the knees.) *This is important as you end up with more fabric/pants material at the zipper/top side of the crotch patch versus the "butt"/back side.* 5. Then I sewed the length of the 'butt'/backside from one 'End' to the other. 6. Now starting back at one 'End,' you sew the other/zipper side of the Length of the leather, Pulling the leather taut the whole way. Hopefully, this will allow you to have enough length to reach the other end and finish off your seam. (keep checking) 7. Now lift your pressor foot and scoot it in/sideways, so that you can just see your outside seam on the right side of your pressor foot. 8. Go around your leather and sew the "double" seam. 9. Remember to back-stitch all of the ends of your seams to 'hold' the thread so it doesn't unravel.
-
thinking about scratch building my dc15L
fett-bobafett replied to Fettski's topic in Kashyyyk Trooper Weapons
You have to build it tough enough to be "droppable." I let kids hold my Fett blaster for charity drive pics. I made the mistake (Once) of buying a resin gun for my Fett on ebay. It arrived with a small torn hole on one corner, in a tight-fitting box, and inside the box were several resin pieces and one small piece of bubble wrap. It was very difficult to get my money back. My Aurra Sing pistols are poured resin and (Shhh! Don't tell Will), one slipped out of my hands while painting it. It bounced off a plant and dropped 18 inches to the tile floor. Luckily it only broke off one piece that I was able to glue back on. A friend started my current EE-3 Fett blaster, and I finished it with another friend's help. It is made of wood for the butt, metal for the trigger area, and PVC/styrene for the barrel. I still try really hard not to drop it. I hear what you are saying, though. The DC-15L looks like a BIG gun and will be very heavy to have to carry around. Even my Fett blaster gets heavy after a while. -
I have decided to avoid vinyl due to the breakdown, over time, of my friend's Darth Vader body suit. His was vinyl and he asked me to help sew it back together. When I looked at it, the material had completely pulled apart from where it had been stitched, all down the stitch line, creating cracks in the vinyl along the stitch lines. There was no way to repair it. If we are taking so much time, trouble, and expense for our costumes, we really don't want them to totally breakdown after only a couple of years. If we are not doing fabric for the "stripes" on the gloves, then I will do a thin leather. Sewing in gloves really sucks though. And leather is especially hard. PS with leather, you don't get second chances with the sewing. Any holes you make are permanent and may be seen after a mistake.
-
With the great ideas from some of you guys for modifying the soles using a dremel, I will be modifying the following boots: These boots, if you like them, can be found at your local Wallyworld for just under $50.00. Herman "Survivors," Item#2504015; Shoe name: Breaker; Color: Wheat. Bar Code: 856718000456.
-
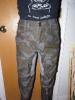
I resized the pockets to 4x6 and raised them up, although shortening the size also helped with "raising them up." The dye job went well. I cooked mine in a giant canning pot on the stove. I went about 1 1/2-2 hours total on medium heat for my shirts using RIT dark brown, and about 2 1/2 hours total for the pants, stirring occasionally. (My shirts were used and well worn in. My pants were brand new. I washed them a couple times, then dyed them longer due to the "finish" on the cloth still being a barrier to water and dye.) The fabrics/print color from item to item seemed different as well, so the shading from garment to garment is a little different. **I found some areas on the pants and shirts did not get as much dye as others, because I put all 4 items in the pot together at first. So I put the shirts in a bucket while I dyed the pants, and vice versa, checking everything carefully to make sure they dyed evenly. (Some parts float to the surface and don't get as much dye time, so you have to stir them under every so often. I did the RIT Black dye on the shirts for about the same length of time as the pants. About an hour each. **HINT--During the dying process, I dyed some leftover fabric that matched each item, so that I have "patching" material for later, in case I need it. I'm worried that some of the areas where I removed pockets are weakened and show more sewing holes than the regular material. This could "break down" later with wear and tear. After dying, I put the shirts /pants in the washer on the soak/rinse cycle. Then I washed them 2 times. Then dried them. I'm very happy with the results as they are still dark after washing.
-
I measured down from the waistband exactly the same on both pairs of pants. It is partially an optical illusion with the two of us standing next to each other, with one of us taller than the other person. The pants are only one size different in the waist. I will remeasure from the crotch seam to see if it will look different, but the pic on the left does look a little lower. I will try to "skinny up" the pockets. Thanks!