Fettski
-
Posts
309 -
Joined
-
Last visited
Everything posted by Fettski
-
I was approved yesterday. It was my goal when i started and I still have a couple things I want to do and i focused on basic approval. I will now work on some comfort mods and some more towards Lancer.Also some weathering.
-
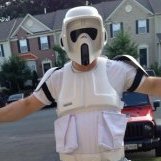
Going to be trimming the bund. Question about the seam. If I cut it at the bottom, how will the seam be visible if it is behind the belt? Here is a dress rehearsal I did with what I have just for fun. Obviously there are issues. I am working through them. Mainly interested in sizing minus the bund. The attachment of the rear drop box strap to the belt, are these ok or do i have to move them to the center?
-
Big quarantine update. I hope all of you are doing well. Once i get it all done, I plan on doing some weathering. Things i need to do, Make Cod piece, bridge for chest/back, mount shoulder plates to chest/back, Make vest, Mod coveralls to add the butt flap, riding patch/thigh straps, add velcro to help keep knees in place, and possibly tailor the legs a tad, paint/replace helmet bolt, and mount TD to belt. As always, if you see anything preventing Lancer that I have not mentioned, please let me know. Helmet is done minus painting or replacing the bolts on the visor. I also want to do something to better mount the visor to make the bottom closer to the helmet. Chest and back only need to make the bridge connection and attach the shoulders Made the pouches and cummerbund this week/weekend. Need to make the cod piece Belt is assembled, just need to finish the mounting of the TD. Boots are done 3d printed blaster that will need to be upgraded when i have the funds and a run opens up Baby and bag for fun at Cons
-
Makes perfect sense. I got carried away and sewed it shut and connected it before i even thought of that. easy enough when i go to make the actual set for real.
-
Will do. Now that I have a first hand example of how it goes together, ill be able to do a better job on the next one, I'll use the iron on the seam allowances to help them lay flat as well. Here is the current progress, Working on odds and ends on the armor kit, Id like to get the armor done to help me get some measurements for the soft parts, I pretty much decided that I will end up getting an Alt helmet for my lancer app in the near future and probably use this helmet as a backup and eventually for a possible snow scout. helmet - needs black stripes on the back of helmet, chin strap and visor installed chest and back need to be connected at top and sides, need to mount the lower elastic strap to the tank shoulders need just about everything knees, biceps,forearms, and gloves are done belt needs the rear strap finished and the rear straps connected TD needs clips and one side round cover glued on boots only need the heels cut out undersuit needs the suede attached and velcro added where needed flak vest pouches and cummerbund are currently a pile of rolled up interfacing, fabric, velcro and thread some assembly required This is a list mostly for my benefit so i can refer back and check stuff off.
-
Working on a prototype for my pouches. 6x5x2 This was just a test to see how it goes together and I didnt put any velcro on it. Looking for any feedback for Lancer status. Should be able to get the corners to be better on the next one.
-
Thanks for the feedback. Here is an update on the progress. I talked my wife into making me something for motivation. Please feel free to comment on anything that may be an issue for Lancer approval. Caveat* I am aware of the seam on the SC helmet needing to be fixed. Not sure this will be my Lancer app helmet or not yet. I REALLY dont want to have to sand and paint this helmet. Not that I have any trouble doing the work. I just prefer the straight white ABS finish. I am thinking about the possibility of using ABS sludge to fill in the seam then sand and polish that to fill the seam. This SC kit doesnt result in much scrap material in the end. May have to get some scrap ABS if i decide to go that route. A decision for another day...... SC helmet getting glued. Not sure if I will use this one for Lancer or offer it up for sale and go with an Altmans Some progress towards the belt Boots are nearly done. Just have to do the lancer details on the heels of both boots and attach the holster
-
Some work on the boots, the top is not glued to the boots yet and still need to add stitching to the "dogbones". It looks like ill be able to cover the laces with the "dog Bones". Started on the boot carving. Going to take a few more nights here and there. Picked up what i hope is enough suede to do the riding patch and the butt flap. It is still mostly rolled in the picture.
-
Update with pics of progress for some parts. Got the armor in super fast and still working on the boots while working on the armor. between other projects. I am going to be going for Lancer. and will include pics to highlight those efforts. I will update all of the Lancer app pics once it is all assembled and fit right, but these pics should highlight any necessary details. I welcome any constructive criticism. now onto the pics.
-
Greetings scouts, I started out long ago with a Mr. Bungles Kashyyyk scout build and hd very little clue what i was doing but he had a great build thread that i followed, got approved, trooped a little and then sold it. Built a TB and then sold it for some illogical reason and now I am returning to build another TB that I plan to keep awhile. I have also build a mando for the mercs, ROTJ Boba, custom R2, started and sold a few other mandos and sold all of the costumes thinking I was done until I saw the Mandalorian scouts on chapter 8. I am not building that version, at least not yet with this build but I am going to make the bag for fun. The scout was my favorite character as a kid growing up. I will try and keep this thread updated as I finish parts of the build. I am currently TDY for work in Alaska and will be returning home next week to meet up with a pile of most of the parts i need for this build. I am thinking i may go for Lancer on this build. I may just go for basic to get my membership reinstated and then work on the updates as needed and still have the ability to troop events. Ill get some pics next week when i get home. Thank you for joining me on this journey. I appreciate any constructive criticism. I have 20 years in the military and some fairly thick skin. Let's talk about what my materials list is. Soft Parts: Ked Kap coveralls - I will be altering myself for the first time Vest - Going to try and make this myself. I still need to decide if I am going to make my own template from scratch or try the T-shirt method. Bund/cod - Have the materials to make this myself. I made the bund for my Kasyyyk scout and barely had a clue what i was doing and i think it turned out fairly well so i think i can handle this. Gloves - Wampa Wear Boots - This will be the 3rd pair of boots I have made so nothing new here except these will have the Lancer details for the first time. Balaclava- something cheap on amazon. Armor- SC Helmet - SC blaster - something my friend 3d printed for me that will probably not pass for Lancer. dlt19 - going to try the happy trooper (?) build templates Just for fun or possible future use: Mandalorian Scout child bag- Done Extras not yet decided on: I am looking for a decent bin. I have a pair of the huge Stanley bins and I remember there being a smaller bin made by Blue alpha or something that i cant seem to find anywhere. I WTB a 12 inch pathfinder patch if anyone has an extra. Id like to eventually get a UKSWrath mic/speaker kit Helmet fans
-
i have industrial strength vecro hook side on the knee and sew on loop side of velcro sewn to my elastic. I also have the narrow elastic riveted on. I added a little bit of velcro to the top center of the knee and sewn a small amount to the flight suit to keep it in place. I ran into a little discomfort at my first event over this past weekend and added a small square or ~.25 inch eva foam hot glued at the bottom center of the knee armor. i wore it last night for a few hours and they stayed in place and no discomfort. Hot glue is not the best method to attach it so if it fails, i will replace it with a new piece of foam and e6000 and that should be the last time i worry about it.
-
When in doubt, talk to your GML. He/she can offer advice and maybe arrange a chance to get together to look at it in person and offer suggestions.
-
Pictures will help. if it is not too much weathering and it is balanced over the whole kit it should be fine. If you have a bunch of heavy weathering in one spot, it wont look too good and might get kicked back.
-
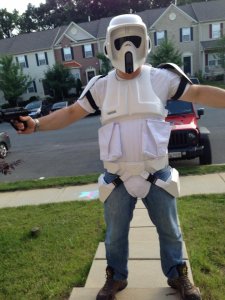
Thighs could use some tailoring on the undersuit, they are a bit baggy Helmet needs holes cut for the "ears". And the flap for the cod cover is not visible. Might be due to the baggy pants. Everything else looks pretty good.
-
I have an SC bucket and used the supplied method witht he tabs to secure the visor. I felt it was sufficient and worked pretty well. No glue and it is removeable if needed.
-
Thank you for commenting. I was really hoping someone would find this helpful. It is nice to have the do's and dont's in the same thread and i thank those who have posted images and commented on them.
-
They sell Thimbles pretty cheap and can help with that a little.
-
I have a solid resin blaster and i used Jo annes Marine vinyl. I put an elastic band with velcro to wrap around my calf at the top of the boot behind the holster and it works pretty well. I have not trooped it other than walking around my neighborhood, but no issues. my boot is a size 9 and i have sc holster for what its worth.
-
I should not have been so vague in my comment. I meant that there are a few issues with the pic. The white is all washed out, there appears to be a gap between the top of the belt and the bottom of bund, and the thigh boxes look too far forward to me(which leads me to the reason behind this thread). Looking at that archive picture, if used as our reference, our thigh boxes should nearly be touching the cod cover. I have seen a lot of comments about thigh boxes needing to be adjusted further back, not forward like this pic would suggest. The pics you posted are more of what i was hoping for. I think this could be useful to myself and to other scouts to get a better idea of where they should be. I think the requirement is more than between the front and the back, between the belt and knees. Forgive the exaggeration, but you kinda get my point i hope, that there is a grey area and an ideal area. if anyone has the time to post some good better best pics together, it could potentially be a great help.
-
Thats not a very good picture. From the comments i have been reading, if someone posts a pic looking like this, they will be told the thigh boxes need to be more on their side. It would be nice, for example, to have a pic of right and wrong next to each other in a sticky or something that can be referenced.
-
It seems like everyone has trouble with this. Is there someone out there that could put together a series of do's and dont's. Maybe even a pic or 2 from the wearers POV looking down. I know that different people will have differing results but I think there would be value if someone had the time. Maybe a right vs wrong series of images. I know i have been using a mirror and every time i use it, i am constantly making tiny adjustments.
-
Chex, you mentioned the snout color and pouches. I think this pic shows the snout is the same color as bolt covers and the pouches are swapped and have filling in them. I will be getting some foam or something to put in them to get a better shape and still hold my speaker. Also is a pic of the thigh strap and mud flap
-
Blholmes, I commented on your post on the Garrison Forums as well. You should try to come out to an event that myself or Grubzilla, or one of our other scouts and check out our armor. I did my boots myself and i would be happy to help with boots and point you in the right direction if you like my gloves.
-
I agree with both. I have yet to troop in mine but i have worn it around my neighborhood. I don't have another set of armor to compare it to but my purchase and build were enjoyable experiences. Great communication and value. I was comfortable paying the price for the kit with the helmet. The package is quite complete. I needed some e6000 and some additional velcro and webbing but i was trying to get closer to accurate. I also needed some rivets. I think i spent more time sewing velcro to elastic than anything else on the kit. having a cheap sewing machine will be very helpful.
-
Thank you for the response Cucblack. Other than the pouches being swapped sides, is there anything that MUST be changed for approval? I am my Garrisons GML so I cannot approve my own kit. I seek the approval of the Detachment Leader so i can have my CO approve me. I remove my personal bias from my costumes. I have seen comments about Lancer but I am not going Lancer. If more pics are needed, i can take better "approval" quality pics. These were just a quick throw it all on and see how it feels and snap some pics type thing.