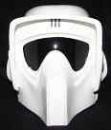
luckyxero Posted November 12, 2010 Share Posted November 12, 2010 Here's my build for the KST armor. It's a repost from the New England Garrison's board, so sorry if I explain the obvious. ======================== Finally after having a Mike Pghfett BARC helmet for about 4 years and having the Mr. Bungle armor since March, I actually cleaned up my workshop (a wreck since St Patty's), opened the box from Mr Bungle and started to get this armor built. I'm also slowly collecting the soft armor and trying to determine if I can build the cbund boxes. Here's the raw Mike Pghfett helmet. It's actually 2 pieces, a resin helmet and a fiberglass visor. Here's what the Mr. Bungle armor contains: chest & back with tank pre-built, shoulder bells, biceps, elbow, forearms, rubber belt, cod, thigh pouches, knees, shins, and toes. On the top of the pic, you'll see a whole bunch of greeblies that come with it - knee straps, belt loop, bicep greebly, shin buckles, and some other random pieces that need a final destination. I worked on the helmet today - trimmed the loose parts and flash from the mold, sanded it, and cut out the eye shield. It should be almost ready for painting. I also trimmed the shins and started to assemble them, but then realized that those are usually the hardest part to get right, so I stopped and started to trim the other parts. More to come. Quote Link to comment Share on other sites More sharing options...
Fettski Posted November 12, 2010 Share Posted November 12, 2010 Great to see another KST in the works. Quote Link to comment Share on other sites More sharing options...
mrbungle Posted November 12, 2010 Share Posted November 12, 2010 about dang time!!!!!!!! Quote Link to comment Share on other sites More sharing options...
luckyxero Posted November 13, 2010 Author Share Posted November 13, 2010 about dang time!!!!!!!! Yeah, I was in a rush at the beginning of the year to get it in the St Patty's day parade, but they cancelled it this year. This WILL be done by the end of the year, if not by thanksgiving!!!!!! (except maybe the grey suede on the pants) . Quote Link to comment Share on other sites More sharing options...
Peaches Posted November 13, 2010 Share Posted November 13, 2010 YAY one in the NEG!!! Quote Link to comment Share on other sites More sharing options...
darren1970 Posted November 13, 2010 Share Posted November 13, 2010 Welcome from one budding KST to another Quote Link to comment Share on other sites More sharing options...
luckyxero Posted November 13, 2010 Author Share Posted November 13, 2010 Got some more last night. Not too many pics because there's not much to show. I trimmed the biceps and glued them together. Since the armor is HIPS, I used the same RED can of plastic welder and a "For Sale" sign (really a handicap parking sign) that I got at HD. While each connection was curing, I cleaned up all of the edges of the armor and sanded all of the surfaces of the armor. Everything should be ready for painting, just in time for the 60 degree weekend (I hope). Here is the biceps. They weren't perfectly round when I connected them, so I heated them with a heat gun to round them out. Kept the clamps on so I didn't stress out the connection of the two sides of the bicep. Here's how they look after they were glued and shaped. I'm going to use the acetone and HIPS homemade putty to hide the edge. It's brewing now. These are the sanded and wiped down parts. I'm going to try to paint them silver first, then tan, then add the 3 camouflage colors. Here's what I did today. Painted the back of the armor and the inside of the helmet black today, and the first coat of silver, of which 90 percent will be covered up. Helmet looks cool in silver though. Quote Link to comment Share on other sites More sharing options...
mrbungle Posted November 14, 2010 Share Posted November 14, 2010 looking good. keep it up. Quote Link to comment Share on other sites More sharing options...
Lonescout Posted November 14, 2010 Share Posted November 14, 2010 Looking great! Quote Link to comment Share on other sites More sharing options...
Fettski Posted November 15, 2010 Share Posted November 15, 2010 Making me jealous that I dont have my armor to work on as well. My goal is to be a pathfinder by may 4th 2011. Quote Link to comment Share on other sites More sharing options...
luckyxero Posted November 29, 2010 Author Share Posted November 29, 2010 Again - This is posted originally on the New England forum, but wanted to post here too. Sorry if it's common sense to some people - just look at the pix. Got some more work done this long weekend. First up. Here are my updates to the soft armor. These are British Desert BDUs. I added removed the lower side pants pockets and used the material to add front thigh pockets. I had to make them smaller than what people are typically doing bc I'm shorter, so the perspective would be better. The shirt picture is stock. I've dyed them dark brown (for 30 minutes) and black (for an additional 15 minutes) using RIT dye. They are drying now in my garage, but if they don't hurry up and finish, I might go to a local laundry mat. Next up - Painted all the armor in its base color. There's a specific color coding that Mr. Bungle found on BS.net that people are using to paint the armor base. Here's what the helmet looks like with the black on the snout painted in. Boots - I found some boots at Walmart with a tan sole and a high arch. The problem is that they are leather suede and not white. So I taped them up and painted them in white primer. Now these shoes have a non-stick sole, so I couldn't tape them up to mask them. So I actually had to tape them on the suede part of the shoe and touch them up. This part is going to be weathered anyway, so the discoloration between white paints will not show too much. The top of the boot is going to be hidden by the calf armor. Original boots First round of painting Finished unweathered boots in white. Lastly for today - Here's a pic of the cod piece. It is painted the base color with black on the back. But Mr. Bungle was kind enough to include the cloth piece that covers it (giving it texture). It is simply gooped to the plastic and held overnight. I actually have alot more done, but haven't taken pics yet. The helmet is camo'd and basically all but weathered. All of the armor is painted, all but weathered. (I hate painting camo.) The cummerbund is sewed, minus the belly belt. The rubber belt is painted. Armor straps applied to the elbows and knees. Still need to start the cummerbund boxes. grrrrr.... thinking of doing these in cloth covered foam to lighten the load. Here's what my helmet looks like. Still unweathered though. Quote Link to comment Share on other sites More sharing options...
mrbungle Posted November 29, 2010 Share Posted November 29, 2010 looking good. Quote Link to comment Share on other sites More sharing options...
Fettski Posted November 29, 2010 Share Posted November 29, 2010 pants pockets look like they are flat. I'm not sure if there is a requirement for them to have any depth to them or not. other than that great progress. Quote Link to comment Share on other sites More sharing options...
darren1970 Posted November 29, 2010 Share Posted November 29, 2010 Cool pic of the helmet. Keep up the good work trooper Quote Link to comment Share on other sites More sharing options...
luckyxero Posted November 30, 2010 Author Share Posted November 30, 2010 pants pockets look like they are flat. Yeah, they are flat. I tried making the boxy type, but failed and cut too much of the material. So I decided to go with flat. I didn't see it as a requirement. But if it is, I'll have to modify or get new pants. (or get someone that knows what he/she is doing and pay that person). I hate sewing these pockets. Had to do it on my GM too. Quote Link to comment Share on other sites More sharing options...
luckyxero Posted November 30, 2010 Author Share Posted November 30, 2010 More updates....... The shirt and pants finally dried.....They are pretty close in color despite them starting off in different colors. Sorry for the poor picture quality. Here's the bain of my existence. The damn cummerbund. It is a piece of gray material, with straps sewed on them in vertical lines and one horizontal belt going 2/3 of the way down with 2 velcro (black) pieces representing belt loops. The vertical straps fold over the top and bottom and are sewed 1/3 and 2/3 of the way down. Sounds easy, right? NOT!!!!! I had to pull stitches from this sucker about 6-7 times because the straps weren't straight. This is the best I could do, but I did make sure the 3 center straps were the straightest because those are what show the most. The others are really hidden by the cummberbund boxes. The reference pics show uneven lines too so it's not totally inaccurate. The straps are 1.5 inches with 1 inch spacing. Straps from strapworks. Once I finish the boxes, I will add velcro to the cummberbund to attach them. Here is the painted armor-unweathered. I didn't want to over do it on the camo, so once the armor is together and I can try it on, I'll most likely be tweaking. I mostly used sponge brushes to paint on each color (as specified by Mr. Bungle on his tutorial). I liked the way Mr. Bungle did his armor - smaller blobs with thin pointy lines extending, but I also liked some of the screen caps which had larger blobs and faded splashes. So I'm trying to combine the looks using larger pointy blobs with thin lines and splashes (sorry for the primative description, but I think you get it.) The brown and green "splash marks will be part of the weathering, using a black, brown and green spray bottles. See the 2 empty spray bottles next to the windex and the black windex. Here are the knees and the elbows/forearms. The kit came with rubber straps for the knees, but goop wouldn't stick to the straps. So I "old school'd" it and riveted them. I still have to add either padding or elastic straps to the knees to make sure they stay in place. The elbows/forearms have the rubber from those bungy cords on them. On these the goop stuck, so no rivets on them. That's it for now. Still gotta do: Belt bicep greeblies calve straps and greeblies gloves (grrrrr.....) and attach everything together. Quote Link to comment Share on other sites More sharing options...
Jimah Posted November 30, 2010 Share Posted November 30, 2010 Wow lookin' mighty fine... and thanks for the in-depth WIP thread, will definately refer to this when I get my KST rolling! Quote Link to comment Share on other sites More sharing options...
LENOX61 Posted November 30, 2010 Share Posted November 30, 2010 Lookin' good. Quote Link to comment Share on other sites More sharing options...
fett-bobafett Posted November 30, 2010 Share Posted November 30, 2010 Looks good! And those are the same boots I picked! Please tell me where you got the materials for the lens in the helmet. Thanks, Colleen Quote Link to comment Share on other sites More sharing options...
luckyxero Posted December 1, 2010 Author Share Posted December 1, 2010 Looks good! And those are the same boots I picked! Please tell me where you got the materials for the lens in the helmet. Thanks, Colleen I got it on ebay. Search "football visor green". It's actually just a thin piece of reflective material. I supported it with a clear welding visor. ebay link: green visor This is what I cut up for the clear material. It was lying around so I sacrificed it. link Quote Link to comment Share on other sites More sharing options...
luckyxero Posted December 1, 2010 Author Share Posted December 1, 2010 OK - I was looking at some more of the reference pix and decided that i needed to "lighten" up some of my camo colors. That is, I didn't really see any solid paint on the reference pics. Most of them looked sanded down or sponged on - letting some of the original base color come through. So I ended up sanding down the camo on my armor to eliminate the solid paint using 300 grit and 600 grit sand paper. I also weathered it using the typical windex and acrylic paint. Here I wanted to add those mud splashes on the armor, so windex and coffee colored paint was the color of choice. I put about 2 squeezes of paint in spray bottle and added about 20-30 sprays of windex. (accurate right?). Here's two a pre and post sand job. You'll see some vertical lines, which look like sanding marks (sandpaper scrapping to hard). But these are actually the paint brush strokes on the base armor. I painted this in about 45-50 degree weather, so the paint probably didn't have enough time to settle before it dried. The mud splashes are kind of washed out with the flash, but it does look like I was riding my bike in the rain in armor. Here's the chest piece with the mud still wet. Here's the back piece & tank. Here's the helmet Quote Link to comment Share on other sites More sharing options...
luckyxero Posted March 28, 2011 Author Share Posted March 28, 2011 So i took a break doing this to work on a Death Watch grunt. Cummerbund Didn't do anything with the paint yet, but I did get the cummerbund all velcro'd up and made the boxes. Here's what it looks like half on & half off. Gloves I also got my first glove adventure complete. I had Calvin Klein gloves (on sale) and converted them into the kashyyyk gloves. They are basic black gloves, but needed 3 gray pads on them which I made out of marine vinyl. I ripped the liner out of the gloves, ripped up the side seams and sewed the vinyl on. The vinyl was preformed by folding and hot gluing in the center so I could sew the edge without interference of the glue. The brown part of the gloves are a separate piece with a greeblie from acrilyhan. It's also marine vinyl with a piece of velcro on the edge to attach to the glove. blah blah blah....look at the pics. Quote Link to comment Share on other sites More sharing options...
Grumpy Posted April 16, 2011 Share Posted April 16, 2011 Based on looking at the main 501st site, am I to say that congratulations are in order? Did we add one more Kashyyyk Trooper to the roster? Quote Link to comment Share on other sites More sharing options...

Recommended Posts
Join the conversation
You can post now and register later. If you have an account, sign in now to post with your account.