Florian Posted March 9, 2024 Posted March 9, 2024 Hi all, I started last year in April for my research, bought the hard-parts kit from RS-Props and the softparts from keeptrooping. Everything was delivered in July and I was keen to start. But starting with the helmet was not the best idea. I should have listened to my local 501st contacts 🙁 It took me some time to get motivated again and in parallel I had to finish my BobaFett and my Son's Kylo Ren costume. After that I started with the rest of the armor and that went really well. Until today biceps, forearm, knees and holster are finished. Thermal detonator will be done during the next days, I only had to wait for the clips to arrive. After that tank, back, chest and belt will be the last parts to put together. All parts are already cut out and sanded, I just need to glue/bolt them together. The youtube videos from RS-Props are helping a lot! In parallel I will order a finished helmet from RS-Props to be on the safe side. During the last weeks I made huge progress on all the parts, and I don't want to destroy my motivation in another attempt building the helmet. Also the blaster is still missing. Found one on Etsy. Maybe I will order this one. In the beginning I set myself under pressure and wanted to finish everything until a specific date. But only after I ignored this date, I began to enjoy the process of building. What motivated me the most was the first part that was completely finished and I was able to put it on. I am not a pro builder, for sure but maybe my findings will help somebody on the way: Search for videos on how to build the armor – watch them repeatedly See what tools the guys in the videos are using, some of them are very useful Dremel, glue, pliers for example Check your parts if you have all of them, go through the videos and CRL, write down everything you need to buy – and the buy it! (I know it sounds obvious but I did it different and sponsored some companies more than I wanted to 😉 ) Check out the pictures of the CRL Download the pictures on your smartphone to be able to check them quick Start with some easy parts – putting a finished part on is a huge motivator Take your time – to much pressure kills motivation During the build, it can help seeing a finished costume in real. If there are events or conventions in your surrounding, go there. Take pictures. Ask questions. Quote
Florian Posted March 9, 2024 Author Posted March 9, 2024 While I was writing my first post, the clips for the detonator arrived. Today I had some time to finish also this part. Quote
Aradun Posted March 9, 2024 Posted March 9, 2024 Slow and steady wins the race. Looks like things are coming together for you. If you have any questions let us know. 1 Quote
Florian Posted May 26, 2024 Author Posted May 26, 2024 Phew, a long time since I did my last post. A lot happened since then. My armor is finished and I waited for the pre-built helmet from RS to arrive. But since I had nothing to build, I gave the helmet kit a second chance while waiting. I'm still waiting for the delivery and I'm almost done, building the bucket 😄 Just need to figure out how to mount the head strap inside the helmet and how to glue the lens. (I tried to add some pics, but either they are to large or I am not able to add them via URL 🤔) Quote
Retrofire Posted May 26, 2024 Posted May 26, 2024 Hi Florian! RS has a great tutorial on their helmet that might help you with your helmet kit. Give this playlist a review and hopefully it'll help you while you wait for your new helmet to come in. Looking forward to seeing you approved and out there trooping! Quote
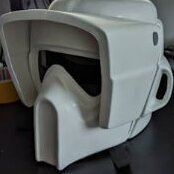
Aradun Posted May 27, 2024 Posted May 27, 2024 For the chin strap. Mine starts at the top of the V runs down the inside of the bucket (glued) and exits a slot at the bottom, then up the out side of the bucket (no glue) and back through a slot at the top, as pictured below.Here’s a shot of the inside of the face plate. Lens attached via hot glue at the outer edges and then at bridge of the nose, top and bottom.You want a little gap for venting heat so don’t mount the entire lens flush or seal the entire lens with glue. 1 Quote
Florian Posted May 27, 2024 Author Posted May 27, 2024 Thanks for your replys. Peter: I watched the RS Videos a few times. Unfortunately they are not showing anything about the inside. I read that they are creating new videos. Maybe they show it then. Corey: I tried with photos from my google drive but the URL turned red when I clicked on "Insert into post" Dennis: Thank you for the hint on the lens regarding venting. I see you also have the "sideburns" made of hook and loop 😉 1 Quote
TreeHuggerMatt Posted May 27, 2024 Posted May 27, 2024 RS are redoing all their scout assembly videos. This is the first new one covering their bucket 1 Quote
Aradun Posted May 27, 2024 Posted May 27, 2024 IMO, the easiest way to insert photos into your posts is to use the free Tapatalk app for your phone. You’ll be able to insert photos directly from your phone at a decent resolution. Others use an image hosting site like Imgur. 2 Quote
Florian Posted June 3, 2024 Author Posted June 3, 2024 Thank you all for your help. I just recieved the approval. TB-13202 is reporting for duty Quote
TreeHuggerMatt Posted June 3, 2024 Posted June 3, 2024 11 hours ago, Florian said: Thank you all for your help. I just recieved the approval. TB-13202 is reporting for duty Congrats !! 1 Quote
Aradun Posted June 3, 2024 Posted June 3, 2024 Congratulations Scout! Welcome to the Pathfinders! 1 Quote
OnkelPaschulke Posted June 4, 2024 Posted June 4, 2024 Congrats and welcome to the Pathfinders! 1 Quote

Recommended Posts
Join the conversation
You can post now and register later. If you have an account, sign in now to post with your account.