Sithping Posted February 5 Share Posted February 5 So...here we go...i received my Imperial Surplus V2 Shoretrooper Kit back in November, and slowly getting ready to start assembling parts. I have sourced parts and materials from many different vendors to hopefully achieve an authentic build. Helmet - Anovos Shirt & Neckseal - Keep Trooping Breeches - Keep Trooping Boots - Orca Bay Gloves - Endor Finders Armour - Imperial Surplus Hip plates - Mr Paul 2 Quote Link to comment Share on other sites More sharing options...
Sithping Posted February 5 Author Share Posted February 5 Quote Link to comment Share on other sites More sharing options...
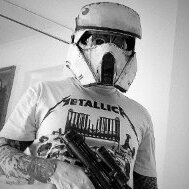
Sithping Posted February 5 Author Share Posted February 5 I've removed the anovos factory lens and replaced with new rounded accurate lens. Quote Link to comment Share on other sites More sharing options...
Sithping Posted February 5 Author Share Posted February 5 Mr Paul's hips, talon sling, surefire flashlight and accurate chin cup. 1 Quote Link to comment Share on other sites More sharing options...
Sithping Posted February 5 Author Share Posted February 5 Trimmed back and chest pieces and acquired paints. Quote Link to comment Share on other sites More sharing options...
Sithping Posted February 5 Author Share Posted February 5 So...that's where I'm at the moment, hopefully continue with this at the weekend concentrating on the forearms. Most likely any painting will have to wait until next month as the weather is bantha poodoo here this time of year. 3 Quote Link to comment Share on other sites More sharing options...
BikerScout007 Posted February 5 Share Posted February 5 3 hours ago, Sithping said: So...that's where I'm at the moment, hopefully continue with this at the weekend concentrating on the forearms. Most likely any painting will have to wait until next month as the weather is bantha poodoo here this time of year. Hey Paul! @KOtrooper and @Minimo are our resident Shoretrooper experts, so feel free to reach out with any questions. Also, your build is pretty similar to mine, so here are my threads to the extent they help: 1 Quote Link to comment Share on other sites More sharing options...
Sithping Posted February 5 Author Share Posted February 5 2 minutes ago, BikerScout007 said: Hey Paul! @KOtrooper and @Minimo are our resident Shoretrooper experts, so feel free to reach out with any questions. Also, your build is pretty similar to mine, so here are my threads to the extent they help: This is awesome, Mickey! I've been using your Vanguard thread a lot for reference and the video you produced kitting up for the Legion YouTube has been most helpful.... Congratulations on your re election as DL💯 1 Quote Link to comment Share on other sites More sharing options...
KOtrooper Posted February 5 Share Posted February 5 You're off to a great start. Smart decision to wait for better painting weather. Better to wait and get it done right than to rush and waste time sanding and repainting anyways. Looking at your group shot of paints and weathering cans, will you be adding a can of dark brown for the base layer?Sent from my Pixel 7a using Tapatalk 1 Quote Link to comment Share on other sites More sharing options...
Sithping Posted February 5 Author Share Posted February 5 20 minutes ago, KOtrooper said: You're off to a great start. Smart decision to wait for better painting weather. Better to wait and get it done right than to rush and waste time sanding and repainting anyways. Looking at your group shot of paints and weathering cans, will you be adding a can of dark brown for the base layer? Sent from my Pixel 7a using Tapatalk Hi Melody, thanks for checking my wip. Yip I have a few paints still to arrive, grey primer, dark brown and shock yellow? Could I omit the grey primer and use the dark brown by itself as a key before the Sahara? I can see the build lasting until the weather is better, but I may be tempted to try paint some smaller parts like the hand guards and belt parts. This will give me an idea of how the paint works before tackling the bigger pieces. 1 Quote Link to comment Share on other sites More sharing options...
Minimo Posted February 5 Share Posted February 5 Welcome to the beach Paul, some excellent parts you have there!! Looking fwd to seeing your progression!! 1 Quote Link to comment Share on other sites More sharing options...
Sithping Posted February 5 Author Share Posted February 5 7 minutes ago, Minimo said: Welcome to the beach Paul, some excellent parts you have there!! Looking fwd to seeing your progression!! Cheers Joe! Like my home detachment FISD I can see my fellow Troopers here at Pathfinders are just as welcoming and their wealth of knowledge on these Imperial armour is incredible. 🙏 Quote Link to comment Share on other sites More sharing options...
TreeHuggerMatt Posted February 5 Share Posted February 5 Looks great so far. Maybe ya can help with my scout setup lol 1 Quote Link to comment Share on other sites More sharing options...
KOtrooper Posted February 6 Share Posted February 6 Yeah, I don't think you need the primer. The dark brown I used was Rust-Oleum and was fine for plastics. Just ensure that there is plenty of cure time between the enamel and acrylic paint. I'd spray a scrap piece brown along side the rest of the kit. Then, spray the beige on the scrap piece first to check you won't get a bad reaction between the two types of paints. Sent from my Pixel 7a using Tapatalk 2 Quote Link to comment Share on other sites More sharing options...
Sithping Posted March 5 Author Share Posted March 5 So just to update my WIP I made a start on the forearms few weeks ago adding the details and cover strips. Wondering, I don't see any mention in crl for basic or L2 regarding fully closed armour or fix one side and leave other for velcro closure? Which would be correct method for L2 on forearms? Velcro or fully fixed with adhesive? Quote Link to comment Share on other sites More sharing options...
BikerScout007 Posted March 5 Share Posted March 5 The method for closing isn't as important as whether it looks correct when viewed from the outside! Quote Link to comment Share on other sites More sharing options...
Sithping Posted March 5 Author Share Posted March 5 19 minutes ago, BikerScout007 said: The method for closing isn't as important as whether it looks correct when viewed from the outside! Noted thanks Sir! 1 Quote Link to comment Share on other sites More sharing options...
Sithping Posted March 8 Author Share Posted March 8 Got myself a half bust mannequin to assist me with the build. 1 Quote Link to comment Share on other sites More sharing options...
mgabriel74 Posted March 8 Share Posted March 8 Uffff... Nice Display and setup... 1 Quote Link to comment Share on other sites More sharing options...
KOtrooper Posted March 11 Share Posted March 11 On 3/5/2024 at 10:14 AM, Sithping said: Wondering, I don't see any mention in crl for basic or L2 regarding fully closed armour or fix one side and leave other for velcro closure? Which would be correct method for L2 on forearms? Velcro or fully fixed with adhesive? Unless it is spelled out in the CRL, if we can't see it - we can't comment on it. 1 Quote Link to comment Share on other sites More sharing options...

Recommended Posts
Join the conversation
You can post now and register later. If you have an account, sign in now to post with your account.