Hiker Scout Posted January 6, 2022 Share Posted January 6, 2022 I have been approved for a few month with my ROTJ scout trooper. I believe I have all the specs appropriate for Lancer approval and would like to submit. Not able to post all the pics on a thread due to size limits. What photo sharing site is preferred? Is there a free one? Link to comment Share on other sites More sharing options...
Chopper Posted January 6, 2022 Share Posted January 6, 2022 Hi Chris, you will need to use a hosting site such as imgur, flickr, or dropbox, which are free, to host your application images. Please also check this post for other requirements regarding the application process: 1 1 Link to comment Share on other sites More sharing options...
Retrofire Posted February 24, 2022 Share Posted February 24, 2022 Hi Chris. Hey I wanted to reach out and see if you need any clarification on the app process or if you need anything. We're always here for you if you should need anything just let us know. Link to comment Share on other sites More sharing options...
Hiker Scout Posted February 24, 2022 Author Share Posted February 24, 2022 30 minutes ago, Retrofire said: Hi Chris. Hey I wanted to reach out and see if you need any clarification on the app process or if you need anything. We're always here for you if you should need anything just let us know. No I understand how to apply. Been really bad weather and super busy since I posted to get my kit on and outside to get some good quality photos. Will get some on here soon for yall soon I hope. 1 Link to comment Share on other sites More sharing options...
Retrofire Posted February 24, 2022 Share Posted February 24, 2022 Ok cool. I just wanted to touch base with you to make sure you didn’t need anything. Life and family always comes first my friend! We’ll be here when you’re ready so take your time. 2 Link to comment Share on other sites More sharing options...
Chopper Posted June 14, 2022 Share Posted June 14, 2022 Chris, thank you but you will need more than just the standard GML photos for a Level 2 application. Check this post: http://forum.501stpathfinders.com/index.php?/topic/20150-lancer-deployment-request-rev-2022/ "4. Take pictures of all your gear. Using a ruler in the image is a great help to the team. Make sure the lighting is good." Check this application as an example: http://forum.501stpathfinders.com/index.php?/topic/22040-tb-92576-lancer-deployment-request/ 1 Link to comment Share on other sites More sharing options...
Hiker Scout Posted June 15, 2022 Author Share Posted June 15, 2022 Ok the long awaited photos. I had some issues with Photobucket but think it shall work now. Here we go again! Armor and helmet-studio creations Gloves-wampa wear Flightsuit, flak vest, cod piece, cummerbund, and boots are all home made. Front fully suited up. Front close up detail: Back: Back close up detail: Left side: Left side arms up: Right side: Right side arms up: Helmet greeblie: Helmet 3M grey bold and ear cut out: Link to comment Share on other sites More sharing options...
Hiker Scout Posted June 15, 2022 Author Share Posted June 15, 2022 Now for all the measurement photos!! Flight suit suede riding patches and 2" strap around leg: Flak jacket with 1" ribs Cummerbund with 1" ribs. Boxes are 6" high x 5" wide x 2" deep Shoulder strap with 1" webbing and shoulder bell held on by black zip tie. Shoulder bell strap with 1/2" strap Upper armor T bit detail: Upper armor 2" strap Forearm armor 1" strap Parachute buckle with 1.5" webbing looped behind: Thermal detonator detail: Knee armor with rivet: Knee armor with 3/4" lower strap, and 1/2" upper strap secured with rivet: Boot details: slots cut into sole and dog bone detail Boots 1" back velcro. Boot holster 5 cut slots and riveted to boot: Link to comment Share on other sites More sharing options...
MrPoopie Posted June 15, 2022 Share Posted June 15, 2022 Can you please provide the following detail photos: Back of vest velcro with measurement Chest/Back side webbing with measurement Tank Topper detail photo with measurement of rivet Detail of closure on cummerbund with measurement Measurement of codpiece strap Measurement of dropbox strapping Measurement of rear nylon belt strapping 1 1 Link to comment Share on other sites More sharing options...
Hiker Scout Posted June 16, 2022 Author Share Posted June 16, 2022 Back of flak vest/ Cod piece with 2" velcro, and 2" codpiece strap: Chest/back side webbing 1.5": Tank topper detail: Back of cummerbund with 2" velcro closure: Rear belt nylon strap measuring 2" Drop box strap webbing 1.5" Link to comment Share on other sites More sharing options...
MrPoopie Posted June 16, 2022 Share Posted June 16, 2022 Thank you for the extra photos. We'll continue our initial review. 1 Link to comment Share on other sites More sharing options...
MrPoopie Posted June 18, 2022 Share Posted June 18, 2022 Can you submit a photo of your balaclava and blaster. No need for measurements, just need to see that they exists. The blaster does need a few different angles and to make sure that it fits in your holster. Link to comment Share on other sites More sharing options...
Hiker Scout Posted June 18, 2022 Author Share Posted June 18, 2022 5 hours ago, MrPoopie said: Can you submit a photo of your balaclava and blaster. No need for measurements, just need to see that they exists. The blaster does need a few different angles and to make sure that it fits in your holster. I feel so embarrassed I sent yall pics without my balaclava on!! It was so hot last week when I took pictures I forgot to put it on. Sorry guys. Here is my balaclava. Is the blaster required for approval? Link to comment Share on other sites More sharing options...
MrPoopie Posted June 19, 2022 Share Posted June 19, 2022 On 6/18/2022 at 1:02 PM, ChrisA said: Is the blaster required for approval? Yessir. 1 Link to comment Share on other sites More sharing options...
Hiker Scout Posted June 20, 2022 Author Share Posted June 20, 2022 4 hours ago, MrPoopie said: Yessir. Sorry I must have been confused. The blaster is listed under optional equipment. It has level 2 specs but never says that it's required for Lancer on the CRL. I do have a blaster. I can take pictures of but unsure if meets level 2 specs. Link to comment Share on other sites More sharing options...
Chopper Posted June 20, 2022 Share Posted June 20, 2022 Chris, as a Legion-wide policy, weapons are optional only for Level 1 clearance. They are required for any Level 2 approval, be it Lancer, Vanguard, CHIPs, etc. If you have a blaster, please post up the photos and we'll take a look. 1 Link to comment Share on other sites More sharing options...
Hiker Scout Posted June 20, 2022 Author Share Posted June 20, 2022 22 minutes ago, Chopper said: Chris, as a Legion-wide policy, weapons are optional only for Level 1 clearance. They are required for any Level 2 approval, be it Lancer, Vanguard, CHIPs, etc. If you have a blaster, please post up the photos and we'll take a look. Let me repaint it this week and I'll post some pics Link to comment Share on other sites More sharing options...
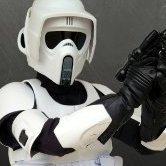
Hiker Scout Posted June 21, 2022 Author Share Posted June 21, 2022 Here is the blaster I have. Link to comment Share on other sites More sharing options...
MrPoopie Posted June 21, 2022 Share Posted June 21, 2022 13 hours ago, ChrisA said: Here is the blaster I have. The fit in the holster looks good. Can we see the other angles of the blaster, in particular the front as well as the back of the scope. There are required details for those areas. 2 Link to comment Share on other sites More sharing options...
Hiker Scout Posted June 21, 2022 Author Share Posted June 21, 2022 I will check the crl and take appropriate pics Link to comment Share on other sites More sharing options...
Hiker Scout Posted June 21, 2022 Author Share Posted June 21, 2022 Blaster pics. Scope has stepped design. Scope has no stickers of cross hairs. Link to comment Share on other sites More sharing options...
MrPoopie Posted June 23, 2022 Share Posted June 23, 2022 Thanks for your patience and additional photos. Our initial review and findings are below. Please don't hesitate to ask for details or guidance. Overall: Your armor fits fairly well but some adjustments with armor spacing. The main areas to work on are the bund and shoulders. Flight Suit: Butt flap is a bit too long, remove 1” from bottom, and a bit too wide, remove 1.5” per side. Slightly loose thigh straps, need to be brought in just a bit to snug them up. Visible pocket on right leg needs to be removed. Shoulder Armor: Sitting a bit too far back, but that's because of the shoulder bridge attachment. You need to trim maybe 1/2" off the front bridge, and 1/2" off the back, which will make the shoulder bells and chest armor sit a bit further forward. You should overlap and tape the front and back parts first to get a good fit before trimming. Shoulders bottoms may need to be trimmed just slightly but we’ll need to see when the shoulders and chest are adjusted properly. Bicep Armor: Bring up 3/4" - 1" Forearm Armor: Move armor forward to the 10 and 2 o'clock positions Gloves: Need to remove clips Cummerbund: Bund is upside down. Closure at the back should be right over left. Need to remove secondary stitching line between Velcro. The only stitching that should be present are on the outer edges of the 2” Velcro closure. Chest Armor: See notes above for shoulders Back Armor: See notes above for shoulders Belt: Round the squared edges on the back corners of the belt where it joins the webbing. Center the buckles on the back straps. Holster: Corners should be more rounded. Cutouts are too thick; the gap should be thinner. Blaster: You will need to use some plastic cutouts or something similar to close off the hole in the front of the scope as well as the hole in the interior of the rear of the scope. Link to comment Share on other sites More sharing options...
Hiker Scout Posted June 23, 2022 Author Share Posted June 23, 2022 Thanks for the feedback. Most looks to be some subtle and relatively easy fixes ( flight suit, belt, biceps, and forearms ), Not sure how my cummerbund got flipped. I guess after I got approved I did add velcro for better position of boxes. I guess if flipped when i sewed them on. Not too hard a fix though. A few questions: Gloves - do the clips need to be removed or the little leather tag that holds the clips as well. Blaster - so the scope needs to be appear "filled" and not hollow like a real scope with a flat front end even with the edges of scope? Holster - the slits are too big? So need to be filled and recut smaller. Shoulders - I believe i need to cut off 1/2" from each side of bridge. I will get to this last after the other adjustments are made. SO will post pics of taped up for review prior to making any snips. Link to comment Share on other sites More sharing options...
MrPoopie Posted June 23, 2022 Share Posted June 23, 2022 58 minutes ago, ChrisA said: Gloves - do the clips need to be removed or the little leather tag that holds the clips as well. Blaster - so the scope needs to be appear "filled" and not hollow like a real scope with a flat front end even with the edges of scope? Holster - the slits are too big? So need to be filled and recut smaller. Shoulders - I believe i need to cut off 1/2" from each side of bridge. I will get to this last after the other adjustments are made. SO will post pics of taped up for review prior to making any snips. Gloves: The clip as well as the leather attachment tab need to be removed. Blaster: Correct, filled. Use the "auction Blaster" (Scoutopedia) as a reference, NOT the "Hero Blaster" Holster: Yes, you'll need to fill the cuts that you already made with ABS paste or something similar and then cut them out again. The best reference is that they should only be about as thick as a dremel cutting wheel. Shoulder: Good call, better to make sure than have to rebuild the shoulders straps. 1 2 Link to comment Share on other sites More sharing options...
Hiker Scout Posted February 1, 2023 Author Share Posted February 1, 2023 Ok it's been a while. I have some updates. These are not my final pictures. Just showing the updates and wanting info on the shoulder/chest positioning. Flightsuit- buttflap adjusted. Right side pocket removed and straps tightened. Gloves- clips removed. Will also remove the inner yellow tags for final. Cummerbund- fixed right over left and removed center stitching on velcro. Belt - back edges rounded. Buckles centers on webbing. Forearm/bicep armor position to be fixed on final fitting. Boots- holster was filled and reslotted. Pic in final fitting. Blaster - scope end capped and Inside viewer closed. Pics of chest/shoulder. I have them overlapped as suggested. Does this look right to cut and fix? Link to comment Share on other sites More sharing options...

Recommended Posts