Philscratch Posted July 11, 2020 Share Posted July 11, 2020 Hi everyone, so my armour arrived today from RWA Creations, upon opening the box I was met with excitement and dread, excited because of how much I wish to achieve Lancer with 501st Pathfinders and dread because I am completely new to this and don't know where to start!!! 1 Quote Link to comment Share on other sites More sharing options...
Chopper Posted July 11, 2020 Share Posted July 11, 2020 Hey Phil. Welcome to the Pathfinders detachment. There are a few build threads that you can check to help you on your way: Strider's Lancer build tutorial: http://forum.501stpathfinders.com/index.php?/topic/17305-lancer-build-tutorial/ Pandatrooper's Studio Creations build (this one is somewhat old, but it covers most of what you need): http://forum.501stpathfinders.com/index.php?/topic/9781-pandatroopers-sc-biker-scout-build/&tab=comments#comment-81496 When in doubt, check the CRL and if you're not sure, ask an armorer! https://databank.501st.com/databank/Costuming:TB_Scout_trooper Again, welcome. We look forward to seeing your build progress! 1 1 Quote Link to comment Share on other sites More sharing options...
Philscratch Posted July 11, 2020 Author Share Posted July 11, 2020 Thankyou at present I am looking for lancer status so I am trying to get the build as perfect as possibly so far I am trying to negotiate trim lines and not sure how far to cut or not to cut, also the abs seems quite thick for my lexan scissors so may have to resort to dremel, but I am going to take my time with it, im still waiting on softs from Chefs Creations Quote Link to comment Share on other sites More sharing options...
Philscratch Posted July 16, 2020 Author Share Posted July 16, 2020 Just a quick update, I've pencilled in most of the trim lines on the armour, started with forearms, knees and shoulders, here are a few pics of trimmed and sanded pieces and pieces I have marked, feedback greatly appreciatedSent from my SM-G960F using Tapatalk Quote Link to comment Share on other sites More sharing options...
Philscratch Posted July 16, 2020 Author Share Posted July 16, 2020 Also I know the edges look jagged but its the pixelation of the photo, I had to get the resolution as small as possible to uploadSent from my SM-G960F using Tapatalk Quote Link to comment Share on other sites More sharing options...
Philscratch Posted July 16, 2020 Author Share Posted July 16, 2020 Also I know the edges look jagged but its the pixelation of the photo, I had to get the resolution as small as possible to uploadSent from my SM-G960F using Tapatalk Quote Link to comment Share on other sites More sharing options...
Retrofire Posted July 16, 2020 Share Posted July 16, 2020 Those lines look pretty good Phil. Your slot sizes should compare to the strapping sizes found in the CRL here: https://databank.501st.com/databank/Costuming:TB_Scout_trooper The forearm strapping size is 25mm and the bicep strapping size is 50mm. Quote Link to comment Share on other sites More sharing options...
Philscratch Posted July 16, 2020 Author Share Posted July 16, 2020 Those lines look pretty good Phil. Your slot sizes should compare to the strapping sizes found in the CRL here:https://databank.501st.com/databank/Costuming:TB_Scout_trooper The forearm strapping size is 25mm and the bicep strapping size is 50mm.Thanks, Ross sent me the correct strapping for Lancer standard, so I am good to go once my softs arriveSent from my SM-G960F using Tapatalk 1 Quote Link to comment Share on other sites More sharing options...
Philscratch Posted July 16, 2020 Author Share Posted July 16, 2020 Forearms done, have used masking to as temp hold for strapping will fix permanently once my softs arrive so I can adjust the tensionSent from my SM-G960F using Tapatalk 1 Quote Link to comment Share on other sites More sharing options...
Retrofire Posted July 16, 2020 Share Posted July 16, 2020 Those came out great! Nice work Phil and keep it up! 1 Quote Link to comment Share on other sites More sharing options...
Philscratch Posted July 17, 2020 Author Share Posted July 17, 2020 Forgot to post elastic thickness for Lancer CRL 25mm elastic used for strapping Sent from my SM-G960F using Tapatalk Quote Link to comment Share on other sites More sharing options...
Philscratch Posted July 20, 2020 Author Share Posted July 20, 2020 Left bicep armour trim lines, also marked and measured for greeblie, notice I have placed the 2 dots to remind me that the circles on the greeblie face forward/inward as per CRLSent from my SM-G960F using Tapatalk 1 1 Quote Link to comment Share on other sites More sharing options...
Philscratch Posted July 20, 2020 Author Share Posted July 20, 2020 Apparently I have reached my limit for the month for uploading photos, here's the semi finished left bicep, greeblie fixed with gorilla glue, had a little panic moment when the glue expanded and it seeped out of the sides, please give feedback if i need to trim or sand edges any further, the elastic is 50mm width as per lancer specSent from my SM-G960F using Tapatalk 2 Quote Link to comment Share on other sites More sharing options...
Aradun Posted July 20, 2020 Share Posted July 20, 2020 Looks really great Phil. Nice clean edges. Spot on to my eyes.Re: photo limits. Yeah, I ran into that with my build at critical moments with heavy image posts. For a buck a month it’s worth subscribing so as not to have to worry about photo limits or having to wait until your monthly limit renews. It’s worth considering, and you can always cancel once you’re finished your WIP. 1 Quote Link to comment Share on other sites More sharing options...
Philscratch Posted July 20, 2020 Author Share Posted July 20, 2020 Looks really great Phil. Nice clean edges. Spot on to my eyes.Re: photo limits. Yeah, I ran into that with my build at critical moments with heavy image posts. For a buck a month it’s worth subscribing so as not to have to worry about photo limits or having to wait until your monthly limit renews. It’s worth considering, and you can always cancel once you’re finished your WIP. I didnt realise it was that cheap!, I signed up for the year, it saves me a lot of hassle of not being able to upload photos as I would hopefully like someone to be able to follow my wip if needed Sent from my SM-G960F using Tapatalk 1 Quote Link to comment Share on other sites More sharing options...
Philscratch Posted July 22, 2020 Author Share Posted July 22, 2020 Can i get some advice reference the detonator end caps, ive been trying to find the exact measurements for width also how much of the tube shows from the ends of the detonator i have 300mm tubingSent from my SM-G960F using Tapatalk Quote Link to comment Share on other sites More sharing options...
Philscratch Posted July 22, 2020 Author Share Posted July 22, 2020 This is the width as it came in the boxSent from my SM-G960F using Tapatalk Quote Link to comment Share on other sites More sharing options...
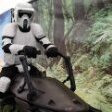
Retrofire Posted July 22, 2020 Share Posted July 22, 2020 The width of my TD end caps is about 9-10mm so you’ll need to trim those down. Do it in increments as you can always take more off but can’t add it back. The length of the tube varies but looking at your TD box and tube together in the picture I don’t think you’ll have any problems with what you have. Looking at your biceps I did notice that your T-bits are the older style with the ridges in the verticals portion of the greeblie. While acceptable for basic they would not be approvable for Lancer if that is your goal. Talking with @Chopper we think that you could probably mod the box portion by using a file to remove the ridges and then repaint. Another option would be to carefully fill them in using a modeling putty like Squadron Green Putty then sand and paint. Here’s a pic of a screen used T-bit for reference. 1 Quote Link to comment Share on other sites More sharing options...
Philscratch Posted July 22, 2020 Author Share Posted July 22, 2020 Can you show which parts I have to file down as I have already glued them to the bicepSent from my SM-G960F using Tapatalk Quote Link to comment Share on other sites More sharing options...
Philscratch Posted July 22, 2020 Author Share Posted July 22, 2020 I think i know what you mean now, its the ridges between the 2 circles yeah?Sent from my SM-G960F using Tapatalk Quote Link to comment Share on other sites More sharing options...
Chopper Posted July 22, 2020 Share Posted July 22, 2020 52 minutes ago, Philscratch said: I think i know what you mean now, its the ridges between the 2 circles yeah? Sent from my SM-G960F using Tapatalk Yep, the four horizontal ridges between the circles. Quote Link to comment Share on other sites More sharing options...
Philscratch Posted July 22, 2020 Author Share Posted July 22, 2020 Yep, the four horizontal ridges between the circles.So will i get away with filing them down or does it need to be filled as per the picture?Sent from my SM-G960F using Tapatalk Quote Link to comment Share on other sites More sharing options...
Aradun Posted July 22, 2020 Share Posted July 22, 2020 Phil here’s what my greeblie looks like for comparison. As the CRL requires a “film accurate” t-bit greeblie, this is the final look you should be striving for. Should be an easy fix using Retrofire and Chopper’s suggestion above. 1 Quote Link to comment Share on other sites More sharing options...
Philscratch Posted July 22, 2020 Author Share Posted July 22, 2020 Is that a raised line at the bottom as well? Sent from my SM-G960F using Tapatalk Quote Link to comment Share on other sites More sharing options...
Chopper Posted July 22, 2020 Share Posted July 22, 2020 Even for Lancer, the greeblie does not have to be "exactly" like the screen used version. However, it should be close and generally representative as a whole of the ones worn in the film. For example, this is the SC greeblie, which is perfectly acceptable for Level 2. Is it exactly the same as what's in the screen used armor? No. Is it generally the same in that it has a flat face and the two small front facing bolts? Yes. You could follow @Retrofire's advice and fill in the side divot with apoxiesculpt or greenstuff and repaint. I would try and get the greeb off first though. What sort of glue did you use? Quote Link to comment Share on other sites More sharing options...

Recommended Posts
Join the conversation
You can post now and register later. If you have an account, sign in now to post with your account.