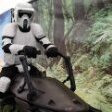
Philscratch Posted February 24, 2021 Author Posted February 24, 2021 The cod does look to big. Ideally it should just lay on the front of your body and only the strap should go between your legs. Bring the shoulders up, rotate the biceps so that the t-bt is to the side and then the armor pieces will look pretty good.Shoulders need finishing just got to attach cable tie to shoulder bridge and then they are done, I agree on the cod though think I may have to invest in a new one unless someone can advise Sent from my SM-G960F using Tapatalk Quote
Retrofire Posted February 24, 2021 Posted February 24, 2021 That suit up is looking good Phil! Yeah once you get those ties in place it should pull those shoulders in. The cod is a bit wider and could use some trimming. I’ve tried to etch in about where it should be but tablets are finicky. I would also pull the bund up as much as you can to get the cod to sit flatter against you. It’s getting pulled under by your cod strap so give yourself a little breathing space there. Just a thought for the cod, before you consider making another one, maybe reach out to Chef there in the UKG. He’s very experienced with the Scout and the soft goods and I bet he can give you some pointers on how best to address narrowing it down. He built several pieces of my Scout soft goods as well as my Endor Commando so he knows his way around a needle and thread. You are looking great so far! 2 Quote
Philscratch Posted February 24, 2021 Author Posted February 24, 2021 Thanks buddy, all of my softs were through Chef, ill message him tomorrow and ask if it could be thinned possibly see what he suggests, would that not have an effect on the curved stitching though?Sent from my SM-G960F using Tapatalk Quote
Philscratch Posted February 24, 2021 Author Posted February 24, 2021 Thats a shot after I took the elastic from the back of the vest and attached to the back of the bundSent from my SM-G960F using Tapatalk 1 Quote
BikerScout007 Posted February 24, 2021 Posted February 24, 2021 I think that's better. The width of the codpiece is not an issue for me; you just want to bring it up so that the crescent is not so far down 2 Quote
Aradun Posted February 24, 2021 Posted February 24, 2021 Phil it’s awesome to see you in your first suit up! Kudos on achieving that milestone. It’s really coming together. I’m super excited for you! 1 Quote
Philscratch Posted February 25, 2021 Author Posted February 25, 2021 Cheers@AradunFF, I didnt realise how far up the leg the knees were either till I looked at the crl image, I can easily pull those further up, Codpiece I have been assured by Chef is fine its just a balancing game of getting it in the right position obviously I didnt have my belt on either so that might make a difference I can certainly bring it further up at the front, hoping to do another test fitting on Sunday with shoulder bells fitted correctly so will send more shots over.Sent from my SM-G960F using Tapatalk 1 Quote
Aliaz Posted February 25, 2021 Posted February 25, 2021 4 hours ago, Philscratch said: Cheers@AradunFF, I didnt realise how far up the leg the knees were either till I looked at the crl image, I can easily pull those further up, Codpiece I have been assured by Chef is fine its just a balancing game of getting it in the right position obviously I didnt have my belt on either so that might make a difference I can certainly bring it further up at the front, hoping to do another test fitting on Sunday with shoulder bells fitted correctly so will send more shots over. Sent from my SM-G960F using Tapatalk I think just bringing everything up will bring the cod to the right position. remember the belt should be higher up then a normal belt. 2 Quote
Philscratch Posted March 1, 2021 Author Posted March 1, 2021 So did another test fitting yesterday, still not happy as bund constantly slides down so advice on how to avoid this greatly appreciated, I was thinking possibly braces or suspenders whatever you guys call them under the chest and back armour? Also the belt is proving frustrating as it doesn't seem to work at the back straps dont come round far enough if drop boxes are one inch below the belt, Sent from my SM-G960F using Tapatalk 1 Quote
Omaha Joe Posted March 1, 2021 Posted March 1, 2021 Hey Phil, looks like you might have enough strap excess at the back to make it work by simply changing the angle at which they attach to the belt. Holding the drop boxes in place where you want them 1”-1.5” from the plastic belt, is it possible to reposition the ends of the strap toward the center of the bund so they’ll meet and end up covered by the detonator..? once I got my drop box straps positioned where I wanted them in the back, I simply riveted them to the main belt so they’d always hang at that same height on my hips, and was then also able to slide and position the buckles exactly where I wanted them 2 Quote
Chopper Posted March 1, 2021 Posted March 1, 2021 Phil, have you tried putting some velcro on the bottom of your flak vest, and the top part of your bund? A lot of folks do that to help keep their bund from slipping down. The 1" measurement for the drop boxes is only an approximate measurement for Level 2 and isn't required for basic clearance. Omaha Joe is on track with his advice, can you give that a try? Also, you don't have any side shots, but from the front/back, it looks like your boxes are shifted forward a bit as well. 2 Quote
Philscratch Posted March 1, 2021 Author Posted March 1, 2021 I was a little reluctant in posting side shots as the bund is so low but ill post them anyways so you can see, thanks guysSent from my SM-G960F using Tapatalk Quote
Philscratch Posted March 1, 2021 Author Posted March 1, 2021 I agree the boxes could do with coming further towards the back also the knees i am going to glue some velcro the flight suit and the knee armour so they can stay in positionSent from my SM-G960F using Tapatalk Quote
Aradun Posted March 1, 2021 Posted March 1, 2021 Phil, it’s coming along so kudos on striving to get things set for submission. I’m pulling for you brother! I’m going to throw this out there for [mention]Chopper [/mention] to weigh in so don’t do anything I’m suggesting until you get feedback from him on this.Looking over you bund. It looks like you have about 2-3” of bund that extends below the bottom of your pouches. I think if you drop your pouches down so that the bottom of the pouches align with the bottom of your bund, that will allow you to pull the bund up by at least 3” which in turn will raise the cod where you want it. It will also eliminate your belt from sitting on top of the bund and instead sit right under it which is ideal. It will also give you plenty of real estate up top to attach hook&loop to the top and back of the bund so that you can secure the bund to your flak vest as Chopper suggested. That will keep it from sliding down. This fix might not be needed for basic approval, so again, wait for Chopper or another armorer to weigh in on my suggestion as they’re the pros. 1 Quote
Philscratch Posted March 2, 2021 Author Posted March 2, 2021 I understand what you mean but If I do that then I run the risk of not having enough elastic for the cod, also it means unpicking more velcro and resewing which is gonna set me back a ways. I'll wait on further advice thoughSent from my SM-G960F using Tapatalk Quote
Retrofire Posted March 2, 2021 Posted March 2, 2021 The boxes are looking better there Phil and most of this looks really like fitment stuff to me. Dressing this costume is like dressing in top hat and tails for the Ascot in that there are so many parts😃. What I’m seeing and @Chopper chime in here too is that your bund is slipping down below your chest armor and that’s “wonking” the look. So pop off your belt and chest armor and let’s focus on the vest and bund. The vest is fine so that’s good. Give yourself a little slack on the cod strap and now pull your bund up level with your chest pectorals somewhere around the middle take a deep breath and connect the Velcro. Cod should be hanging kinda loosely. Now sit the cod flat on your front and just snug up the strap not tight just snug. Now put on your chest armor. The tops of the pouch flaps should ride at the bottom of the chest armor. Now put on your belt and bump it up against the bottom of the bund and tighten it up. Phil I think you’re right there. Just need to adjust and tighten up a few things. Dressing is a learned skill that all of us have to get down when we first start. 2 Quote
Philscratch Posted March 2, 2021 Author Posted March 2, 2021 Thanks guys I think I can honestly say I'm on the final straight now, like you guys said a few little dressing issues and hopefully should be ready for clearance shotsSent from my SM-G960F using Tapatalk 4 Quote
Chopper Posted March 3, 2021 Posted March 3, 2021 Yes, I agree with @Retrofire. If you look at your side photo, Phil, the bund is almost under the chest and back armor. If you were to move it up to about where the top of your side strap is, then it'd be much better positioned. Otherwise, yeah, I think you're nearly ready to go. 2 Quote
Philscratch Posted March 4, 2021 Author Posted March 4, 2021 Just letting you guys know ive had to disassemble lots of the armour remove the rivets that were put in before the crl change, as it wouldnt pass for basic ive had to remove the elastic and rivets from the tank as it wouldn't pass basic for UKG, apparently my boots are too tall as the knees are overlapping on one shot but that was simply the knees kept slipping down as I was turning round, so been advised to fold down the boots. If you go on my wip on ukg forum you will see the suggestions, im now set even further back than I was at the start of the year. Not a happy scout right nowSent from my SM-G960F using Tapatalk Quote
Philscratch Posted March 8, 2021 Author Posted March 8, 2021 Ok quick update, knees ended up ruined one rivet melted through the plastic (steel rivets remember) and another just cracked the plastic so now I have to get some new knees, trim, sand and reapply elastics and rivets......on a plus note all rivets will be 1/8"........Sent from my SM-G960F using Tapatalk Quote
Aradun Posted March 8, 2021 Posted March 8, 2021 Hey Phil. I’m sorry to hear about the issue with your knee armor. Is there any chance you can make abs paste to fill the melted portion and crack? Perhaps for the crack you can glue a piece of abs scrap on the inside of the knee and then weather the crack on the outside so it looks like a scratch? Just some thoughts to try to save you the expense of new knees.My belt cracked between the boxes at a natural stress point after my second troop. I pulled too hard taking it off forgetting that I had it secured to my cod with hook and loop. The abs paste sealed the crack and thickened that area. It was an easy fix because it didn’t require any sanding or finishing afterwards. Your melted portion will likely need a little sanding to get the outside surface nice and smooth. Again just a thought if you haven’t ordered new knees yet. 1 Quote
Philscratch Posted March 12, 2021 Author Posted March 12, 2021 Ive already ordered new knees mate, I can always keep the old ones as spares just in caseSent from my SM-G960F using Tapatalk 1 Quote
Philscratch Posted April 12, 2021 Author Posted April 12, 2021 Just an update guys, all of the rivets on my armour are now 1/8" Elastic on tank has been changed to 0.5", I dont think there is much else I need to do for basic now, hopefully once cleared I can put in for Lancer without any need for alterations!!Sent from my SM-G960F using Tapatalk 4 Quote
Philscratch Posted April 29, 2021 Author Posted April 29, 2021 So here are some shots I got took earlier today, I know there are some dressing issues which are getting sorted, the shoulder bells for one were way too far back but thats been rectified by moving the cable tie to the chest armour and not the back, if there is anything that is glaringly obvious which I havent seen please can you let me know. Sent from my SM-G960F using Tapatalk 3 Quote
Chopper Posted April 29, 2021 Posted April 29, 2021 Hi Phil, do you have a back photo as well? 1 Quote

Recommended Posts
Join the conversation
You can post now and register later. If you have an account, sign in now to post with your account.