Starscream Posted September 16, 2019 Share Posted September 16, 2019 Hey everyone, Here is my WIP for my Patrol Trooper. I'm just showing a few pictures I took during my build. If you want specific pictures of something, I'd be more than happy to take them and upload them. I ordered the ArmoryShop kit and had them finish the armour for me, but got the helmet as the raw kit. I gotta say, I'm really happy with 3D printed armour. I wasn't as lucky as others and my box arrived in less than ideal condition. Luckily only the back plate was damaged and I was able to repair it fairly easily (I plan to weather it to look like damage). 3 Quote Link to comment Share on other sites More sharing options...
Starscream Posted September 16, 2019 Author Share Posted September 16, 2019 BLASTER I started off with the blaster. 2 Quote Link to comment Share on other sites More sharing options...
BikerScout007 Posted September 16, 2019 Share Posted September 16, 2019 Wow! that box was in rough shape. Your collar was cracked too? Thanks for starting a thread and I look forward to your progress. 1 Quote Link to comment Share on other sites More sharing options...
Starscream Posted September 16, 2019 Author Share Posted September 16, 2019 BUCKET Next was the bucket. Had a mishap with overspray on the white (a misting of black paint). Once I get everything weathered it won't be an issue. Got the ol' Dremel out and started trimming away. Teeth and visor cutout. Next was a coat of primer and some light sanding. First coat of white. Taping off everything for the black. Unfortunately the tape didn't hold up in some spots, so I had to touch those areas up (weathering will also hide all this). Greeblies all painted Just visor and mesh to install (you can see the black overspray on the mouth). 2 Quote Link to comment Share on other sites More sharing options...
Starscream Posted September 16, 2019 Author Share Posted September 16, 2019 CHEST/BACK My neck isn't that long, so I had an issue with the helmet and the collar hitting and I couldn't move my head at all. So I took out the Dremel and trimmed out some of the inside of the chest and back plate. I took out over half an inch and I can now move my head a little bit, but I'm probably going to do a bit more trimming. So far it has held up really well, but I plan to reinforce it once I'm done. My chest plate also didn't sit against the ab plate very well at all and my chest was puffed out really far. This also created issues with the back and chest piece lining up, as the chest was angled out and the back wasn't sitting in the groove properly. I used my heat gun and ever so carefully warmed up the chest and then pressed it against the ab plate so it would fit snuggly. Ended up working really well. Before After Quote Link to comment Share on other sites More sharing options...
Starscream Posted September 16, 2019 Author Share Posted September 16, 2019 I rushed the belt and boots because I was trying to get done for our local con this weekend. So no photos of that yet. The test troop this weekend was fairly successful, but I still need to work on some strapping issues, but it's mostly done. Photos are submitted for approval. 4 Quote Link to comment Share on other sites More sharing options...
Starscream Posted September 17, 2019 Author Share Posted September 17, 2019 Wow! that box was in rough shape. Your collar was cracked too? Thanks for starting a thread and I look forward to your progress.Yeah the left collar was busted right off and a big crack in the back plate on the right side. The box was crushed and was really damp. Must have sat in the rain or something.Sent from my Pixel 3 using Tapatalk 1 Quote Link to comment Share on other sites More sharing options...
wingnut65 Posted September 17, 2019 Share Posted September 17, 2019 Glad you have another IPT in for approval. Your armor looks great! I'm having the same issues with the helmet and neck rubbing. I love your idea to trim from the inside. I was considering getting the paint and doing it to the top side, but your's looks better. 1 Quote Link to comment Share on other sites More sharing options...
Ruthar Posted September 17, 2019 Share Posted September 17, 2019 Nice work! Best of luck with approval - let us know how it goes! 1 Quote Link to comment Share on other sites More sharing options...
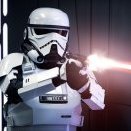
Starscream Posted September 17, 2019 Author Share Posted September 17, 2019 Thanks, it was really fun and easy build. Denis made things really easy. Just minimal modification needed. Hoping the approval goes well. I'll be weathering everything soon for level 2 approvals. Although part of me loves the clean look. Also, a friend just photoshopped this for me. The background is real, he just added the blaster bolt. 3 Quote Link to comment Share on other sites More sharing options...
BikerScout007 Posted September 17, 2019 Share Posted September 17, 2019 11 hours ago, Starscream said: Thanks, it was really fun and easy build. Denis made things really easy. Just minimal modification needed. Hoping the approval goes well. I'll be weathering everything soon for level 2 approvals. Although part of me loves the clean look. Also, a friend just photoshopped this for me. The background is real, he just added the blaster bolt. That looks great! Let us know when you are approved and I'll upgrade your access! Quote Link to comment Share on other sites More sharing options...
Btabc Posted September 19, 2019 Share Posted September 19, 2019 Nice build! I’ll be following yours and Wingnut’s Quote Link to comment Share on other sites More sharing options...
Starscream Posted September 19, 2019 Author Share Posted September 19, 2019 Nice build! I’ll be following yours and Wingnut’s If you have questions or want pictures of anything, just let me know.Sent from my Pixel 3 using Tapatalk 1 Quote Link to comment Share on other sites More sharing options...
TanRu Posted September 19, 2019 Share Posted September 19, 2019 @Starscream, how'd you get that nice finish on your blaster? Did you use XTC3D, or something else? Thanks! Quote Link to comment Share on other sites More sharing options...
Starscream Posted September 19, 2019 Author Share Posted September 19, 2019 6 hours ago, TanRu said: @Starscream, how'd you get that nice finish on your blaster? Did you use XTC3D, or something else? Thanks! I have never used a 3D print coating before, I find that a good primer usually works well enough. I should try XTC3D sometime though, it might save me a lot of time on larger prints. I used the classic method of primer, sand, repeat. I did that probably 4 times. 2 Quote Link to comment Share on other sites More sharing options...
Starscream Posted September 23, 2019 Author Share Posted September 23, 2019 On 9/17/2019 at 9:08 AM, BikerScout007 said: That looks great! Let us know when you are approved and I'll upgrade your access! Looks like my 501st profile page was finally updated with my Patrol Trooper! 1 1 Quote Link to comment Share on other sites More sharing options...
BikerScout007 Posted September 23, 2019 Share Posted September 23, 2019 38 minutes ago, Starscream said: Looks like my 501st profile page was finally updated with my Patrol Trooper! Awesome! Welcome to the Pathfinders, Trooper! 1 Quote Link to comment Share on other sites More sharing options...

Recommended Posts
Join the conversation
You can post now and register later. If you have an account, sign in now to post with your account.