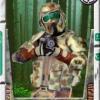
ParsleyBoi Posted February 27, 2014 Share Posted February 27, 2014 Hey everyone slowly been working on a kashyyyk trooper! Hoping to be the 2nd kashyyyk trooper in the Terror Australis Garrison but 1st in the Desert scorpion squad(Western Australia) anyway here's some photos of where I'm up too There is still some more work needing to be done to my back and chest, need to find my balaclava from work. I would really like to know your opinions guys! If I need to modify anything else And a little fun with the last pic! Quote Link to comment Share on other sites More sharing options...
Grumpy Posted February 27, 2014 Share Posted February 27, 2014 Coloring looks great! I know you said you have some more work to do. That's good. You are coming along nicely. Okay...some suggestions to work with... Definitely try to close the gap between your back and the back tank. The weathering and colors on the chest and helmet look awesome! Now... Add some more coloring to the sides of the pouches, and then weather them. Add some weathering to the cummerbund. (Maybe give it some "rusty colored" drips here and there.) Weather the shins and other smaller armor pieces. Use spray paint and give a mist spray on those items. Maybe brown and a small bit of black. To make it look like dirt spray or carbon scoring spray. If you haven't made them permanent yet, raise the drop pouches up a bit. To where they aren't hanging at the same level as the thigh pouches. Somewhere at a good level where it's in between the belt and the thigh pouches. (Maybe hanging over the top of the thigh pouches...a bit.) And don't forget to add the two black discs at the back part of the visor, on both sides of the helmet. Plus, the Kashyyyk "fishhook" symbol, at the bottom front of the left side visor. And the stripes under the lens area, on the front of the helmet. (See below picture as a reference.) Overall, you have a great build going. Keep it up! Cheers...future Kashyyyk Trooper!! Quote Link to comment Share on other sites More sharing options...
ParsleyBoi Posted February 27, 2014 Author Share Posted February 27, 2014 Thanks Grumpy going to put some hard work in this weekend to hopefully complete it. I can't wait for it to be done! Oz comic con is coming up in four weeks so want to rock this costume before then! Quote Link to comment Share on other sites More sharing options...
ParsleyBoi Posted March 1, 2014 Author Share Posted March 1, 2014 Alright guys and girls I think this is just about ready for approvals now, I have changed everything needed to be changed and the result to me is looking fantastic Let me know your thoughts! Quote Link to comment Share on other sites More sharing options...
ParsleyBoi Posted March 1, 2014 Author Share Posted March 1, 2014 note too self don't do pretend twerking before taking these shots just realised my cummerbund drifted downwards Quote Link to comment Share on other sites More sharing options...
Grumpy Posted March 1, 2014 Share Posted March 1, 2014 note too self don't do pretend twerking before taking these shots just realised my cummerbund drifted downwards Ha! ...twerking...that's great! Made me laugh! I was just going to say something about the cummerbund, especially in the back. The tank should sit right on top of the large horizontal back pouches. Over the top part of the cummerbund, in the back. Was the cummerbund too large? If it was, I can send you another piece of Velcro, no charge. If you sew that in, it will give you two places where the Velcro will hold and keep the cummerbund more snug on you. Just add the new pieces opposite of where it will sit, when it is snug on you Just let me know, and I'll send it to you. The chest and tank area look great! It sits level. Well done. I see you had to cut some of the strap area off of the back plate for it to fit. As you wear it to troops, you will find the weight of the back tank pulling at you. So, you'll always feel the need to pull the chest are down in the front to bring is back up. (It happens.) And check the top shin strap on the left leg. It's sagging. Overall, with the exception of the "twerking malfunction" and a couple of places that just need a tighter fit, the colors look great, the overall fit of the armor looks great. Well done! Well done, indeed! Quote Link to comment Share on other sites More sharing options...
ParsleyBoi Posted March 2, 2014 Author Share Posted March 2, 2014 Well I've fixed the problem and it looks much better!! Approval shots sent in! Fingers crossed but if there is anything I will get on top of it straight away Quote Link to comment Share on other sites More sharing options...
Death Recon Posted March 9, 2014 Share Posted March 9, 2014 I'm just going to point out a few things, take it with a grain of salt because you've done really well. 1. I noticed that your gloves wrist/forearm piece seems to be 2 separate pieces, it should be connected where the black glove meets the brown forearm piece. 2. most of your greebs do not seem to be the correct color, ie. your left bicep strap and box should be grey; your knee straps should be grey; and also your chest/back strap connectors should be grey as well. (unless they are grey and its just my monitor showing differently) 3. your thigh pockets that are attached to your pants are too large, they need to be 7" by 5" if I remember correctly But as I said you have a come along nicely and everything looks great Hope to see you get your approval soon so you can join us in the swamp! - Allan Aka Recon Quote Link to comment Share on other sites More sharing options...
ParsleyBoi Posted March 10, 2014 Author Share Posted March 10, 2014 Thanks Allan I have noticed a couple of these things as I got feedback for my approvals Pretty much the same thing you just told me and I'm currently working on getting these things changed so hopefully by the end of Saturday all of it will be done and ready for approval photos only thing they didn't mention the thigh pockets, and I have no more DPM material to work with thanks for the feedback and looking forward to joining the ranks! Quote Link to comment Share on other sites More sharing options...
Death Recon Posted March 11, 2014 Share Posted March 11, 2014 Keep working on what they told you too and you'll be approved buddy Quote Link to comment Share on other sites More sharing options...
bselphfsu282 Posted March 11, 2014 Share Posted March 11, 2014 Allan took the words out of my mouth on the greebs. Should be an easy fix. Also, I can't tell from the photos, but is your lens reflective? I got dinged for this when I tried to submit and had to rely on grumps and Allan to help get a fix. I would use the lens you have now as a temple and pic up some clear plexi and put the reflective green window tint over it. The BC lens is just too dark with the tint over it. Quote Link to comment Share on other sites More sharing options...
Grumpy Posted March 11, 2014 Share Posted March 11, 2014 Please post a picture of the thigh pouches without the drop pouches in front of them. Show the flap on the thigh pouch. Get a good close picture. On the gauntlets, it appears that your gauntlet greebs are facing the wrong way. Check other builds. The angled in area of the greeb should be facing down, towards the fingers. Like this: And the black part of the glove will go over the brown gauntlet. Right now it looks like a brown sleeve. And, yes, you need a green reflective lens in the helmet. This is just helping you correct a few things. Do not take any of this the wrong way. I just want you to have a great looking Kashyyyk Trooper! Cheers! And curious...what was said about your Kashyyyk, that was incorrect? Quote Link to comment Share on other sites More sharing options...
ParsleyBoi Posted March 12, 2014 Author Share Posted March 12, 2014 Thanks guys for the point out's at least I can modify them while I'm at it I have a lot of free time this weekend so hopefully I can get a lot done and possibly re-submit for approvals Quote Link to comment Share on other sites More sharing options...
Death Recon Posted March 13, 2014 Share Posted March 13, 2014 Yeah nobody here will attack you on anything, we are all here to help you out and just point out the issues that might stop your approval. another point on the gloves... do you have the grey wrist strap.. ref: Matts picture above where the black meets brown Quote Link to comment Share on other sites More sharing options...
ParsleyBoi Posted March 15, 2014 Author Share Posted March 15, 2014 Yeah but I think I did a S%*^ job on the gloves so i don't know if anyone here makes them properly first time sewing Quote Link to comment Share on other sites More sharing options...
gerald Posted March 19, 2014 Share Posted March 19, 2014 if those are BC greeblies will be hard to paint them ,they are light grey i,ve misted/dirty'ed em with dark brown/black spray probably it will drop off after few troopings but u can always ad new mist untill You find paint wchich will stick to that silicon ,if so let me know Quote Link to comment Share on other sites More sharing options...
ParsleyBoi Posted March 24, 2014 Author Share Posted March 24, 2014 Ok almost too that level of approval, green tint in visor and ordered better gloves which are more tactical gloves, and other than tht everything should be good Quote Link to comment Share on other sites More sharing options...
miqt Posted March 24, 2014 Share Posted March 24, 2014 if you smudge the rubber with Tamiya weathering powder in a color you like it'll last a looong time Quote Link to comment Share on other sites More sharing options...
ParsleyBoi Posted April 11, 2014 Author Share Posted April 11, 2014 Got some new gloves and started sewing it together what do you think, are they good do they meet the standards? Quote Link to comment Share on other sites More sharing options...
miqt Posted April 11, 2014 Share Posted April 11, 2014 The proportions of the knuckle pads are a little off. The one closest to the knuckles should be bigger and the farther one smaller. Also, you will get a much cleaner line cutting with a metal ruler and exacto on a cutting mat. Youre getting there. Take another look at the ref pics and the gloves Grumpy makes to nail those proportions. Quote Link to comment Share on other sites More sharing options...
comm tech Posted April 12, 2014 Share Posted April 12, 2014 THe gauntlet greeb is supposed to be on the inside of the arm not the outside. Quote Link to comment Share on other sites More sharing options...
ParsleyBoi Posted April 13, 2014 Author Share Posted April 13, 2014 New glove greeb style matching grumpy's Quote Link to comment Share on other sites More sharing options...
Grumpy Posted April 13, 2014 Share Posted April 13, 2014 The knuckle pads on the top of the glove weren't bad. What comm tech was referring to, were the rubber greeblies on the brown gauntlet. They are supposed to sit on the top of the wrist when worn. Such as this: Where the thumbs would be on top, the gauntlet greebs will wrap over the top of the wrist. So, when looking at the top of the hand, when it is flat, the gauntlet greeblies should look similar to this... A sort-of reference photo of a Kashyyyk Trooper... Close up of the glove-wrist area... The gloves that I have made...I can never seem to get them to match properly. It's a never ending battle. I do what I can with what I have. Cheers! Quote Link to comment Share on other sites More sharing options...
ParsleyBoi Posted April 14, 2014 Author Share Posted April 14, 2014 aahhh I see now so it only has too be on the side, but other than that are my gloves good? I'm not the best at sewing Quote Link to comment Share on other sites More sharing options...
Al74 Posted April 14, 2014 Share Posted April 14, 2014 Looks great mate, I love your Paint Job.. I hope to make my own Kashyykk Trooper some time next year & I know for sure where to come with questions & queries when I do. Best of luck with clearance. Al. Quote Link to comment Share on other sites More sharing options...

Recommended Posts
Join the conversation
You can post now and register later. If you have an account, sign in now to post with your account.