

Weasel
-
Posts
54 -
Joined
-
Last visited
-
Days Won
1
Everything posted by Weasel
-
(Added a Todo / Progress List at the very beginning of the thread that I keep more up to date in between posts) Time for an update after over a month! I slowed down the last two weeks of August, ignoring the piles of shame (see below) in my workshop in favor of another costume that I created in that time. After being invited to Renfest, I decided that I would try to make an inexpensive costume. I recreated one of my favorite characters, the Black Knight from Monty Python And The Holy Grail: It was a lot of fun doing my first costume / cosplaying at an event. It was a lot of fun and I got many great reactions to my costume - it was just WAY too warm for that getup. That's what you get when you got at the end of August here. Doing something different for a bit and then getting the reactions to the costume was incredibly motivating to kick my work on the Shore Trooper into high gear (which involved a ton of sanding at first). Since I was doing a lot of armor pieces with plenty of room, I switched from manual sanding to using a detail sander (the ones shaped like an iron) which really moved things along. It still took me a few long nights just sanding away while listening to Audiobooks (currently listening to the Expanse series), but eventually I got there. I then used some filler primer to catch some of my missed spots (and make my life easier). After that it was time for a black coat. I decided to use black sandable primer on top, rather than spraying another Primer + Color combo before the Saharah Beige. Then it was time for the Saharah Beige. I followed some advice and ordered new cans of the spray, since the ones from Home Depot were clearly old stock. Suddenly the paint flowed great, without the spatter. Wish I had known that for the helmet, but I'm not going to fret too much about that subtle texturing. I have painted the yellow stripes on the Bicep and the Black and White Stripe on the Shoulder Bell, but have forgotten to take photos. Then it was time to get the 3D printer going again (It was actually printing while I was sanding) for the E22 Blaster. After talking with a friend, I decided to give making the electronic a shot. A pack of 9V LEDs with attached resistor and a lot of fussing around later, I managed to get it working! I dont have many shots of the E22 in the works. I dry fit everything with tape and once I had the LEDs working glued everything together. For support in the middle I decided to go for a wooden dowel for weight and stability. I sanded a channel on the side of the dowel to feed the cables through. I am missing the lights below the scope, but at this point I didn't really have a good way to add them in anymore. In retrospect, I should have make the cutouts for the various plastic parts in software (for the 9V compartment for example) and printed them out again, but I don't plan to make another E22 anytime soon. While there are channels for a thin cable to run through, it was a lot of head scratching and cursing under my breath until I got it all to fit and work. The E22 has a lot of rough spots when it comes to sanding, but as long as it looks good in the end without my nose right up to it, I'll be happy. In my horde of disassembled things, I found round glasses for watches, that will fit nicely into the 3D printed scope. Hoping that will work out, since I really don't have the budget for a replica or original scope. I have bought materials for the pants and ordered boots & the shirt from Keep Trooping. My personal hope would be to have an approved costume by Mid October, but even then I don't think I'd be able to join some friends in their costume at the Air N Scare, not enough time to register and whatnot, even IF these parts arrived fast enough. I still will try to hold to that date, just to give myself a sort of deadline.
-
I'll be happy if I can get my kit approved, but I am building with L2 in mind, so I might as well use the correct color. Would be a shame to do all the work to mount the boxes properly, just to redo it. I had already sewn a belt with the dark color, so now I got the exact measurements to make quickly in the right color and I can mark the boxes placement with markers on the wrong colored belt. I've seen lists for paint colors for the armor which is super helpful, but I hadn't seen one for most soft parts, mostly just locations to buy them from; chances are I missed this somewhere.
-
Ooooh! Well, then I guess I will have a lot of extra brown nylon straps for ... dog toys? Thanks for that info!
-
Oh no, I can't throw another color into the mix haha. I have bought both of these and I need to pick one now
-
Valafar's 3D-Printed Shoretrooper build [FINISHED]
Weasel replied to Valafar's topic in Shoretrooper WIP
Thanks for the video, I like the snap stud solution and I'll probably try to recreate it like this. I figured I'd use Nylon straps to attach the bicep armor to the shoulder bell, but flexible band sounds like a better solution. I will also totally yoink that rare earth magnet mount for the strap, that is neat! Thanks for posting that video! -
Hey, I need some help figuring out what the right color for the belt is ... I know its tricky to show colors from a mobile photo without a palette next to it, but I got two photos that at least on my screens kinda match reality. One is under a warmer bulb and one under a more cool one. One seems almost too light, the other seems too dark. I guess I can weather down the lighter one? Anyway, maybe someone can help me pick the right one https://www.dropbox.com/scl/fi/tk7wwm92lqqhqprk10jtd/2023-09-06-02.47.08.jpg?rlkey=i2lnjo3mcei0so06hra4d0466&dl=0 https://www.dropbox.com/scl/fi/0wazicedneaf4wtd1ssrj/2023-09-06-02.47.28.jpg?rlkey=80lk5i7kvuu9sb9powh8jp3u7&dl=0 Product pages: The lighter one https://www.sailrite.com/1-1-2-Tan-Lightweight-Nylon-Webbing The darker one https://www.amazon.com/gp/product/B0C2TQDVRZ/ref=ppx_yo_dt_b_search_asin_image?ie=UTF8&th=1 Thanks!
-
I've noticed that Keep Trooping has a notice on their page that their next wave is Sep 08th and while I feel very confident, I can pull off the pants (and already have the Duck Canvas and Muslin), I will try to get the top and bib through them and fall back to the batting between / foam between layers.
-
Got shirt material... color is way too light
Weasel replied to NegativeEleven's topic in Shoretrooper Soft Parts
Sorry to ressurect this, but would this fabric be ribbed enough to be approvable? I might be able to get my hand on ribbed material like this. How about L2? -
Hm yes, I had a feeling I had to DIY the fabric. Does anyone have an idea what the best process would be to create the ribbing? Just sewing over fabric wouldn't seem to yield the correct results. Adding thin foam in between fabrics? Any guidance would be really appreciated
-
Hey everyone, I am trying to find the right fabric for making the shirt, but I seem to have a hard time finding the right material. Does anyone have a link to a fabric that is ribbed wide enough? I keep finding nice materials but their ribbing is fairly small and I'm worried it would become a problem for approval. Any help in finding the right materials would be greatly appreciated! Also the mesh under the arm pits, does it have to be white or would a black or Dark Grey work too?
-
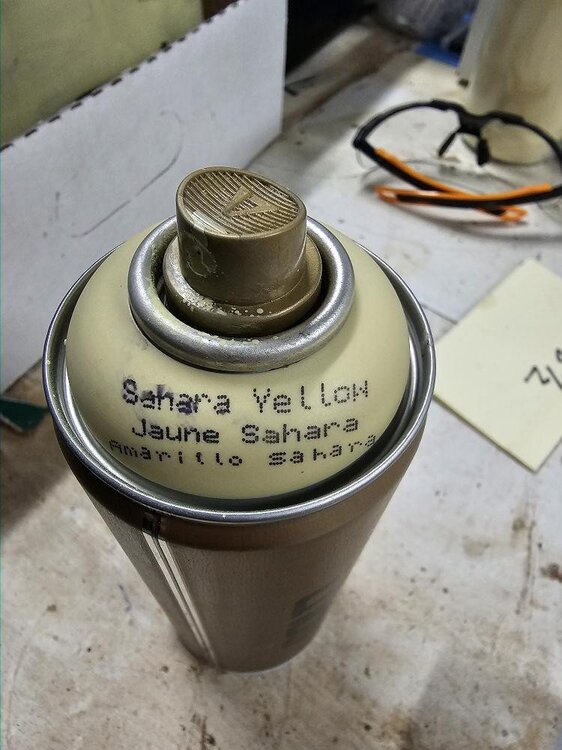
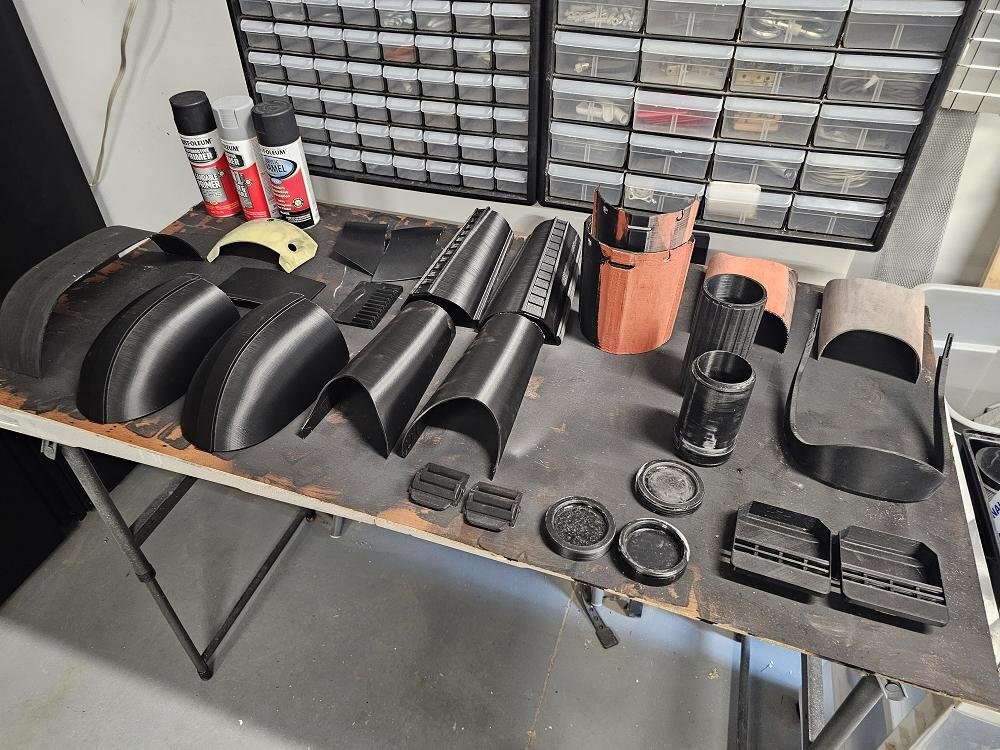
Time for an update, since I haven't posted in a few weeks. I've been slowly wittling away at the costume, especially the printing parts. As of yesterday I have printed the last piece for the suit, everything else are soft pieces or the straps (which I both intend to buy, once I have the rest of the armor in a good spot). Since I am paranoid that parts will break at a weak layer line while I am out trooping, I decided to give every piece a good coating of epoxy resin on the inside. As I mentioned last time, I had to respray the helmet in Sahara Beige, since I had gotten Sahara Yellow first. Tthe cans of Montana seem to have really bad spatter and I am not really sure how to reduce it. I thoroughly shake the cans, and the nozzle is clean, yet I get a lot of this undesirable spatter. Any ideas what I could do to reduce this spatter before I spray the rest of the armor? I used Vallejo liquid mask to have some areas where the pain chipped. While being closeup there are plenty of little things that are discouraging, tend to I like the overall look. The helmet still requires its stencil and, of course an acrylic weathering. While I wanted to wait for everything to be sanded, I decided to start painting the pieces for the belt to deal with the feeling of overwhelm, when I was thinking of the remaining work. I used liquid latex to remove larger chunks of paint. This is the stage before I went and added more weathering with some sandpaper. They look a little stark on clean pieces, but I assume will blend together with the rest of the weathering. Since I was feeling pretty good about making visible progress on some pieces, I brought the glove plates to the same level, i.e. weathering before acrylic wash. The tip of removing the liner was absolute clutch - they now fit perfectly! This was around the time I got an addition to the family: A Bambu P1S. Part of me wishes I would have invested earlier in this one, but the P1P had no enclosure and the X1C was out of my price range. Bambu Labs to the rescue. If only I had that printing quality on my earlier prints, I would be sanding a lot, lot less The "only" things left for it to print were the legs / shins and the armor backplate. The E22 is probably the next project I am going to print on this one. A few weeks ago I also dabbled with forming a lens, particularly using vacuum forming, so I made a table that I figured would be big enough (spoiler: it wasn't and the sheets of material weren't big enough as well) I made the form with air dry clay and overall I am pretty happy with how well it held up. The problem came down to that the tinted PC sheet was too small to properly pull over the form. I also had to heat it more to make it bend over the form, which led to bubbles. My first attempt failed miserably, ruining the sheet. The second attempt came out better, but it also required a lot of heating and bending after the fact. There are lots of bubbles from heating the PC too much, but They are actually not too bad when looking through it in the helmet and not visible for an outside observer. The helmet is a bit of a mess on the inside, but I am pretty happy with how the lens sits. I think I will make another lens with my form, but with the help of my spouse, so one person can push the sheet onto the form, while the other keeps heating it with a heat gun. That way I should be able to avoid making bubbles inside the PC and get an overall cleaner form. But thats future me's problem. This is how the lens looks inside the helmet (this was the old version, before I resprayed it in the correct color). If I went with Sean Field's files for the helmet, I could have ordered a lens from Etsy, which I would recommend, rather than trying to do it yourself, like I did. IF I end up redoing the helmet in the future I will definitely go with different 3D files that have a bit more 'aftermarket support'. At least I learned a good deal from tying to form the lens, and it's serviceable and I can look through it So yeah, lots of work done, tons more to go. I've tried to avoid sanding, since I want to sand outside, but it has been brutally hot here the past few weeks. With my self-imposed deadline of mid October, I am going to have to really get going. I started listening to the Expanse book series (almost done with Caliban's War), so at least I have good entertainment while I do it!
-
Awesome! You are happy with the quality of the top? Just got my Endorfinder gloves. I measured and came out to exactly 8 for the circumference so I went with a M, which they had listed. Let's just say that it's a very tight fit. I think I will be able to stretch mine out, but it's not ideal. Otherwise they feel great.
-
Snaps and Velcro sound good, that way I can fill up the weird gaps with apoxie sculpt. Little update from today: Plenty of printing being done, currently working on my chest piece. I will reprint the helmet blast shield since the other had some bad layer adhesion, so it cracked. I should have applied some 2 part epoxy in the back, which I will do with the new piece. Now here's a lesson: I had bought the wrong paint. I bought Sahara Yellow NOT Beige,... so as it turns out, I will get another chance of doing the weathering on my helmet! After sanding and recoating everything with the correct base color.... It looked similar enough and Amazon didn't carry a Sahara Beige, so I thought I had the right color. While annoying, I am glad this happened before I sprayed my entire armor with the wrong color. Even setbacks can be a form of progress.
-
Hi, another day another challenge! I printed the biceps and as it turns out I missed the supports for the straps. I am also not confident about their strength (I never quite trust small pieces like that). Does anyone have any hot tips how to add those back in or knows of a better way to hold them in place thag doesn't rely on these small hooks? I was thinking I could melt a metal rod into the abs, but before I attempt to Frankenstein this, are there better ways? Sent from my SM-S918U using Tapatalk
-
Honestly, at this point I'd be down to just buy the lens, but I have no seen a listing for the NXT3D models and I'd be too concerned that another lens won't fit. Maybe I will go that route when I go for attempt #2 with the helmet Sent from my SM-S918U using Tapatalk
-
Today, with all the pieces finished and painted, I finally weathered the helmet. As it turns out, weathering is quite difficult, even after watching a ton of videos on it. I guess it comes down to pratice and I have never weathered an item like this before (since this is also my first helmet / piece of armor). Initially I had tried another method which caused the paint to change shade (when I rubbed graphite onto it, bad idea), which led me to repaint... long story short, it was messy. I finished it with a coat of matte clear coat to hold the weathering in place. (I got a kick out of the look with the glasses :D) While I am not super thrilled with the result, I am trying to be gentle on myself. It's all a learning experience. As a matter of fact, I had just read a relevant post, which made me feel better ^^' I learned a few lessons in the process and things that I would have done differently. I suspect there will be another printed helmet in my future, but for now, I will continue with the rest of the armor instead, rather than getting hung up on a single piece. I don't want to burn myself out on that. As long as I can reach trooping condition, I'll be a happy camper. Question: What's usually the final sheen of the armor? Satin or Matte? I attempted to get the Hobart Face Shield Replacement Lens (https://www.amazon.com/gp/product/B002VECKRO/) into shape with a heat gun and lets just say it didn't go well at all. Now I'll have to wait for another shield. A friend gave me some tips I'll try to follow, but if anyone has some advice on how to create a decent lens, please let me know. I have the final lens shape as a 3D print, but I have a hard time recreating a piece from that lens that I can then use in the helmet.
-
Edit: Adding a list of finished parts and status (shamelessly yoinked from IRoS ) to keep better track myself: Last update: 10/31/2023 DONE! Hard parts: Helmet ✅ Helmet Lens ✅ - Taped the lens into the helmet, might redo it in the future, but for now I'm happy with it. Chin Strap / Cup ✅ Fans & Suspension ✅ - Done, Just need to order a battery that fits better into the helmet Abdomen ✅ Shoulder bells ✅ Biceps ✅ Forearms ✅ Hand plates ✅ Kidney ✅ Belt boxes ✅ Rear belt plate ✅ Greaves ✅ Chest plate ✅ Back plate ✅ E22 Blaster ✅ Soft parts: Gloves ✅ Boots ✅ Hip Plates ✅ Ammo pouch ✅ Neckseal & Shirt ✅ Belt Neck Seal ✅ Baclava ✅ ---------- Original Post: Hello everyone! After the first few weeks of working on my Shore Trooper Helmet (as part of the entire costume), I figured it was time to make a WIP post. I am working with the NTX3D files https://www.etsy.com/listing/1478364990/star-wars-rogue-one-inspired and I am pretty happy with the files so far. My 3D printers (Anycubic Kobra, Artillery X1) on the other hand ... ho boy. I had (and still have) a lot to learn when it comes to working with ABS. I had some issues along the way, which lead to a TON of post processing. I will not pretend that this went smooth Despite some troubles, I am having a ton of fun working on this. It is my first helmet (and costume), so I am expecting many more mistakes along the way. This is the structure. Some pieces were still too big for me to print in one part, so I split the mesh further apart. I printed the fins and the front greeblie with my Resin printer. While I am perfectly happy with the durability of the large greeblie, I am either going to print the fins with ABS or give it another go with ABS-like resin. I had mixed myself some ABS putty / paste already and glued the pieces together of the face rim, I decided to invest in a cheap little plastic welding tool. I hope the pins will make sure these pieces never come apart. The welding kit was cheap enough and I have a wheelbarrow that needs the same treatment. The large back helmet piece came out really nice in one part. The raft turned out a bit thick and after tweaking my 3D printing enclosures, I can get away with 1 layer skirts. As I started to glue pieces together I noticed that not only I had to deal with some warping but that I had also sanded a bit too eagerly... Apoxie Sculpt to the rescue. (I also removed the mesh from the greeblie, once I realized I had glued it in at an angle and it was driving me crazy...) I made heavy use of Fillable Primer by Rust-Oleum, between sandings. At this point I've been sanding and sculpting quite a bit, but the parts of the helmet I had been working on started to come out nicely. I split the top part of the helmet into two smaller files. In hindsight that wasn't my best move ... Here a better view of the lower half of the helmet assembled, sanded, and heavily sculpted to fix any problems I had with the print. As mentioned above, spliting the helmet into two pieces wasn't a great idea. Possibly due to warping, the parts didn't line up well. I like to describe the next phase of my project as 'The ABS war crimes'. I was refusing to reprint the parts and decided to try to do my best with ABS paste. I could pretend it didn't happen, but I feel posting this is going to be either a cautionary tale or inspiring for someone else. I never said my process was pretty At this point I had started making use of Bondo® Glazing & Spot Putty. "Versatile formula repairs scratches, pinholes, holes and nick." Nobody says how large those scratches can be ... That being said, it's a great tool to fill slightly separated layers in your prints or deal with layer lines. I was really surprised how dang fast this stuff dries, so I decided to try applying it in a few layers. Once dried, it sands much easier than ABS and allowed me to shape it further without having to wait a day for Apoxie Sculpt to dry. Eventually I had all the pieces together! (minus the fins or the shades). Time for the sandable primer! No point in hiding the bumpy front. I eventually did a bit more sanding on the sides that will be visible, but my shame will be hidden behind the mid shield and blast shield! Finally, it came time to paint my first pieces with Sahara Yellow by Behr. I am not sure if I got a bad cap, but I had some serious issues with paint sputtering with that can. As some will have noticed, the greeblie has been glued onto the mask (I had to do some serious sculpting to make everything fit... did I mention I am stubborn and don't like to reprint things if I can avoid it?) , which meant I had to do some careful taping. Would you look at that! It kinda looks like a helmet! After spraying it, I noticed many small details that somehow slipped past me, so I ended up sanding some of it again and adding another coat (not pictured). I have already made a few mistakes in the weathering process (which I didn't document, because I was too frustrated), but I will try to do a writeup once I have finished that part. By my next post I will hopefully have my helmet weathering and shades done. (I haven't forgotten about the logo) Right now my 3D printers are working on the rest of the armor...
-
After some more browsing, I realized that TooTall is working with the same files, so I will also follow his progress. I am in the middle of the helmet print, so I will probably create my own WIP thread once I feel I have a bit more to show for
-
Hey, I've been trying to get more information around the E-22. It isn't very clear for me from the post on this forum and the files I have found and the posts whether a real base is required / endorsed / preferred or 3D printed is fine as well. Edit: After actually trying to find the airsoft, I've realized that even if I were interested in using these parts for that build, there doesn't seem to be any supply, which renders my questions somewhat moot. I am interested in using an airsoft as the base, for added heft, but will obviously go full print if that's the only viable option at this point.
-
What would be the best way to go about it? My untrained eye doesn't see any differences in the helmet, but that doesn't say much. Would it be possible to get these files evaluated so I know whether I should even continue using them, or should I just go ahead and spring for one of the approved designers instead? Thank you!
-
Hello everyone! Don't mean to hijack this thread. I had found several options on https://shoretrooper.co.uk/ and went with Ben Grieger's version: https://www.etsy.com/listing/1478364990/star-wars-rogue-one-inspired I started work on the helmet, but haven't touched the armor yet (still very far out). Are Ben's files an accepted version of this build (at least for the helmet) or do I need to bite the bullet and start over?

