

Glory530
-
Posts
48 -
Joined
-
Last visited
-
Days Won
6
Everything posted by Glory530
-
Hi Toby, I'm excited to hear we have another future GLG member in the works! Costuming in a post-Joann world is certainly going to be a challenge. To answer your questions, all of the elastic that I used is the Dritz brand. I brought mine from Joann, but it looks like their products are available on Amazon. I believe that is where I found my webbing as well. As for the fabric, I'm not sure where you are located in Michigan, but there is a pretty good fabric store called Haberman Fabrics in Clawson. I've visited there once, and they have a pretty good selection of apparel fabrics. Ordering online is an option as well, but I would recommend ordering a swatch to make sure it looks and feels right before placing an order. If you haven't already done so, I'd also recommend starting a build thread here and asking questions when you have trouble finding materials or need help with anything. The Pathfinders staff is AMAZING and was super helpful to me throughout my build. Best of luck with your build!
-
I'm so glad to hear you're finding my thread helpful! That's partially why I like to do these. Let me know if you have any questions about anything I did or if we've got an upcoming troop together and you want me to bring any of the pieces for you to see or try on.
-
TB-50191 Lancer Request (Approved)
Glory530 replied to Glory530's topic in Lancer Deployment Request
Changes complete! Per the team's findings, I have done the following: Sleeves shortened by 1/2 in. Both pouches moved inward towards center of cummerbund by 3/8 in. each (I split the difference between the suggested 1/4 and 1/2 in.) Shoulder bell zip ties adjusted to bring the shoulder bells 1/4 in. closer to the shoulder bridges. 90 degree corners on belt rounded off. 90 degree corners on forearm armor rounded off. Photos of the changes are below. Please let me know if you need anything else! Thanks, Gloria -
TB-50191 Lancer Request (Approved)
Glory530 replied to Glory530's topic in Lancer Deployment Request
Thanks for the clarification! Glad I asked 🙂 -
TB-50191 Lancer Request (Approved)
Glory530 replied to Glory530's topic in Lancer Deployment Request
Thank you so much for your feedback! These changes sound fairly easy, so I should be able to get this turned around within the week. To answer your question, yes the thing on my butt flap is a Velcro tab. Belts love to slide up in the back on me, so I added this (and the corresponding piece on the inside of the belt) to make it stay put. For the shoulder bell comment (bring in the shoulder bells by 1/4"), can you please confirm whether you mean trim 1/4" from each vertical edge of each shoulder or bring them in by 1/4" total (1/8" trimmed off each vertical edge of each shoulder)? Thanks again, Gloria -
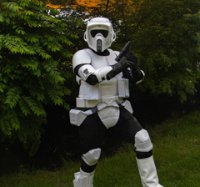
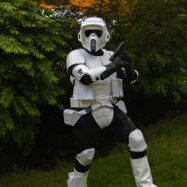
Name: Gloria Northup TKID: TB-50191 Garrison: Great Lakes Garrison Build Thread: Parts Helmet: Studio Creations Lens: Hobart 770580 Face Shield Replacement Lens Bolts: Fibre-Metal by Honeywell FM4001 Quick-Lok Helmet Adapter Kit Balaclava: Under Armor Unisex Adult HeatGear Tactical Balaclava Flight Suit: Modified Red Kap Suede: Tandy Pigskin Soft Suede Armor: Studio Creations Gloves: Wampa Wear Vest: Self-Made Fabric: Classic Sportswear Cotton Twill Fabric from Joann's Cummerbund: Self-Made Fabric: Sateen Solid from Joann's Codpiece: Self-Made Fabric: Sateen Solid from Joann's Pouches: Self-Made Fabric: Duck Canvas Fabric - Utility Fabric from Joann's Boots: Self-Made Base Boot: Timberland Women's Original Boots Vinyl: Marine Vinyl from Joann's Blaster: BlasterWorks Full Body Photos Action Photo Helmet Photos Balaclava Photo Flight Suit Photos Shoulder Armor Photos Bicep Armor Photos Forearm Armor Photos Glove Photos Vest Photos Chest & Back Armor Photos Cummerbund Photos Codpiece Photos Pouch Photos Belt Photos Thermal Detonator Photos Knee Armor Photos Boot & Holster Photos Blaster Photos That's everything! Please let me know if there are any additional photos or information that you need, and I will post it ASAP. Thank you so much! -Gloria
-
Approved! Thank you, thank you, thank you to everyone who provided helpful feedback and advice in this thread or answered my questions. Also, a very huge thanks to fellow GLG scouts @masteroftheforce and @chillywill22 who gave me some awesome pointers, let me borrow patterns, or let me photograph the heck out of their helmet for reference. I'm excited to take this armor out for its maiden voyage on Saturday!
-
Velcro is attached so everything stays in place, and submission photos are taken! Here's a sneak peek. If anyone sees any issues jumping out at them, please let me know, otherwise, I'm going to shoot these over to my GMLs and let the anxiety begin. What a wild ride this has been - I can't believe I'm finished!
-
After an entire weekend plus a few bonus hours, the final piece is complete! It was a pain to get everything fitted up and lined up correctly, but in the end, it worked out. I followed the SC instructions for assembly with a few deviations: Long black snout greeblie painted medium gray (basic approval requirement) Earholes cut out instead of using the provided decals (basic approval requirement) Hobart #770580 replacement face shield used to make black color lens instead of using provided green lens (basic approval requirement) Fibre-Metal by Honeywell FM4001 Quick-Lok Helmet Adapter Kit used in place of provided bolt assemblies (Level 2 requirement) Added matte black adhesive vinyl to black out the areas inside of helmet exposed through earholes (basic approval requirement) I'm going to share the process I used for marking and cutting the earholes, since I think it worked very well. I also used the same cutting process for the lens cutout: I stuck the provided earhole decals onto paper and cut them out to make templates. I placed the templates in position on the helmet and stuck them on with tape. I traced the outside of the template with dry erase marker. Then I removed the templates and traced the inside of the dry erase marker line with a sharpie and erased the dry-erase line. I drilled a hole in each earhole area to stick the Dremel in. Using the Dremel and a drywall bit, I cut all the way around, just on the inside of the sharpie lines. I switched to a small diameter sanding barrel and smoothed just to the outside of the sharpie lines, removing them. Finally, I cleaned out the holes with a deburring tool. For the pads, I used a universal airsoft/tactical/bicycle pad kit that I found on Amazon for $10.99. With all of the included pads (and doubling up the ones in the temple area) I was able to get the helmet to fit my tiny child-sized head. Also, my balaclava is the Under Armour HeatGear Tactical Balaclava. I think the only other thing worth noting is that I had to heat bend the lens clips (they came flat) before gluing them on to get the right shape like the photos in the instructions. Speaking of glue, I used Devcon plastic welder for all of the helmet gluing, which it looks like it is what most folks use for the helmets in my forum search. This is the most foul-smelling adhesive I have ever used in my life, but boy does it set quickly and hold fantastically! And here are the photos of me in the helmet. All I have left to do is go through the "tips for keeping your scout costume together" post and Velcro the heck out of everything so that it says in place. Full costume photos to come after that is complete.
-
Thank you! No worries about the sewing question - we are all noobs at one point! I used a normal presser foot and leather needle to sew the Velcro onto the vinyl. There was enough texture on the back side of the Velcro that I had no issues with it sliding just holding it in place as I went. Where I definitely do recommend the walking foot, if you have not done these yet, are the quilted parts of the cummerbund and vest. Two layers of fabric and multiple layers of batting will want to shift around as you sew, and the walking foot will help with that.
-
OK, NOW the holster is done! The SC holster is pretty ginormous, at least for me, so I trimmed quite a bit off the front edge so it wouldn't go across the center of my shin and start wrapping around the other side of my leg (which would require quite a bit of heat forming anyway to fit the contour of my leg). I also rounded off the corners to make is look like the film holsters, even though I did not see that as a requirement for basic or L2 approval. I just think it looks better. I was concerned that I would need to add something (like an internal Velcro strap) to keep the boot shaft from sagging under the weight of the blaster, but since the holster is nearly as tall as my boot shaft, I'm not sure if I need to do that. What do you guys think? My blaster is from Blasterworks, and I feel like it sits kinda funny in the holster (tilted forward). It also bothers me that I can't take advantage of the magnet in the nose feature to keep the blaster from clunking around in the holster because the surface where the magnet would need to go is way below where the nose of the blaster is when holstered. Does this look ok as is, or do I need to do something to fix this? I could make a shim to go inside the front of the holster (under the slots) for the blaster to lean against so that it sits up straight. Again, I will do whatever the experts here think is best!
-
How did I spend my entire 3-day holiday weekend? Making boots! I started with the base Timberlands from my previous post. When it came to marking the soles for cutting, I made things a little easier for myself - I made some templates out of card stock on the Cricut. Then I just held them in place on the soles while I traced. Cutting... was challenging with these boots. Luckily, my husband did this part for me, for which I am eternally grateful! He used an INSANELY sharp chisel and carefully hacked away at them for several hours. The cuts didn't end up very smooth, so I took over at that point with the Dremel and the long, skinny, cylindrical grinding attachment and just went back and forth over each cut until it was smooth. Some sprayed air and a little scrubbing with water and a toothbrush, and they were good to go. From there, I just followed the cheesewhoopy tutorial, which was really good. Just to be safe, I used E6000 for everything instead of Super Glue for the few steps that call it out so that I don't have to worry about anything cracking or being too stiff if the boot flexes. Also, since my boots were a little floppy (maybe because they're used), I found it helpful to stuff them with crumbled up packing paper to help them keep their shape while I formed and glued on the vinyl. Here are the finished boots. I still need to assemble and attach the holster because I ran out of time and energy, so that will be next!
-
Next up is going to be the boots. As I mentioned in my first post, I have small feet, so a base boot with a single-colored sole in womens 7.5 was extremely difficult to find! I found this pair of Timberlands for $25 on Poshmark *in my size* a few months ago, so I scooped them up. But I before I start cutting them up and gluing vinyl to them, I just want to confirm that they will be good for approval. I think I've seen other women here use this boot or an extremely similar pair from Timberland. If not, let me know and I will start searching again.
-
Arm and leg armor update! I built the bicep, forearm, and knee armor today. As with the chest and back, since the arm pieces were way too wide for me, I used boiling water to bend the sides in as much as I could. Between that and Lots of elastic tension, the forearms are still kind of loose. Velcro is going to be my friend for sure when it comes to keeping things in place! No issues with the knee armor (I've got plenty of leg circumference). I added the additional level 2 strap and rivets to the knee armor at this point, since I'm planning on level 2 submission. I received my gloves from Wampa Wear a while ago. I got the smalls, and they fit perfectly. They are very comfortable with lots of lining on the inside, which I will be quite grateful for during those outdoor troops in November! Here I am again with everything I have completed on, which is now the entire costume minus helmet and boots. Please let me know if I didn't put something on right or if any adjustments need to be made. I did my best to match how the CRL model is dressed, by my arms are much shorter, so spacing with everything on the arms is much different. Oh, and I did notice after taking the photos that the yellow tags in the gloves are extremely noticeable when not tucked inside, so I'll probably just trim those off.
-
Butt flap: take 2! Thank you for always providing constructive feedback, Chopper! This time, I measured the CRL photo and my photo and ran some ratio calculations to determine exactly how much I would need to trim off horizontally and vertically. If I were smart, I would have done this to start with. 🙄 I ended up trimming off 0.75 inch from each side and 0.5 inch from the bottom. It looks much better now!
-
Getting there! I spent the weekend on the codpiece and butt flap. The codpiece is the same sateen fabric that I used on the cummerbund, and I used Aradun's pattern from his build thread (which has been very helpful for the soft pieces, by the way!). On the inside, I used one layer of batting and one layer of 0.5 in thick EVA foam underneath the double curve stitching to keep things from bunching up at the bottom, and two layers of batting above the curves. I had the batting on top of the foam on the front side so the edge of the foam doesn't show as the codpiece bends. I was originally going to Velcro the codpiece to the inside of the cummerbund like most do, but the more I thought about it, the more I worried about the codpiece pulling the bund down. So I opted to extend the codpiece a few inches higher on top (sans batting) and sew it to the bottom edge of the vest. The elastic strap also goes up to the vest and Velcroes to the bottom edge of the back of the vest, on the outside. This way, the codpiece is essentially anchored by my shoulders and won't be pulling anything down. I arrived at the butt flap dimensions by trial and error, starting with a pattern leant to me by a fellow garrison member. I think it's good, but if it needs to be shortened or taken in at the sides at all, please let me know!
-
More updates! I finished the cummerbund and pouches. For the cummerbund, I used a sateen fabric and 2 layers of low loft batting (like I used for the vest sleeves). Because of my short torso, large hips, and having to wear my belt lower, the typical straight cylindrical shape of the cummerbund won't work for me without leaving a big gap ap the top. So I opted for a truncated cone shape. As much as I looked for and would have loved to run the calculations myself to get the dimensions, I found an easy button. I used the website https://www.templatemaker.nl/en/co/ to plug in the top and bottom diameters (calculated from the measured circumferences where the top and bottom of the cummerbund will sit) and the height (trigged out from the cummerbund height. The website unfolds the 3D geometry into a template, which when printed full-size, becomes a very nice pattern base! All I needed to do was add seam allowances and Velcro overlap to one side (the website lets you add overlap, but only to one side). I sewed the two layers together at the top and bottom, inserted the batting, sewed the ribs (drawn on first with one of those markers that fades with air exposure, and I just followed the lines with the machine), hemmed the left and right side, and sewed on the Velcro. Here's the finished bund: For the pouches, I used white duck cloth. I ended up making them from Woobiee's pattern in the "Pouch Dimensions and Patterns" pinned thread, which worked out great! The only change I made was to make the flap/attachment tab piece 5 in wide instead of 5.25 in so I could meet the 5 in wide attachment tab lancer requirement. To help the pouches keep their shape and also make them functional (which I am SUPER excited about), I made some boxes out of foam core and hot glue and slipped them in the pouches. I sewed the pouches on to the cummerbund right next to the top edge. Here's the bund and pouches together: And here are some photos with me wearing everything together that I have finished so far. This is the first time I suited up in the costume and said, "wow, I'm actually starting to look like a biker scout!". It's amazing what the addition of one piece does for the overall look. I'm also taking note of all of the pieces that I will need to Velcro to each other to keep them all in place before submission. The bund was really having fun drooping at the pouches from the weight of them, so that will need to be stuck in place. Oh, I also took in the vest sleeves to fix the flare issue.
-
I just completed my "real" vest. The fabric is the Classic Sportswear Cotton Twill from Joann's, and I used two layers of low loft batting in the sleeves. Photos are below. I'm still happy with the sleeve edges relative to the shoulder bell edges after making the adjustments to my practice muslin piece. Also, it looks like I forgot to have my husband straighten my armor in the back, because it's a little crooked (oops). Do the sleeves look too flared at the bottom, or are they OK? It's an easy adjustment to take in the side seams a little to reduce the amount of flare, if needed.
-
OK, I checked for pulled up fabric as suggested and had my husband help me pull the sleeves straight, but unfortunately, they were still slanted. In fact, when I started at the beginning to try and figure out where the issue was happening, I noticed that when just putting the vest on over the flight suit with no armor, the sleeve edges were still slanted forward. So what I did was have my husband draw a straight line around my bicep on the muslin sleeve, even with the bottom edge of the shoulder bell. I seem ripped the sleeve apart, cut at the line, traced it on my patten, and offset it down by 1.25 inches. The result was a sine wave shape for the bottom of the sleeve. Kind of strange, but I made and reattached some new sleeves to see what would happen, and voila, with the sleeves pulled down, they are now parallel to the bottom edge of the shoulder bells!
-
OK, I've run into a bit of a problem, and I'm wondering if anyone can help. I'm working on the vest, and I made a pattern from a t-shirt. As I always do when I make my own patterns, I did a trial run with muslin. The good news is the fit is good. The bad news is something weird is going on with the sleeves. When I put the armor on over the vest, the bottom of the sleeve is not parallel to the bottom of the shoulder bells. Note, I have an elastic loop on the shoulder bells that goes through my armpit, so I'm not sure if that is pulling the vest, but if it were the case, I would think the sleeve would be longer in the center and shorter towards the armpit. Maybe it's an issue with the muslin being so thin that the sleeve is not sitting right? I even pinned the vest sleeves to the flight suit sleeves before putting on the armor to make sure they were sitting right, and the same phenomenon occurred. I'm not sure what's going on or how to fix this. Has anyone run into this, or does anyone have any ideas? I would appreciate any advice! Photos below are wearing the vest with armor and the vest lying flat (note: I moved the closure to the front for the muslin version so I can put it on myself).
-
Back to my build after a VERY busy trooping month! Since my last update, I have attached the clips to the thermal detonator and assembled/attached the shoulder bells. As I'm going for level 2, I used zip ties and zip tie anchors to attach the shoulders to the chest/back armor and used 1/2 inch elastic to secure them to my arms through my armpits. Here are updated full-body front and back photos to show the TD clipped to the belt and the shoulders in place. I did not trim the shoulder bell length. Browsing the Scoutopedia, I figured the Larry Holt picture was best to gauge the proportional length of my shoulder bells to my upper arm length by bending my elbow the same way he did. By just looking in the mirror and at the photo, I thought my shoulder bell lengths looked good. However, when I put the two photos side to side, I'm not so sure. What do you guys think? I can certainly trim them if it looks like I need to!
-
More progress! Belt - I sized it to fit lower, with the top at about navel level. I needed longer webbing, which meant rebuilding the whole thing, but it looks sooo much better lower! I also lowered the elastic straps around the legs so they are recentered between the new belt bottom and my knees. Chest armor - I received my new chest piece, and the boiling water method for bending in the sides (and also putting a little curve into the shortened shoulder straps) is a win! For reference, I brought a big pot of water to a boil, dipped in the area that needed to be bent/curved for a count of 30 seconds, removed it and immediately bent and held it in place until it cooled. I have seen that some do a cold water quench instead of waiting, but I just went with holding it so I wouldn't affect the bend in moving the piece to the sink or a pot of cold water. Chest/back armor - I cut the slits and added a cotton webbing adjustable "belt" to join the front and back around the sides (move give to allow for cold weather gear, tighter for indoor troops). I also added the fuzzy Velcro on the undersides of the shoulders and 1 inch elastic on top to complete the shoulder bridges. Thermal detonator - Finished, minus the clips. I have them, I just need to get the right screws to attach them.
-
Thank you both so much for the belt feedback! I was building with the hopes of going for level 2 approval, so that's why I had built the belt to go around my waist. I agree though, it would look better around my hips with the top about at navel level (photos below), but then I couldn't go for level 2. So I see two options here: 1. Continue building to level 2 specs. I'd have my 1-2 inch gap between the belt and the chest armor and pouches would hang way below the belt (but based on previous comments, I was led to believe this would be acceptable, as long as the pouches were the right size). It would look funny, but it would be a higher level of screen accuracy. But is it though since none of the scouts in the film/exhibits looked like this? 2. Give up on level 2 and wear the belt around my hips as suggested. I'd have to rebuild it with longer webbing in the back and also remove, lower, and resew the black elastic around the legs at the new midpoint between knees and center of the belt. Also, with the belt lower and the fact that my hips are much larger than my waist, my cummerbund would need to be a weird bell shape so that there's not a big gap around the top. In my opinion, this would be the more screen accurate look for people of my body type. I'd also have a costume that meets every level 2 spec except the belt worn around the waist, which might drive my perfectionist brain a little nuts. But it would look better. I'd really welcome everyone's feedback and thoughts on these options, as I'm really not sure what I want to do now.
-
One BIG setback last weekend, but also some progress since then. I was working on the back and chest armor, got everything fitted up, shoulder straps painstakingly measured and trimmed, but the sides are too wide on me. So my husband and I had the idea a bending the center crease open just a couple degrees with the heat gun since we had successfully added some bend to the shoulder straps. Well, with the heat gun on low, the crease went from non-pliable to liquid in less than the blink of an eye and warped beyond repair. Needless to say, I am devastated. I ordered a replacement piece right away (last Saturday) from SC, and the website says it's a 20-30 day lead time. All I got from them was a PayPal receipt, so I really, really hope the order was received! On to the better news. I finished the tank last Sunday. I'm really bad at placing decals straight, and I have the Lego sets to prove it. But I had my Cricut out for another project, so I cut out some paper strips the same size as the decals for placement and practice. Then I make some pencil marks to line up the real ones to. I used the Scoutopedia pictures (so helpful!) for decal, greeblie, and rivet placement. Here's the finished product: This weekend, I completed the belt! Thankfully the SC belt comes already curved, but I did need to curve it a little more to fit the curve of my waist. Since I am now terrified of heat guns, I opted for my hairdryer instead. 12 passes at each "joint" on the high setting did the trick, as the plastic was just barely starting to show the beginning signs of stress when I stopped bending. The cotton webbing and drop boxes went pretty easy other than the time spent in front of the mirror measuring, adjusting, and pinning until the boxes were just right at about an inch below the belt. Here are some photos of me wearing it. Yes, I know the belt looks REALLY high on me. Have I mentioned I have an extremely short torso? The belt is on my waist but pushed low enough to start digging into the tops of my hip bones. In an initial fitup with chest, back, and belt taped on/together before my chest piece bit the dust, it looked as if the gap between the chest piece (with it about an inch above the bra line) and the belt will be somewhere between 1 and 2 inches, just enough for the cummerbund to peek through a little. Hopefully that won't be an issue for approval, because sadly I can't change my torso length. Thermal detonator is in process, just waiting on the E6000 to cure. After that, I'll just keep doing whatever I can without my chest piece!
-
Some questions for the experts, since I tend to over-obsess about colors: In preparation for starting work on my armor this weekend, I sorted through my SC kit to take a look at what was included, what's useable for level 2, and made a list of what I still need to buy. In this process, I noticed that the included 1.5 inch cotton webbing for the belt drop boxes isn't as bright white as all the other white stuff I have, and I'm not sure if this will be an issue, as I was under the impression that shoulder bridge, chest to back webbing, belt webbing, cummerbund/codpiece, and pouch shades of white need to match. Regardless, I need more 1.5 inch white webbing for the chest to back attachment since the kit includes elastic for this. Unfortunately, Joann's doesn't carry cotton webbing, so I grabbed some (returnable) polyester webbing that is a brighter white. Here are the questions: Would polyester be allowed for level 2, or must the webbing be actual cotton for level 2? If cotton is absolutely required, is the fact that it is not as bright as the other straps/elastic an issue? Again, if cotton is absolutely required, does anyone have a recommended source? Preferably something that matches what I have from SC? Doing a quick search, I am only finding the 1.5 inch width in heavy-weight. Not sure if that will be OK or it needs to be normal weight. I have included a photo below for reference. From left to right: polyester webbing, back of belt webbing from SC kit, pouch fabric (duck cloth), shoulder bridge elastic, cummerbund/codpiece sateen fabric, and the cotton webbing from the SC kit laying across everything. Please let me know your thoughts! Thanks so much!
