

Cpt_Chops
-
Posts
45 -
Joined
-
Last visited
-
Days Won
1
Everything posted by Cpt_Chops
-
First Time ROTJ Scout Trooper Build (3D Printed)
Cpt_Chops replied to Cpt_Chops's topic in ROTJ Biker Scout WIP
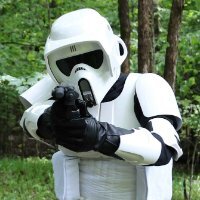
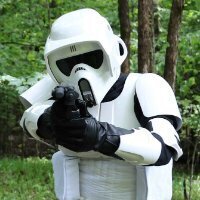
Finally got back to take another look at this. Based on the CRL and your suggestions, I trimmed up the mud flap and butt flap quite a bit. I think it is looking good now. I don't have the belt completed, but I tried to hold it roughly in place. Is this what you had in mind @Chopper? Thanks! -
First Time ROTJ Scout Trooper Build (3D Printed)
Cpt_Chops replied to Cpt_Chops's topic in ROTJ Biker Scout WIP
Thanks @jennyruth! Best of luck with your 3D printed Scout! -
First Time ROTJ Scout Trooper Build (3D Printed)
Cpt_Chops replied to Cpt_Chops's topic in ROTJ Biker Scout WIP
Awesome - thanks! Good to know - glad it won't be an issue for basic clearance. I plan to go for Level 2 eventually, but I will cross that bridge later as recommend. Thanks! -
First Time ROTJ Scout Trooper Build (3D Printed)
Cpt_Chops replied to Cpt_Chops's topic in ROTJ Biker Scout WIP
Thanks for the feedback @Chopper! Thanks so much for drawing on the pictures - that helps a bunch! I'll make some corrections and re-post updates here. Also thanks for the reference picture - I was having a hard time finding a good picture of the back that showed a good angle. Did my earlier post of the boots look alright (sorry to jump thoughts here - been worried a bit about them)? -
First Time ROTJ Scout Trooper Build (3D Printed)
Cpt_Chops replied to Cpt_Chops's topic in ROTJ Biker Scout WIP
Alright, with the other soft pieces in place, I am finally circling back to the riding patches. Based on a combo of the dimensions from: and I was able to made some templates for myself. Before I cut into my suede - I wanted to see what y'all thought. Are the front and back thigh patches correct? I pinned the templates in place to help get a good visual. Front patch (ends just above the knee): Back patch: The "butt flap": My gut feeling on the butt flap was that it was a couple inches to wide and ok on length. However, any feedback would be great. To help see it all together, I also put on the codpiece and cummerbund: Front patch is rounded, so it disappears under the codpiece without leaving an edge: Back flap/back patch: Any feedback/suggestions are welcome - thanks! -
First Time ROTJ Scout Trooper Build (3D Printed)
Cpt_Chops replied to Cpt_Chops's topic in ROTJ Biker Scout WIP
Boots time! Thanks to @cheesewhoopy's great tutorial and @AradunFF's WIP + the handy tip about how to glue the dogbone from @Chopper - I made the boots! Thanks y'all! Got the dogbone positioned above the toe strip. The glue is still drying - but I am anxious to try them on soon. Looking back at the pictures I shared vs the originals, I noticed that my marine vinyl/leather has some texture to it. I hope that won't be an issue. (sitting on pins and needles now) 😕 -
First Time ROTJ Scout Trooper Build (3D Printed)
Cpt_Chops replied to Cpt_Chops's topic in ROTJ Biker Scout WIP
Gotcha - makes sense to me! Thanks! -
First Time ROTJ Scout Trooper Build (3D Printed)
Cpt_Chops replied to Cpt_Chops's topic in ROTJ Biker Scout WIP
Question on the boots: what does the CRL mean by: "Dogbone ends above the toe strip on both sides." Is there a good visual for this? I am currently following this tutorial: Thanks! -
First Time ROTJ Scout Trooper Build (3D Printed)
Cpt_Chops replied to Cpt_Chops's topic in ROTJ Biker Scout WIP
Thanks - I was quite pleased with the result as well! -
First Time ROTJ Scout Trooper Build (3D Printed)
Cpt_Chops replied to Cpt_Chops's topic in ROTJ Biker Scout WIP
Alright, codpiece (or as my wife called it "space diaper") time! Thanks @AradunFF for the amazing template from your WIP: I was able to use your template to make my codpiece without much trouble. I did not have any foam around, so I cut a small piece out of some thin plastic (second pic) I had around (covid-19 face shield material). It was really thin and seemed to do the trick of stopping the codpiece from bunching up. -
First Time ROTJ Scout Trooper Build (3D Printed)
Cpt_Chops replied to Cpt_Chops's topic in ROTJ Biker Scout WIP
Cumberbund and Pouches time! Thanks @AradunFFfor nice instructions on the bund. I was able to follow along and make my own! Huge thanks to @BikerScout007 for the amazing pouch templates: My bund ended up being 8.5 in. tall to fit me correctly and my pouches are the recommended 6x5x2 in. I used velcro to attach the pouches on the tab - so I can pop them off later to die them (if I decide to go that route). My belt still just has primer on it - but I was excited to share the progress, so below is a picture of the bund + pouches. -
First Time ROTJ Scout Trooper Build (3D Printed)
Cpt_Chops replied to Cpt_Chops's topic in ROTJ Biker Scout WIP
I don't have a separate build thread for my helmet. At the moment, it is still in the garage covered in primer and in need of some glossy white paint. However, once I get it up to speed - I'll be sure to share! The helmet was also recommended by MrPoopie as being very accurate. -
First Time ROTJ Scout Trooper Build (3D Printed)
Cpt_Chops replied to Cpt_Chops's topic in ROTJ Biker Scout WIP
I got the STL files for the armor from @MrPoopie. I then bought the helmet STL file from Jesus Salmeron: https://www.cgtrader.com/3d-print-models/hobby-diy/other/wearable-scout-trooper-helmet-by-jesus-salmeron-3d-print-model All of the files printed really well. I had to split the helmet up into several pieces to fit on my printer; however, all the others fit (my printer has a 8 x 10 x 8 in. build volume). -
First Time ROTJ Scout Trooper Build (3D Printed)
Cpt_Chops replied to Cpt_Chops's topic in ROTJ Biker Scout WIP
It looked like it might be easier to put the riding patches on after some of the other soft parts were in place (to help with scaling and placement). So I went ahead and made the flak jacket. Thanks to some great tutorials/WIP's: I used the T-shirt method (heavy-weight cotton), but then cut-off the sleeves and added the raglan sleeves (I am aiming for Lancer if all goes well in the end). My armor is not yet done (needs some more paint and touch-up), but I threw it on just for size/reference in my pictures below. When I held the shoulder bell on, about 3/4 in. of the sleeve stuck out. In the pictures below, some of the seams look a bit white - that is just from some excess marking chalk. -
First Time ROTJ Scout Trooper Build (3D Printed)
Cpt_Chops replied to Cpt_Chops's topic in ROTJ Biker Scout WIP
Thanks Chopper! As for the suede patches, I noticed that in the CRL the wording says the thigh patches "end above the knee". However; in the full picture, the thigh patch is behind the knee armor. I assume when the CRL says "above the knee" it is in reference to the wearer's knee - rather than the knee armor? I figured I should clarify that before getting too far. -
First Time ROTJ Scout Trooper Build (3D Printed)
Cpt_Chops replied to Cpt_Chops's topic in ROTJ Biker Scout WIP
Since its been too cold to spray paint, I started working on the soft parts. For the undersuit, I used Red Kap coveralls, removed the pockets, sized it to fit, and added the collar as shown: http://forum.501stpathfinders.com/index.php?/topic/19259-undersuit-mods/ Before putting the suede patches on - I wanted to see if the undersuit mods/sizing was done correctly. Comments/suggestions are welcome! -
First Time ROTJ Scout Trooper Build (3D Printed)
Cpt_Chops replied to Cpt_Chops's topic in ROTJ Biker Scout WIP
I did exactly what BikerScout007 suggested - lots of personal time spent with a palm sander! My general process was to epoxy together all of the pieces (for those requiring assembly) and then use a palm sander (with 120 grit) to sand down all surfaces to remove the layer lines and seam lines. Some areas are hard to reach with a palm sander, so I used a detail sander (little triangular pad) to reach those. Anything I couldn't do with that - I did by hand. Once the parts were all sanded, I filled the seams with plastic wood filler. Then just alternating coats of filler primer (or just heavy rattle can primer), wood filler, and sanding until it looked ready for color. Once it looked like the parts were pretty smooth, I sprayed one last coat of filler primer and then wet sanded up to 2000 grit. After the parts had dried, I used an air hose to blow off dust and a tack cloth to wipe any remaining grit/fuzz off the surface. Last but not least - white gloss paint! The process is pretty tiring for all the parts - but I am happy with the results thus far. If I do it again, I am definitely going to look into the other methods BikerScout007 suggested ;D It got too cold here for me to keep painting, but once it warms up a bit - I will hopefully finish the armor and share more progress. -
First Time ROTJ Scout Trooper Build (3D Printed)
Cpt_Chops replied to Cpt_Chops's topic in ROTJ Biker Scout WIP
Thanks Chopper - that's great to hear! I am glad that the insides can be left as they are (the raw print is smooth enough with just a bit of hand sanding to not catch on anything). Smoothing the outside is a bit tedious and doing the insides would have been a lot to do. The paint rubbing off is a good point, I may try to hit the insides of the parts with a clear coat to reduces chances of the paint rubbing off. Thanks again - more pictures to come over the next few weeks as I complete more of the pieces. -
Hi Y'all! I am excited to be working on a ROTJ Scout trooper build! Over the summer, a friend and I made some costumes (Mando and Captain Rex). I had such a good time making the Mando costume that I wanted to do a Scout trooper and join the 501st. Since this is my first time building something for the 501st - so feel free to let me know if I am off track at any point. I choose to 3D print the armor and helmet for the Scout trooper (that is what I did for the Mando costume). I have already printed all of the armor (over 600 hours of printing) out of PETG and I am now working on finishing it. The files I am using for the armor are from Mr. Poopie (huge thanks!) and the helmet is from Jesus Salmeron (excellent file as well). Since I am in the process of finishing the armor, I wanted to go ahead and start a WIP post and share my progress. I have shared a couple of pictures of the scout trooper armor. In this first picture, is the first two nearly finished parts (they still need one more gloss white coat to even out a few places). It took a lot of sanding and filler/primer, but I managed to get the surface pretty smooth. For 3D printed parts, I was wondering what the requirement for surface quality was? Would the quality in the picture be acceptable? I have smoothed out almost all noticeable layer lines from the print (there are still a few faint ones if you look really close). Also, I was wondering what the requirement was for the non-visible surface of the parts? I have currently not sanded the back of the parts - so the layer lines are still visible on the back of the parts. I did paint the back of the parts white as well, so that it would match the color of the front (the side shown in the picture). Since the back of the parts are not visible while worn, I assumed that I would not need to sand/smooth the back of the parts; however, the CRL's are pretty specific and I didn't want to make a mistake and miss anything. This is just a picture of some parts awaiting additional coats of primer. This past week I had some time and got the first coats of primer on the helmet - but I'll save those pictures for another time. I have ordered a bunch of material for most of the soft parts (thanks to other tutorials on this forum!) and I will share updates over the next weeks as I get a chance to start working on the soft parts. My current focus is getting the printed armor looking good. Thanks for you help!
