

Kilika
-
Posts
67 -
Joined
-
Last visited
-
Days Won
2
Everything posted by Kilika
-
Hello everyone, I am glad to say that after much frustration, and several failed attempts, I finally printed out the final piece of my left leg's main "body". Sean's legs come in four pieces with the shins coming also in four sections (neither of the shins are pictured here). The Mrs. helped me with a quasi-fit test and, while it looks abysmal with all the tape, everything seemed to be fitting together pretty well. Sadly as The Dark Side Closet is facing a back log due to supply chain issues I decided to don a Christmas pair of pants and a hoody for a make-shift kama. Not screen-acute but felt festive and cozy. I am looking forward to getting everything assembled and more presentable now that I am basically done with my printing. Going to take time with assembly and sanding so I'll post progress as it is made slowly and surely. A big thank you for the armorer's guidance thus far and encouragement from all as it has helped greatly. A very Happy Holidays to all. Cheers Chris
- 58 replies
-
- 4
-

-
- squad leader
- 3dprinted
- (and 1 more)
-
IRoS, I don't mind sharing what I have but ask that it be taken with a "grain of salt" as what I do works great for me but may not be so good for others. I use a fill density of 15-20% which has seemed to be working well enough for me. Print speed is around 50mm/sec. I use ABS as my filament with a bed temperature of 100 and an end temp of 255. I experimented with a lot of different temperature combos but this ended up working the best for my printer. I am a big fan of Overture filament as that again seems to work great for my specific needs. Bed adhesion also gave me fits which is why I like printing with rafts. I then repurpose my rafts for making ABS glue/slurry as well as using it for tinkering and experimenting with techniques for painting/weathering. I did end up getting a printing mat to help with adhesion and have had nearly flawless holds since then. However that resulted in bed level issues which I was able to fix by baby-stepping the Z axis up to allow for the tip to clear and not grind against the print bed. I have a CR-10S V2 so this was fixed by going to "Control" then "Tune" and moving up the Z axis slowly until it started extruding smoothly. I hope that is helpful. I will stress that for your printer the best thing is to trial and error as it took me about 8 months of printing before I started to get it into a "rhythm". What is nice is that with what I have learned working on my kit I've been able to transfer over to other projects to include printing a Darth Nihlius mask for one of my kiddos for Halloween as well as making Christmas gifts for extended family. One final thing to mention for this reply is that with Sean's files there is an issue with the hand plates. There is supposed to be a "slot" near the edge by the knuckles that is not present in his files. The bellow hyperlink is from Thingiverse and is a modified version of Sean's hand plates that includes the slot: https://www.thingiverse.com/thing:3750366 Hope all is well for those reading the post. I am currently working on finishing up my left leg (anticipate being done in a couple of weeks as I only print over the weekend) and am working on general assembly/sanding of the armor. I am planning on trying to post an update on chest, back, and abdominal progression in about two weeks with fingers crossed to have some rough "full armor" pictures in about a month or two. Regarding soft parts still looking forward to my pants/kama getting in and need to construct the belt but progress is forward moving. I hope everyone has a great rest of their week. Cheers Chris
- 58 replies
-
- 4
-

-
-
- squad leader
- 3dprinted
- (and 1 more)
-
IRoS, I do hope your day is going well. To respond to your question, yes I am only using Sean's files. I did order two strap sets (chest and greaves) from Mr. Paul but everything else is from Sean Fields. To my knowledge they are good for basic approval, as I have been getting build feedback from experienced ST armor's in this post. Going for Level 2 however does require modifications. Far East has a super impressive build post about how he converted Sean's files to Level 2 parameters. The only immediate inconsistency I have seen with the basic files and the ST CRL for Level 1 is the left grebil in the backpack's left box not having five rectangles. I have been enjoying my build. It just takes patience but each piece that comes together becomes more and more satisfying. I do wish you well with your building. Cheers Chris
- 58 replies
-
- 3
-
-
- squad leader
- 3dprinted
- (and 1 more)
-
Hello Everyone, Still working on printing out the pieces and am currently rounding out the left leg. Been working on the back: So things to note is that I will be working on "smoothing" out the seems as there are seven different pieces pictured here: two for the backpack, four for the back frame, and the collar connector. The little gap in the center is meant for the center grebil which is another piece I didn't include in this picture. While we do have the circle indent on the lower left side, we do not have the circular extension that goes below the center grebil nor do we have the extensions above the box cut outs (should be two raised areas above each if I am not mistaken). Additionally, I'll need to drill the circle and two square holes by the left box. The "vented" siding is present on both left and right so that is a pleasant win (not pictured here). The collar connector can be seen better here but we can note that the upper portion isn't raised nor is the circular indent present on the top of the right backpack section. The slot for the chest straps is solid and shouldn't be so another area that will need some attention when I work on putting it all together. Pictured here we have the back lower connectors for the Version 2 Chest. The difference in size is why there are cutout guides included in Sean's files for the V2 Chest. Thus there is trimming to be done in the future. With the back boxes you need to be sure to use Sean's boxes with Sean's back. He included back upgrade boxes that are specific to those style armor/files. From playing in Cura I am certain the box upgrades will not fit properly with Sean's. This is Sean's left and pops in just fine. The left grebil however is a point to note as the CRL says it needs to have 5 rectangles and the "as is" at best has four. Also the tube that goes from the bottom left to across the middle isn't present as a piece. I am planning on using some old tubing I have to represent that and will show this picture again as a "compare and contrast" when I make more progress on this one. All I have for now. As always, thank you for reading my post. Cheers Chris
- 58 replies
-
- 2
-
-
- squad leader
- 3dprinted
- (and 1 more)
-
Good evening everyone, I do hope your respective days have gone well. I have been working on printing pieces lately and am very likely going to try assembly of the abdominal armor in the near future. First with Halloween approaching my boys wanted to go as Star Wars characters. My youngest is going as Wrecker from the Bad Batch but my middle wanted to be a Sith Lord. Being the ingenuitive, and lazy father I am, I figured I could cobble together a Darth Nihilus. While he isn't even close to CRL, I don't think it was a bad take: Good thing was it gave me practice with attaching visors via hot glue and he was pretty happy with the result so a win-win. E-22 I've been working on dry brushing my E-22 with some metallic paints to simulate wear and tear. Abdominal Armor I like to use painter's tape to piece together the armor to get an idea of how it fits together. I currently have all of Sean's pieces printed except for the central abdominal plate. The belt backer is not shown in the pictures as I finished that after I took the pictures. I did try to label the left side pieces to help anyone that is printing Sean's files to get an idea of what is what and how it goes. The open section is where the central plate is supposed to go. Of note is a print error that occurred in the left plate one. What baffles me is I printed it upside down so that triangle based-catastrophe was at the base of the print...and yet it continued on and finished without further issues which I find amazing. It is patched up currently with a light mix of ABS slurry (white and black pieces made it grey) and I'll be giving it proper love when I work on it further. Plate left 3 also had some warping which I'll be tending to later. I've already noted that the raised area that goes diagonal amongst the front and sides of the abdominal armor are thin on Sean's files so I'll be needing to bulk those up. They are covered by the painter's tape connection plates one and three to plate two and look bigger in the picture than they actually are. I didn't label the pieces immediately next to the back pieces however the "back left", "back right", and the non-labled back pieces are found in the "Kidney" folder of Sean's files. Under them goes the belt backer which comes in a left and right piece. Of the top of my head, the belt backer files are located either in the "Kidney" or "Belt" folders. While not labeled like the left, we have the right side displayed here. As the "plate two" prints for both sides continue down into the belt I am waiting to really mess with it until I get the nylon strap in from Amazon and see how the belt is going to work/integrate. As a question, how many drop boxes does the belt have, four or six? the belt backer looks to have two but I am not sure if that is in addition to the four on the belt front/side or not. Any guidance in that area would be appreciated. I am anticipating printing the abdominal plate and the upper connectors for the chest/back this weekend and hope to have some updates with observations in about two weeks. As always, any thoughts or suggestions would be appreciated. Thank you all for your time. Cheers Chris
-
TIA, If you downloaded your files from https://shoretrooper.co.uk/ there should actually be instructions in the Version 2 Helmet folder you can open as is. They show step by step how to assemble the bucket which was super helpful. As for the rest of the armor I would look at the completed STL file of the piece and figure out how each subfile would fit into the "puzzle". Cheers Chris
-
Good morning, I would agree with Minimo and go with the bucket first. I am currently working on a Sean Field's set and the "moral boost" from seeing the bucket come together helps a lot. I see my WIP bucket every time I go into my building area which helps as a visual reminder of the "end state" as I am slowly piecing together the other parts of the armor. I wish you the best with the build. Cheers Chris
-
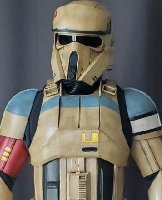
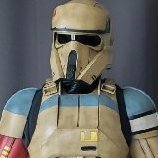
Good day to everyone. I do hope your respective weeks are going well. I recently finished a family trip to Disneyland which was quite enjoyable. Very first ride was Smuggler's Run and everyone, save my poor motion-sick prone wife, enjoyed it. I've been working on jumping back-and-forth printing different pieces for different sections of the armor and have a nice hodge-podge of items at the moment. I've been making some progress on the bucket and the right bicep as pictured below: Bucket With the bucket I'm currently working on trying to touch up the basic paint and then table it until the rest of the armor is ready to weather. That way I can try to get an even and consistent look amongst the pieces. I'm also experimenting with hot gluing the visor (using test scrapes) so when it comes to do it for real, it will go well. Right Bicep Just like with the bucket, I am working on trying to touch up some of the painting. Some of the weathering seen was actually a misstep on my part with the red paint clumping together (misjudged the humidity that day) and I sanded it off. Ironically, I think trying to fix the mistake resulted in the start of favorable scuffing. E22 No updated pictures for the E22 however I did get everything printed and attached. I need to sew up the sling still but think overall it is looking pretty descent. I got in my MPSB straps for my legs and chest today which was a pleasant surprise. They look like they will work beautifully with my Sean Fields build. I still have one more piece of the main back/chest frame to print out (the upper connectors) before I can start trying to play more with that. As many builders likely know, Sean's files are amazing but you get what you pay for. I have identified the following issues so far that I'll be working on addressing: Chest/Back Sean's files include a folder labeled as the Version 2 chest. In contrast to the Version 1 chest, which looks quite "bubbled and rounded" the Version 2 chest looks more similar to reference pictures. Sean's back files however were never updated and reflect "coupling" pieces with the Version 1 chest. Sean did include a folder dedicated to making the necessary upgrades to the Version 1 back so it would properly fit with the Version 2 Chest. From what I have seen and played with, many of the files in the core Back folder are still relevant except the lower and upper connectors and instead specifically need those respective files from the upgrade folder. Sean did include cut guides which appear to be for those that completely printed out the Version 1 back so you could use them to trim it up to fit properly with the Version 2 chest. When I have all my pieces printed out, and start assembly, I'll try to provide pictures pointing this out specifically. Another noted item is that the upper connectors seem to form a perfect bridge between the chest and back. In many of the reference pictures I've been looking at, there is a gap between the two pieces which is bridged by the straps. These means that the upper connector piece will need to be trimmed to allow for better screen accuracy. Abdomen/Kidney I am working on slowly printing out these pieces and am currently focusing on doing them first. Given my current time table I am expecting to have them likely all printed out by mid-end October to begin tinkering with assembly. I do believe the diagonal strip that Sean included on his design is pretty skinny and will likely need to be "bulked up" to meet standards. Legs My right leg has all the pieces printed and, now thanks to Mr. Paul, I could work on starting to assemble. I am holding off on working further on my legs though until I get my pants/kama in. I ordered from The Dark Side Closet and am excited for when they get in. Regrettably, they are back-logged (if not I likely would have gotten them by now) so I am hopefully they will come in the next few months. If not, I will just focus on the rough assembly of the abdominal items and work on finishing the back. I do thank you all for taking the time to look over my post. By chance, if anyone has good recommendations on a post on how to weather, it would be appreciated. I am a bit away from it still but would be very interested in reviewing more about the technique before I actually need to start it up. I do hope everyone has a good rest of their week. Cheers Chris
- 58 replies
-
- 1
-
-
- squad leader
- 3dprinted
- (and 1 more)
-
Hello all, I do hope your respective weeks have been going well. I made some progress over the weekend working on assembling parts of my E-22 as well as trying to move forward on the right leg. In regards to the E-22 I still need to finish up the flashlight and get it attached to the right side. In addition, I followed BikerScout's strap tutorial which was both helpful and whimsical (identifying strap direction in relation to the correct way to place a new toilet paper roll made for zero confusion). I still need to sew the strap and get another swivel stud for the right side of the blast but beyond some painting and weathering, I think it is getting closer to completion. I am looking at trying to dry brush a metallic paint on some of the areas that should have a natural "wear" to them like the grip and shoulder stock in order to simulate general use. In regards to the right leg I finished printing the "core" parts and need to move on to the shin. From the front it looks like the bottom of the greaves flair out however that is because I don't have them "secured" with the back strip/the straps. You can note from the back picture that there is a gap that is resolved with bringing the pieces together and covering with the back strip (it looks a lot worse than it actually is). I am looking at widening the back strip slightly to account for some "wiggle-room" while also not compromising the overall look. The current strip I had printed was a partially failed piece so is being used as a reference point, thus why I am looking to try to print a new strip this weekend so I can start experimenting with securing methods (looking at velcro that is then further secured with the low and high straps as secondary methods) while I work on sanding and getting ready to resin the "core" leg. Also pictured is the family dog, Cerberus. He very much likes my Orca Bays and has been trying to help me with the weathering process, via his teeth, despite my protests...so points to him for trying to be a good crafting buddy. I still need to obtain the straps and am looking at going for a MPSB set for the legs and chest buckles/straps. Any insight by those whom have used his straps (I expect they are exceptional) would be appreciated. As always, thank you to all for your insights and advice as they are appreciated. Cheers Chris
- 58 replies
-
- 1
-
-
- squad leader
- 3dprinted
- (and 1 more)
-
Good day to everyone. Been making some steady progress this weekend. Grandparents were visiting so my little ones where out and about with them which helped for the adult "arts and crafts". I finished printing my hengsletter and just need to do some resin work on it before I start painting and work on completion of my E-22. I've also been working on one of my greaves. I don't want to get into it to much until I get my pants in however it "seems" to be going well at the moment. Using Sean's files, there are four main components to the greave. Pictured are the bottom three pieces (still need the knee/kneecap). I've joined the pieces together using a mixture of ABS/acetone (ABS from the printed rafts/failed pieces/support structures) and then started using wood filler on the outsides to "smooth" it out. I also used by ABS mixture on the interior to help further strengthen the weak points. When I get the fourth piece printed, I'll look at doing my resin layer to provide some additional stability to the outside. Been also working on the V2 Chest. Got all the pieces joined together but need to work on filling in some seems with the ABS slurry (for strength) then smooth the piece out. Sean's chest pieces had some circular outcroppings that don't appear at all on the reference pictures I looked at. I think they may be acting as guides to place the buckles however I sanded it down on the right side and will be getting the left sanded down later. Just like for the greave, I used the slurry to join the pieces. The interior looks messy but it holds really well. I remember reading a post by KOtrooper regarding using fiberglass sheeting to help strengthen the interior which is something I am strongly looking at doing for the chest abdominal sections. Looking to try to get the E-22 finished up in the next few weeks along with progress on printing pieces for the abdominal or back. Hope everyone has a good weekend. Cheers Chris
- 58 replies
-
- 3
-
-
- squad leader
- 3dprinted
- (and 1 more)
-
BikerScout, Thank you for the help. I was thinking that was the case but knowing is a better feeling. Cheers Chris
-
Good evening everyone. I do hope your respective weeks are going well. I had a CRL question I was hoping an armorer could advise on: For the Level 2 Greaves it says the straps cannot be molded. What does molded mean? Is it associated with 3D printed or resin casted? The advice is appreciated as I am trying to incorporate Level 2 elements into my build. Thank you for your time. Cheers Chris
-
A good evening to all. I believe the "correct" version is V2 however I am waiting to fully assemble mine until I have the back made to ensure the sides can join properly per the CRL. The good thing about Sean's files are they are free but we get what we pay for. While Mr. Paul's files require a donation, they are more screen accurate. From looking over the forums, Sean's base files have issues with the hand plates and the side abdominal plates. Specifically missing the front indent on the hand plates and the raised angled ridge on the sides. From looking over pictures I think the V2 chest has a few minor tweeks needed but I will post more on that when I start assemble (missing one more part due to failed prints). Sean also has adjustments for the back/back boxes that I haven't studied yet as I am working on the arm based pieces. I have found it helpful to take the STLs Sean provided of the entire print piece and compare the look to pictures/help figure out how to assemble. Beyond the helmet no guides are present so that has helped me keep some of the pieces straight in my mind. I hope that was helpful. Cheers Chris
- 58 replies
-
- 1
-
-
- squad leader
- 3dprinted
- (and 1 more)
-
In that avenue, I have a progress flow for the first bicep: Good evening everyone, Been working on one of my biceps and have a picture progress flow for it: Starting from the printer: https://flic.kr/p/2mcixkB After sanding and applying wood filler to help fill some of the areas that didn't print smoothly: https://flic.kr/p/2mc9EjM https://flic.kr/p/2mceu3L First round of resin, still not pleasing to look at: https://flic.kr/p/2mcixxA Sanded the resin, nice and smooth and primed black: https://flic.kr/p/2mceR9B https://flic.kr/p/2mcb4o5 Just like all my other pieces, I need to weather and scuff it, but overall I think it came out fairly decent: https://flic.kr/p/2mcREjs https://flic.kr/p/2mcLAnA Next up is working on getting the other printed and procuring some Toyota Red. Thank you for taking the time to look over the post. Cheers Chris
-
Tarok, To begin, I hope your day is going well. From what I have experienced so far, I have not had any issues with adherence or finishing that wasn't user error. I am getting better with my resin application however the only finishing problems I had was thinking I had an even/smooth layer when it wasn't. I've been using the wood filler to help fill in gaps or seems resulting from layer splitting or joining different sliced pieces together (I like using an ABS slurry for initially adherence). For all the areas I've used the wood filler first, then sanded, then used resin, and sanded again I think they have been coming out well. I find I just need to be patient with my application of the resin. Using the bicep piece I've been working on, I did a layer of the resin on 3/4 of it one day and let cure then did the other 1/4 the following day. As I printed it as a single piece, I used wood filler around the base where the print touched the print bed as the raft didn't separate as cleanly as I would have hoped. I also used it around the sides where it had a small gap to help make it more "sturdy". The filler helped fill in the gaps which allowed the resin to be smoothly applied resulting in a piece I was pretty happy with. Thank you for your comment, I hope that my experiences can be helpful for you with your printing. Cheers Chris
- 58 replies
-
- 1
-
-
- squad leader
- 3dprinted
- (and 1 more)
-
Minimo, Thank you for the suggestions as I will look into them in the next few days. The hot glue gun makes so much sense yet completely eluded me. I know the Mrs has one so I need to find it and do some experimenting/practice on scrap pieces. I'm currently working on my biceps. I got one printed, sanded, wood "fillered", sanded again, and finishing up resin prior to sanding than painting. I hope to have pictures of the process up at the start of next week. I'm going to try to finish up my bucket and E22 in the next month so I can switch gears to the chest/back then abdominal/lower back. Ordered pants from Dark Side closet so holding off the greaves till I have those to play with. I hope everyone is having a good start to their week. Thank you for reading my post. Cheers Chris
- 58 replies
-
- 2
-
-
- squad leader
- 3dprinted
- (and 1 more)
-
Hello everyone, I do hope everyone's weeks are going well. I've been working a bit more on my kit but had a bit of a delay given some "electrical issues" with my printer. With that resolved I've been working on finishing the items needed for my E22 as well as printing out the chest pieces. Currently I need one more chest piece before I can start working on the assembly. What follows are linked pictures from Flickr with the current progress: Forearms https://flic.kr/p/2mbsgik https://flic.kr/p/2mbxpSo https://flic.kr/p/2mbw1w6 I've been playing with sanding down the pieces and then going over them with 3-D printing resin. After the resin cures I sand that down and have been getting a pretty decent result. I started doing a little weathering but to the forearms but not much. Shoulders https://flic.kr/p/2mbw1G6 https://flic.kr/p/2mbtiAg The shoulders have been sanded down, smoothed with resin, and primed black. I need to paint them the correct colors but was curious if anyone had good suggestions on where to get the Ford Nordic Blue and grey aging sprays. E22 https://flic.kr/p/2mbtiDx https://flic.kr/p/2mbsgR4 The E22 seems to be coming along well enough. I have the materials to make my strap and am looking to add that, the scope, and flashlight soon. On a secondary note, does anyone have any advise on how to attach the helmet lens? I've been putting off the next step in completing the bucket as I am trying to figure out the best way to accomplish that. As always, thoughts and feedback are appreciated and I do hope everyone has a good end to their day. Cheers Chris
-
Good morning all, I do hope everyone is doing well today. I have the day off so catching up on basic house stuff as well as updating some pictures. I got my printer all set up however my TF card went into hiding so I am waiting on a replacement before starting out some test prints to get it back into fighting shape. To clarify Tarok's post I made mention of working on the pauldrons but didn't provide any pictures. To correct that, I have two pictures that follow. They are currently in a rough state as I need to do some filling on gaps/seams made during the printing. Additionally, as I printed them during some of the colder months, they had some minor splitting between two areas. Nothing was catastrophic but it will require a little more patching and elbow grease come the sanding. I had luck with patching/gap filling on the bucket using some of the ABS melted down with acetone which is what I plan on doing to the areas of concern on the pauldrons. Pauldrons https://flic.kr/p/2m3nHny https://flic.kr/p/2m3nHyk Looking at the forums I've found several good guides on how to put everything together for the E-22. As the pictures show, it needs work but the "skeleton" is coming together. E-22 https://flic.kr/p/2m3MM3Y https://flic.kr/p/2m3MMm3 I'll get some better pictures of the E-22 when I've made some progress on it. In the process of ordering my pants and kama which will only leave the belt for soft parts. I appreciate everyone's prior comments and guidance and hope everyone has a good start to their weeks. Cheers Chris
- 58 replies
-
- 2
-
-
- squad leader
- 3dprinted
- (and 1 more)
-
Evening everyone, Did some quick pictures of what I currently have for the bucket as well as the "plates" on the gloves. I currently have all the pieces for the bucket printed but still need to finish adding them, painting, and then weathering: https://flic.kr/p/2m3fAq5 https://flic.kr/p/2m3bXHz https://flic.kr/p/2m3gGnR Lighting comes into play with the gloves as they are the exact same color (Montana Gold Sahara Beige) as the bucket but they look much darker in the pictures. https://flic.kr/p/2m3jx3o https://flic.kr/p/2m3bXwn I still need to do some aging on the gloves but does the weathering look ok or is it a bit much? I was going for a "chipping" on the left but I might have gotten a bit overzealous on it. Currently working on setting my 3-D printer back up and hope to be back up and running on my forearms this weekend. Thank you all for any thoughts/feedback. Cheers Chris
-
Good day everyone, I do hope everyone has been doing well. I've been away for business and am happy to be back home and looking forward to making progress on my ST squad leader build. I'll be working on getting some current pictures up in the near future and would appreciate any and all feedback. Currently looking at just basic approval with the intent to refine the build once I have more experience (again, any and all comments/feedback would be helpful and appreciated when I have pictures available). Before having to halt the build due to work, I had been working on 3-D printing Sean Field's files. I was making decent progress on the bucket, an E-22, and the pauldrons. I need to weather/finish touching up the bucket, as that will likely be the first item close to completion, while the others still need finishing/parts printed (E-22). I was part way through my first fore-arm prototype when I had to break down the printer in preparation for an office-make over my beloved wife was completing while I was away. I am hopeful to have my office cleaned up soon to get everything set back up and work towards getting more of the armor printed. Planning on finishing up the forearm before transitioning onward to the main body (chest/abdomen). For soft parts I have already gathered a shirt from Imperial Boots (older version that will need some modifications to get beyond Level 1) as well as my gloves (Endor Finders) and boots (Orca Bay). If anyone has some good recommendations for the pants/Kama it would be appreciated. I appreciate everyone's time in reading the post. Honestly drafting it now as a way to motivate/enforce accountability on myself to get back in the saddle and making progress. I hope the rest of your respective day goes well. Cheers Chris
- 58 replies
-
- 1
-
-
- squad leader
- 3dprinted
- (and 1 more)
-
Pathfinders Virtual Armor Party -- 8 August 2020!!
Kilika replied to BikerScout007's topic in Announcements
Good day everyone. I won't be able to attend, due to family visiting from out of state, but I think this is an awesome opportunity and I appreciate the command staff/armorers for putting it on. Please do let us know if another one occurs as I would like to say hi to the staff as I have been appreciative of the help I have received to date. Cheers Chris -
Orca Bay Brecon Sizing Conversion Question
Kilika replied to Kilika's topic in Shoretrooper Soft Parts
BikerScout007, I thank you for the insight and appreciate having someone else's data for comparison. I'm working on collecting up some soft pieces while I finish moving in. Got my gloves ordered from Endor Finders so a trip back to Ard Moor's website is in line in the next few days for my boots. Hopefully in a couple of months I'll start my thread up in the ST WIP section. Cheers Chris -
Good evening everyone, A question for those that have purchased their ST boots from Ard Moor. For those that have would you mind sharing what your shoe size is and what size you ordered? I have been looking at different conversion charts and there seems to be some disagreement about conversion. Thus, I believe the easiest way to determine the correct size I need (I am an 11 US so I suspect a UK 10.5) is to ask the experts that have already done it and compare hard data against the conversion charts. Thanks for your insights and help. Cheers Chris
-
Retrofire and Mickeymark34, I would like to thank both of you for the responses. Just finished Day 1/7 for travel so a bit fried at the moment but very appreciative for the thoughts and insight. I'll look more into both but feel like its basically winning the lottery given that I couldn't lose with either choice. I'll look at reaching out later next week after I've had time to rest a bit and can compile a meaningful e-mail. Cheers Chris
-
Hello all, Due to work I'm moving my family to California in the next week and will then be working on finishing all those respective logistics of the relocation. In the next month I hope to start the first steps towards making a ST Squad Leader or Captain kit and have been spending the COVID period reviewing the forums for insight by others making ST kits (big fan of Cricket's posts). This would be my first build so besides pinging for help/advice on the WIP forum I would like to also e-mail my closest Garrison to tap into their experience/knowledge. I will be in the area of Solano County, which is by Sacramento, so I believe the correct Garrison is either Golden Gate or Central California. If anyone knows which Garrison is the "correct" one to e-mail, your guidance would be appreciated. Sorry for the newbie question but I'd rather ask and get the help. Thank you for taking the time to read the post, I do hope your respective days go well. Cheers Chris