

FarEast
-
Posts
141 -
Joined
-
Last visited
-
Days Won
1
Everything posted by FarEast
-
Many thanks, I’ll continue to support the group and help others with their builds and questions - without that group and the amazing support it gives this build wouldn’t have been possible.
-
FarEast ST19758 Vanguard Request (APPROVED)
FarEast replied to FarEast's topic in Vanguard Deployment Request
I did miss that thank you! -
Yes I did miss this! Thank you so much guys - it means a lot to me, more than you could actually imagine. Last October I had completed a Halloween trooping session at a local kindergarten, on the way back home on my motorcycle I was hit by a car that made an illegal U-turn across 4 lanes of traffic and hit me side on throwing me off the bike and into oncoming traffic. Fortunately my very, very good leathers, armour (Thankfully not my TK armour) and helmet saved me from injuries, however I was wearing lightweight gloves that basically exploded on the impact. The blunt force trauma shattered my little finger, and then all the internal bones in the hand and then the thumb joint requiring pins and plates to hold the hand together in the hope that the bones would repair themselves and that long term disability would be minimised. This had a huge impact on my profession, I was at the time an early education specialist, as well as a professional model building for the likes of Sir Peter Jackson and also Bandai with many of my models being used for display and promotional work here in Japan and on their websites - as you can imagine the injuries to my hand pretty much ended that. However I did not want to be the victim and when I get angry I get creative as I want to channel my energies in a positive way - so I built the Prusa i3 MK2 printer and went about this project..... the idea was that if its 1:1 scale I could pretty much do it one handed...... sadly that was not the case so my kids helped making this a joint effort. Then around March of this year they removed the 3 huge pins locking my wrist and thumb allowing me some more movement in the hand allowing me to start making the serious modifications needed on Sean's wonderful files to meet the standards laid out - at first I was only aiming for basic approval but as time went on and the advice, encouragement from this site and the Shoretrooper Fam on FB; and the realisation that when you start modding you might as well go the whole route this build took on a great aim, that of reaching the Vanguard status. The build took its toll on me, I bled for it popping one of the staples in my hand as well as a few slips of the craft knife.... (Try holding PETG sheet with an elbow while you try and cut it) as well as the sweat and tears we all experience on this builds - The Japan Garrison GML really went above on beyond in getting me approved pretty much staying up all night to go over my armour and soft parts making sure it was done so that I could then try for vanguard. Again the Vanguard approval team really went out of their way to address the issues, post reference photos and advice so that I had a real chance of getting the modifications done in time for the racing shirts orders to go through. Again thank you all - and I'm honored to carry the title of Vanguard!
-
FarEast ST19758 Vanguard Request (APPROVED)
FarEast replied to FarEast's topic in Vanguard Deployment Request
OH Brother that's great news!! Thank you so much and I just ordered that shirt! -
FarEast ST19758 Vanguard Request (APPROVED)
FarEast replied to FarEast's topic in Vanguard Deployment Request
Plastazote and Shoulder Bell correction: I actually reprinted the Shoulder bells bigger after discussion with other Shoretroopers.I also angled the plastazote in wards as per your recommendation so it naturally goes under the bell.: Photos courtesy of my Daughter. -
FarEast ST19758 Vanguard Request (APPROVED)
FarEast replied to FarEast's topic in Vanguard Deployment Request
Upper receiver window repainted to remove the red bar. -
FarEast ST19758 Vanguard Request (APPROVED)
FarEast replied to FarEast's topic in Vanguard Deployment Request
Understood and will remove red strip -
FarEast ST19758 Vanguard Request (APPROVED)
FarEast replied to FarEast's topic in Vanguard Deployment Request
The foam is done - just plan on putting the armour back on and taking the shots for you again. As for the red bar on the blaster - just let me know - two passes with the airbrush is all it takes to change it. if you could let me know ASAP as I hope to pass soon as I’d love kento put the order in for the racing shirt with vanguard status so I really appreciate the effort you’re putting in to help me. -
FarEast ST19758 Vanguard Request (APPROVED)
FarEast replied to FarEast's topic in Vanguard Deployment Request
Bolts replaced with correct version: -
FarEast ST19758 Vanguard Request (APPROVED)
FarEast replied to FarEast's topic in Vanguard Deployment Request
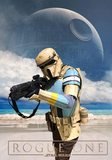
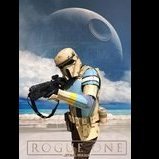
E22 Blaster Stunt E22 Blaster: Sean Fields 3D files - modified M38 Scope: Bulldog Prop M300 Tactical Flash light: Airsoft Replica *Due to Japanese Firearms and Sword laws it is illegal to import the S&T Sterling Airsoft replica - The legal limit on Airsoft replicas in Japan ( 0.98 Joule (325fps) and as the S&T is rated at 350~380 FPS and would be detained at customs and either sent back to port of origin or destroyed. -
FarEast ST19758 Vanguard Request (APPROVED)
FarEast replied to FarEast's topic in Vanguard Deployment Request
New chin cup just arrived! And installed! sprayed it black which will probably flake off leaving a stained look. -
Approved! ST 19758 Reporting for duty!
-
FarEast ST19758 Vanguard Request (APPROVED)
FarEast replied to FarEast's topic in Vanguard Deployment Request
Thank you so much for the references they were a great help and the side by side comparison really showed exactly where the issues were - I appreciate you going out of your way to do that for me. I have a ton of Plaztizote left over so I will probably remove it and remodel it so that it faces inwards like yours. Again many thanks for the guidance. -
FarEast ST19758 Vanguard Request (APPROVED)
FarEast replied to FarEast's topic in Vanguard Deployment Request
That’s really helpful thank you! I think I might have it!! -
FarEast ST19758 Vanguard Request (APPROVED)
FarEast replied to FarEast's topic in Vanguard Deployment Request
Also in regards to the shoulder bell another build group has stated that these are the correct ratios, could you confirm this please as the bands seam to be a sticking point for many of us. I took my measurements directly from the CRL by scaling the image to my shoulder bells. More than happy to repaint - I just want to get it right first time and it seems there is no clear rule of thumb here and its by eye, and due to the curve of the shoulder bell it messes with the perception of band thickness. More detailed imput would be really helpful to the entire community. -
FarEast ST19758 Vanguard Request (APPROVED)
FarEast replied to FarEast's topic in Vanguard Deployment Request
Awesome feed back and I really appreciate the fast response and also the excellent reference photos - I can address some of the things immediately. 2 wedge shaped recesses on the outer edge of each mandible: Colour confrmation: Cover strip colour variation: Thank you for that! It was lighter as I hadn't actually weathered it after a hot fix to remove the detail of the cover strip. Shoes: Front Greeblie: -
FarEast ST19758 Vanguard Request (APPROVED)
FarEast replied to FarEast's topic in Vanguard Deployment Request
Awesome thank you - as mentioned its built with all the correct mounts and screws - its awaiting its gun metal finish and scope and flash light. -
FarEast ST19758 Vanguard Request (APPROVED)
FarEast replied to FarEast's topic in Vanguard Deployment Request
Right now the E22 is being built - awaiting certain parts such as scope and flashlight, is the blaster actually required for Vanguard status? If so can it be stunt or will it need to be the hero version? -
FarEast ST19758 Vanguard Request (APPROVED)
FarEast replied to FarEast's topic in Vanguard Deployment Request
Hip Armour and Details: Jodhpurs: Greaves: Action Shots: E22 Blaster: Work in progress -
FarEast ST19758 Vanguard Request (APPROVED)
FarEast replied to FarEast's topic in Vanguard Deployment Request
Abdominal Armour: Shoulder Bells/Biceps/Forearms: Soft Belt & Hard Belt: Gloves: Shoes: -
Armor: Sean Fields - Modified Helmet: Sean Fields V2 Shirt: Sheev's Emporium Breeches: Steven Walker Boots: Orca Bay Brecon Havana E-22: Sean Fields V2 Soft belt: Jim Tripon Gloves: Endor Finders TK8271 Rogue Trooper supplied me with test cards of Montana Gold Sahara Beige and Nordic blue - these were then copied exactly using spectrum and pigment analyses and used throughout the build Toyota red as per the CRL was used. Helmet Details: Shirt and Neck Seal Bib: Chest:
-
So with a final big push I got the Shoretrooper armour finished and submitted for approval!
-
So on with the build, I decided the next step would be the greaves - I had to slightly increase the size of these due to having large calves from my days as a cyclist. Next I went to work on Paul Prentice's awesome buckles; cutting out the back and sanding them smooth. } Then I lopped through a section of his straps and bonded in to place. Also due to the support required I went back to using automotive filler rather than wood filler. My local hardware shop had a 30% sale on so not only did I pick up a new batch of Montana Gold Sahara Beige, but also a new paint gun and air compressor! Painting armour is now going to be so much easier! Also my Rebel Art Base shoretrooper trousers arrived - WOOT! Now time for distressing and then weathering! And so did I!
-
Also today I got two LBB (Little Brown Boxes) of softparts! The undershirt is made by Sheev's Emporium and regarded as the most accurate undershirt and neckseal currently available. The shoes are through Katherine Partis in the UK who supplied the originals to the set, so these are the real deal!
-
The hip armour was built using the templates provided by one of the awesome members seantrooper - many thanks for sharing this with the community! Because I was unable to get a long roll of plasizone I had to get creative and hide the breaks behind the armoured plates. 1mm Plaplate was added on areas that would take the snaps and also accessories as these would prevent damage to the plastizone if they got caught on anything or through general wear and tear. (I will be reprinting the cyclinders as it turns out the body is too long in comparison to the movie armour. Once everything had cured it was time to hit it with more Sahara Beige and then connect it all together! (Please note that the front of the hip armour has been deliberately left open - I'm reprinting the adbominal armour and can't cut and bond to size until I have a finished piece!)
