

BrinkHouse
-
Posts
46 -
Joined
-
Last visited
-
Days Won
1
Everything posted by BrinkHouse
-
Stefan, I'll use a combination of black washes and lightly misted spray to get the effect!
-
More helmet progress! Once the filler primer dried I went back and touched up a few areas with more wood filler and sanded the entire helmet down in preparation for the black coat. Then I sprayed two light coats of flat black enamel a few minutes apart. It went down great and now I'm waiting for that to fully cure (48hrs) before starting to apply my Sahara Beige, which I picked up at my local Blick Arts store. Paints ready to go. Montana Gold Sahara Beige, Shock Red and Himalaya blue, as well as some acrylic black for washes and some sponges and cheap brushes for application. Biceps are also printing away!
-
Wow, today was VERY productive! I have a feeling I'm going to get a lot done on the helmet this weekend... Here's the first of many, many sanding sessions. The benefit of the wood filler is that it dries super fast, sands beautifully and best of all, no fumes! It also cleans up with water which is great. Filler primer coat #1 went down great. Lots of the helmet is already smooth, other areas with print lines still showing will lessen with second coat, then whatever lines/defects are still showing will get more wood filler, sanding, and a last thin coat of primer. That's (finally) it for today.
-
Time for your mud bath! My printer wasnt able to successfully print the snout circle greeblie, so I cut it out on my CNC machine with a 1/32 bit! Next up is sanding the helmet then first coat of primer! While I'm working on paint/detail for the helmet I'll start printing the armor pieces starting with the arms.
-
Helmet is ready for sanding/filling/painting! (greeblies printed but not shown here) Ordered this lens which is similar to what I've seen others use, I wanted the curved front as opposed to the flat look of the welding shield. https://www.amazon.c...d=ATVPDKIKX0DER Also ordered the pads for the interior. I'm a fan of the military style inserts- https://www.amazon.c...+helmet+pad+set
-
Finished bucket waiting patiently for its greeblies and blast shield!
-
Can you elaborate or link to any threads/posts with more info on these inaccuracies? Thanks!
-
Ok, thanks Stefan! I really appreciate all your great feedback thus far.
-
Almost done with my helmet prints, Sean has a file called 'Eye Bags' which I'm a little confused on. Is it the black piece below the lenses as seen below? Screen shot from Seans install guide- And here are a few photos with/without. I haven't glued it yet, just have it taped until I can get a confirmation on how it should sit. Seems like it probably shouldn't sit so high in the middle? Almost all photos show it only towards the bottom/edges of the lenses. Is it most accurate to have this piece?
-
3D Printed E-22 + Post Processing Breakdown!
BrinkHouse replied to BrinkHouse's topic in Shoretrooper Weapons
Ah yes, I believe this part broke when I printed those parts as it was connected to support material. I'll see if I can maybe add that with some sculpting putty! -
Thanks, Stefan, I'll try to get those changes made!
-
Absolutely will do, thanks Joel. Checking your thread now and feel free to PM me if you wanted to share any specific details!
-
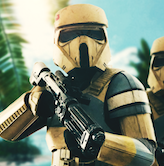
Finished E-22 I just finished printing and painting my E-22, again using Seans files. I used this build as a primer of sorts, as I'm pretty new to 3D printing. You can find my thread which explains my painting/finishing process HERE.
-
Hey guys! So excited to finally be starting this thread. Getting 2018 started right. As the title says, I'm underway on 3D printing a set of shore armor using Seans files! I'm using a CR-10 printer, which has a huge build area of 12"x12"x15". I just finished printing and painting my E-22, which I used as a primer of sorts, as I'm pretty new to 3D printing. I gotta say though, I'm HOOKED! I can't imagine how 12 y/o me would've felt. The CR-10 is awesome in that I can print a lot of pieces in one go instead of having to break them up into separate files. Prints take a lot longer but the payoff is worth it. I'll be updating this thread through the entire build process, all the way to submission and approval so hit that subscribe button, sit back, and enjoy the ride! It's going to be a long one!
-
I've recently finished printing and post processing my E-22, which was mostly printed at .2, 20% infill, 4 shells. I went with slightly higher infill and shells to make it stronger in case it was dropped. It's rock solid and I don't worry about it breaking, well not any more than I would with any other plastic prop. I'm printing the rest of Seans armor now, starting with the helmet, for which I've dropped to 10% infill with 3 shells. A lot faster removing that 4th shell. For the other larger armor pieces with less detail like the biceps, shoulder bells, chest, forearms, etc. I'll probably switch to .3 layer height w/ 10% infill and 3 shells to increase speed, the pieces are thick enough that they should still be plenty strong, esp. once I've finished them with wood filler (much better gap and surface finisher than bondo or resin, IMO)
-
Hey guys! Here is my recently finished E-22 which I 3D printed on my CR-10 using Sean's design. Unfortunately I don't have many pictures of the printing/assembling process, but I did a few things in finishing which I think may be helpful to others also printing this blaster. 1. After the blaster was assembled and sanded, I sprayed three light coats of high build filler primer. I let it set up and after about 6 hours I came back and using a screwdriver created some scratches and scrapes in the primer. The idea here is that once all the other paint layers are added, these scratches will really appear as gouges in the metals surface. More 3D dimensional than just painting on the weathering. 2. Next, I sprayed a few coats of hammered silver paint. The idea with this coat is to add not only the cast metal appearance in the finish, but to also setup for the next stage. Be careful with these coats as the hammered paint goes on thicker and has more tendency to run/drip. 3. If you follow this finishing process, it's important to let the hammered coats cure completely. I waited 48hrs before proceeding. 4. Then, I sprayed two light coats of semi-gloss black. Nothing fancy here. After the paint had dried for about 2-3 hours, I came back and started to do some weathering sanding. Because the hammered silver below is fully cured, and the black isn't, it sands away cleanly leaving the silver underneath. Be careful not to apply too much pressure or repetition in the same area, otherwise you'll go through to the primer. This is a VERY rewarding process, as the sanding process allows you to scuff the rifle in a much more organic way than painted silver detailing (though we'll do some of that as well). It also eats through the paint in a very realistic way, gradually revealing the silver and showing the depth of the layers. I also used sandpaper to add some scratches in the black paint at this stage in areas where I felt like there would be a lot of contact like the butt, cheek rest, barrel, etc. 5. Then I went in with some silver and brass (for the scope) and did some detail painting and additional chipping/damage detail painting. This is always my favorite step as you really start to see the realism come out and you get to tell a story with the damage and the life of the blaster. The more you can imagine the scenarios its been through the more convincing the weathering will look! 6. I applied some black model wash to a few areas, mainly the inner cylinder areas which were painted silver. This makes them blend in more and adds some texture like the metal has worn and scraped inside the body over time. 7. Finally I added two light coats of satin clear coat, and its all done! If you want you can even add some scuffs in the clear for additional weathering/aging, but its up to you how worn you want it. Because the shore troopers look pretty weathered in the film, it made sense their blasters would too! So thats it for this post. Sean deserves so much credit for how beautifully this all went together. He really thought about the whole process from printing orientation all the way out to construction. I'm almost finished with his helmet and then on to the other armor pieces. I'll have a build thread for that separately, but so far the process is just as smooth! Please leave any questions you may have about the E-22 or my finishing process, I'm happy to help and hope you all have a great new year! 'raw' prints, assembled and sanded: finished blaster:
