

sibbel29
-
Posts
326 -
Joined
-
Last visited
-
Days Won
5
Everything posted by sibbel29
-
Jason, my brother! So sad to wake up with the news you won’t be around anymore! Even though we only met online, we had a strong connection about music, scouts and our beloved detachment. I gonna miss our talks about armour, thanks buddy for your positive vibe, gonna miss you! RIP Jason , buckets off[emoji22] Verzonden vanaf mijn iPhone met Tapatalk
-
KS Helmet kit build issue / Finished!
sibbel29 replied to Darthmarses's topic in ROTJ Biker Scout Armor/Helmet
looks good for display, if you want to upgrade it and work out some details like the returnedge of the faceplate, you know how to find me[emoji6] Verzonden vanaf mijn iPhone met Tapatalk -
KS Helmet kit build issue / Finished!
sibbel29 replied to Darthmarses's topic in ROTJ Biker Scout Armor/Helmet
looks great bro !!! Verzonden vanaf mijn iPhone met Tapatalk -
KS Helmet kit build issue / Finished!
sibbel29 replied to Darthmarses's topic in ROTJ Biker Scout Armor/Helmet
no worries bro, let me know if you need ABS, help or otherwise! good luck!! Verzonden vanaf mijn iPhone met Tapatalk -
KS Helmet kit build issue / Finished!
sibbel29 replied to Darthmarses's topic in ROTJ Biker Scout Armor/Helmet
if marcel needs it I have it and ship or bring it to him[emoji1591] and can help him out when neccessary. that supportpiece you mention is what I mean and tried to describe, it works as a placeholder for the faceplate too [emoji4] Verzonden vanaf mijn iPhone met Tapatalk -
KS Helmet kit build issue / Finished!
sibbel29 replied to Darthmarses's topic in ROTJ Biker Scout Armor/Helmet
yeah marcel, that is correct! I have build a RS kit which had to be painted anyways[emoji1787]... the paintjob isn’t something to be taken lightly, mine has been painted by fabian, our garrison bro who works in car body repair industry and is a professional carpainter. If you do this, hit him up cause he’s amazing when it comes to paintjobs! good luck and let me know when you have any questions!! Verzonden vanaf mijn iPhone met Tapatalk -
KS Helmet kit build issue / Finished!
sibbel29 replied to Darthmarses's topic in ROTJ Biker Scout Armor/Helmet
Verzonden vanaf mijn iPhone met Tapatalk -
KS Helmet kit build issue / Finished!
sibbel29 replied to Darthmarses's topic in ROTJ Biker Scout Armor/Helmet
hey bro, what I would do is the following: split the visor into two pieces and trim on both sides about 4-5 mm whatever is needed to loose the gap between the faceplate and visor. reattach the two visor sides with a screenaccurate piece of abs , this piece is holding the faceplate in itsplacw as well as a spacer, use bison two component plastic/abs glue, fill the gap with two component polyester epoxy putty from alabastine, sand it, fill it, sand it and you’re good to go!! hit me up whenever you need advise!!! Verzonden vanaf mijn iPhone met Tapatalk -
thanks bro[emoji91] Verzonden vanaf mijn iPhone met Tapatalk
-
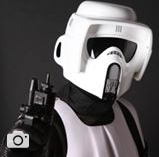
indeed bro, I drilled two holes in the helmet, cut off the connection piece of the innerliner and drilled a hole in them too. I put it together using rivets, works perfectly and even though some scouts have comfort issues with the innerliner, it suits me fine! please note : I am using the screen accurate innerliner sold by KW and not the innerliner provided by RS with the kit. good luck and if you have any questions, let me know!! Verzonden vanaf mijn iPhone met Tapatalk
-
one last update: after wearing my RS bucket I changed the liner. I installed the screenaccurate 3M welding liner ( sold here by Kevin Weir) in my scoutbucket after having issues with the linercushions I installed earlier. This liner is way more comfortable than the black liner RS provides with the bucket kit. It’s amazing! Verzonden vanaf mijn iPhone met Tapatalk
-
sibbel29’s Strider/CFO armor built topic
sibbel29 replied to sibbel29's topic in ROTJ Biker Scout Armor/Helmet
thanks a lot bro! I have built my own RS bucket, I have a thread here , just look up my handle sibbel29 and RS built.. check it out! the strider/cfo armour and the RS bucket are so screen accurate compared to my old SC armour with my Altmann bucket.. very happy with the result! if you need any help lemme know bro!! ( here, facebook or insta) Verzonden vanaf mijn iPhone met Tapatalk -
sibbel29’s Strider/CFO armor built topic
sibbel29 replied to sibbel29's topic in ROTJ Biker Scout Armor/Helmet
thanks bro, I appreciate it! its amazing ans yes mark did an awesome job!! Verzonden vanaf mijn iPhone met Tapatalk -
sibbel29’s Strider/CFO armor built topic
sibbel29 replied to sibbel29's topic in ROTJ Biker Scout Armor/Helmet
thanks so much Mark!!! I appreciate the amazing work you and Constatin have done, thank you guys!!! yeah its amazing, I love it so much!! Verzonden vanaf mijn iPhone met Tapatalk -
Congratulations Mickey another year as DL
sibbel29 replied to TK8271 Rogue Trooper's topic in Announcements
congratz mickey, Brother, chief and mentor. Well deserved, you’ve done so much for our beloved detachment! Pathfinders forever!! Verzonden vanaf mijn iPhone met Tapatalk -
sibbel29’s Strider/CFO armor built topic
sibbel29 replied to sibbel29's topic in ROTJ Biker Scout Armor/Helmet
thanks bro!! Verzonden vanaf mijn iPhone met Tapatalk -
sibbel29’s Strider/CFO armor built topic
sibbel29 replied to sibbel29's topic in ROTJ Biker Scout Armor/Helmet
final update: replaced the holster and put the decals on! I am totally in love with this armour!! I love it!! Last things: have to dye my pouches and bridges, reattach the pouches to the bund, attach the codpiece and adjust it and have to redo my ridingpatch on my flightsuit[emoji1591] #scoutisneverdone Verzonden vanaf mijn iPhone met Tapatalk -
sibbel29’s Strider/CFO armor built topic
sibbel29 replied to sibbel29's topic in ROTJ Biker Scout Armor/Helmet
update: finished the TD. now replace my holster and put on some decals[emoji41] Verzonden vanaf mijn iPhone met Tapatalk -
sibbel29’s Strider/CFO armor built topic
sibbel29 replied to sibbel29's topic in ROTJ Biker Scout Armor/Helmet
working on my TD.. Verzonden vanaf mijn iPhone met Tapatalk -
sibbel29’s Strider/CFO armor built topic
sibbel29 replied to sibbel29's topic in ROTJ Biker Scout Armor/Helmet
update: belt is assembled and ready! working now on the TD and wrapping the electric cord around the tube! almost there!!! Verzonden vanaf mijn iPhone met Tapatalk -
sibbel29’s Strider/CFO armor built topic
sibbel29 replied to sibbel29's topic in ROTJ Biker Scout Armor/Helmet
update: attached the backstraps on the belt.. working on the belt, straps and clips.. need to have the exact same height before I attach them to the backstraps using rivets haha... when this is ready, I’ll start building the tube and TD Verzonden vanaf mijn iPhone met Tapatalk -
sibbel29’s Strider/CFO armor built topic
sibbel29 replied to sibbel29's topic in ROTJ Biker Scout Armor/Helmet
update: started on the belt and boxes. slots and snaps[emoji41] Verzonden vanaf mijn iPhone met Tapatalk -
sibbel29’s Strider/CFO armor built topic
sibbel29 replied to sibbel29's topic in ROTJ Biker Scout Armor/Helmet
update: after the holidays I got back in the game. I finished the knee armor! up next: belt, boxes and TD! then its decals time..[emoji16] Verzonden vanaf mijn iPhone met Tapatalk -
sibbel29’s Strider/CFO armor built topic
sibbel29 replied to sibbel29's topic in ROTJ Biker Scout Armor/Helmet
update: working on my biceps armor.. had a little setback due to a battle with my sewingmachine, but I fixed it and they’re done! just need to glue the greeblies on and its on to the knee armor Verzonden vanaf mijn iPhone met Tapatalk -
sibbel29’s Strider/CFO armor built topic
sibbel29 replied to sibbel29's topic in ROTJ Biker Scout Armor/Helmet
thanks bro!! Luckily I am already Lancer and built a kit before, so I use that experience in combination with doing research to finish this as nice and accurate as possible!

