DK5IDE
-
Posts
46 -
Joined
-
Last visited
-
Days Won
1
Recent Profile Visitors
160 profile views

-

Pouch Dimensions and Patterns
DK5IDE replied to BikerScout007's topic in ROTJ Biker Scout Soft Parts
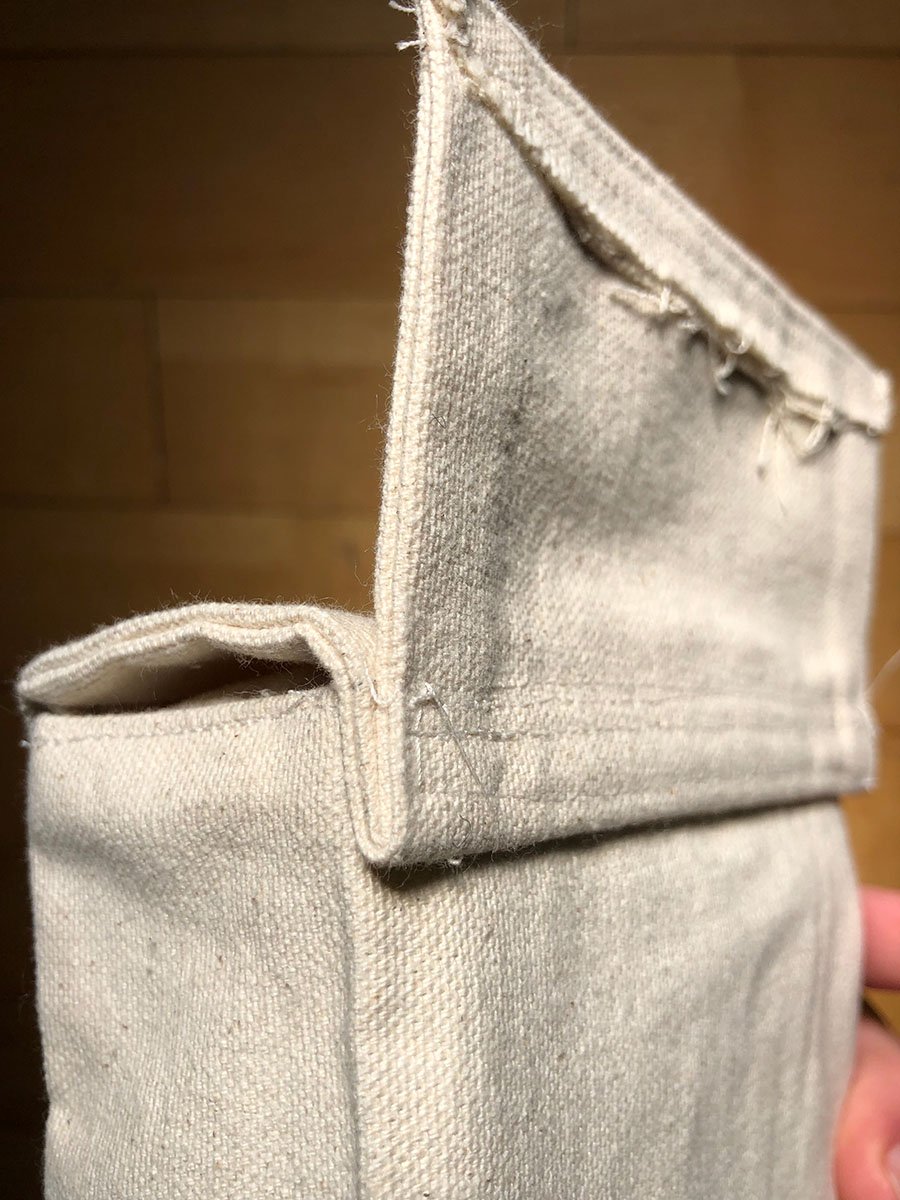
Bryan, sorry for the late reply. I measured the finished size of the flap and they are 5.25" wide, not 5.5". Cleary, I fudged something on the dimensions. The extra quarter inch allows the flap to fold/hang over the box so that you can't see inside it when closed. I split the overhang distance on both sides so each side overlaps the main box by .125" or 1/8th. Of course, if you don't want any overlap, finish to 5" size. You may be able to take you flap apart and re-sew to smaller size. Here's a shot of the top of the flap coming in at 5.25". Hope that helps.
-
Pouch Dimensions and Patterns
DK5IDE replied to BikerScout007's topic in ROTJ Biker Scout Soft Parts
Glad to help, Digger. I went through 3 test boxes fiddling with dimension til I got it where I wanted. Good luck! -
Pouch Dimensions and Patterns
DK5IDE replied to BikerScout007's topic in ROTJ Biker Scout Soft Parts
Hi, Digger. Sorry for late reply. That is correct - there will be one sewing line visible at the front of the box. You can just make it out in the pic here: The flap will fold over this area, however - so you won't see it. Here's a shot of how I've attached the flap to the back of the box. Hope this helps and happy building!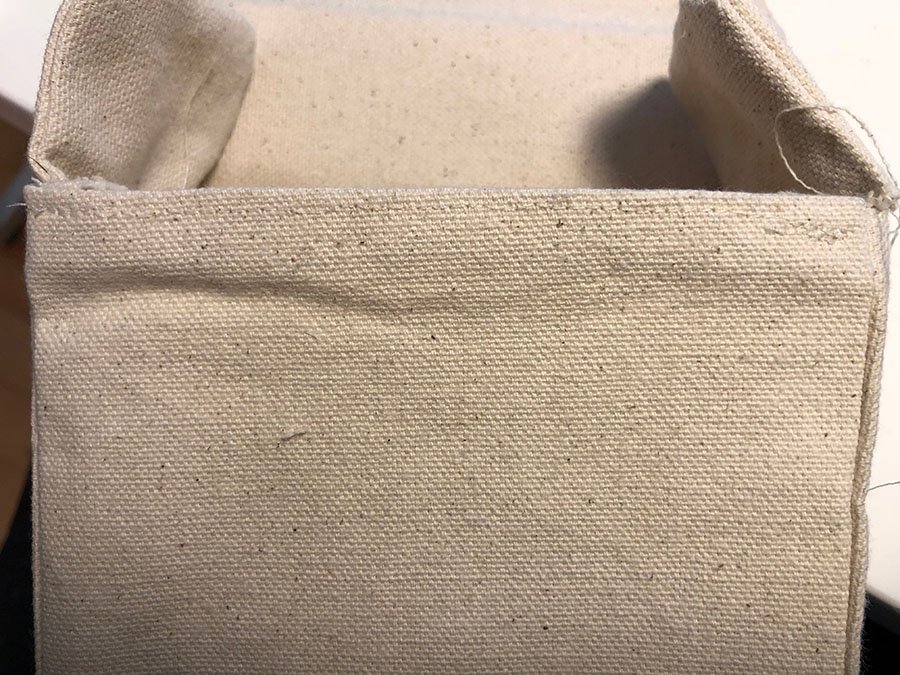

-
Pouch Dimensions and Patterns
DK5IDE replied to BikerScout007's topic in ROTJ Biker Scout Soft Parts
Thanks, and thanks again for the revised specs! -
Pouch Dimensions and Patterns
DK5IDE replied to BikerScout007's topic in ROTJ Biker Scout Soft Parts
Thanks for the new dimensions update. I just finished a pair built off your new specs and a modified 2001 template from Matthew Clayson that's on the forum. I used natural finish/color cotton duck. Here's a shot of the optional interior side flaps. Got the idea from Pandatrooper's thread. My template based on the revised 5 x 6 x 2 dimensions: -
Thanks! Used 762s method for magnets. Made a big difference.
- 56 replies
-
- 1
-

-
- RS helmet
- RS Prop Masters
- (and 1 more)
-
Thanks, Ken!
-
Thanks, Strider!
-
Second helmet complete! Used Krylon Fusion per 762s' recommendation. This paint doesn't go down as easy as the Tamiya white, but I think the overall color and shine is better match for SC armor.
- 56 replies
-
- 3
-
-
- RS helmet
- RS Prop Masters
- (and 1 more)
-
Hey Jimmyc, For the connecting strips, I took some of the spare ABS in the RS kit and just hand shaped them, rather than using a heat gun. I worked out the shape a bit, set it in place, then adjusted again by hand if needed. After shaping each piece, I set them in without gluing and marked the positions in pencil, numbering each so I remembered what order they went in. I glued them in place with E600 and kept them in place with several Neodynium magnets. I had to tape some magnets in place to prevent them attracting laterally to each other. I invested in many more magnets of the larger1/2 size so the pull was greater. That pull strength makes the seams come close together and prevents the Bondo from creeping in. Any that does make it through is easy enough to take off. Hope that helps and good luck on your RS!
- 56 replies
-
- 1
-
-
- RS helmet
- RS Prop Masters
- (and 1 more)
-
On my second build, I used 762s' magnet closure tutorial to bring the visor into close alignment with the bucket. You can find his tutorial here: http://forum.bikersc...l=&fromsearch=1 This method is great for bringing the two halves closed and keeping them that way while trooping. Here's what my magnet placement looked like before priming and painting. Note that the magnets go on both sides. The halves line up much more closely now:
- 56 replies
-
- 3
-
-
- RS helmet
- RS Prop Masters
- (and 1 more)
-
spacebob, sorry for the delay. Needed to buy a proper tape measure to get around those curves. Here are my numbers: A 31.8 cm B 30.5 cm D 38.6 cm E 22.9 cm Hope it helps and good luck.
-
Sure thing, post here and I will send measurements. Considering all the amazing stuff you've built in the past, dunno if you qualify as a newbie. ;-) Sent from my iPhone using Tapatalk
-
Thanks, spacebob I hadn't done decals in 30 years, but Googled a couple of vids. I cut each marking out individually, soaked each in water for about 20 seconds or so, then they easily slide off onto wherever you need to apply. I wet down the contact point on the helmet first, but that's probably not necessary. Once down, you have a couple of minutes to reposition as needed, work out any bubbles, then blot away the water. Easy enough. For the vertical vent lines on the back of helmet, I removed the opaque backing, positioned them, and only burnished the topmost areas of the lines. Then I removed the top clear layer and burnished the lines individually so that they stayed even. Good luck with the ironing!
-
Last looks. All markings are water slide decals except the vent lines on back of helmet. Those are similar to a vinyl sticker.
- 56 replies
-
- 3
-
-
- RS helmet
- RS Prop Masters
- (and 1 more)