

bugdozer
-
Posts
273 -
Joined
-
Last visited
-
Days Won
9
Everything posted by bugdozer
-
The height of the belt has to be determined by the bottom edge of the bund, which is itself determined by the length of the codpiece/strap that goes between the legs. Longer codpiece = higher belt and vice versa. So if you have a short codpiece/strap then your belt HAS to be lower.
-
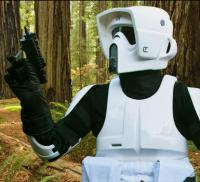
Skull trooper helmets (Biker Skull)
bugdozer replied to Abe's topic in ROTJ Biker Scout Armor/Helmet
Those are awesome! (and still more screen accurate than a Rubies) -
Just a pedantic point here - are we allowed 5 tank stripes? I thought it was 1, 4 or 6.
-
One thing I've noticed but never see mentioned: the middle of the belt boxes appears to be the same height as half way up the curved stitching on the codpiece. I think I've got mine the right height, but they are secured with velcro for instant adjustability!
-
Can I raise a question on the practicality of attaching these bridge covers? What method do people use for securing them in place (e.g. having them permanently glued to one side of the armour, or completely detachable with a snap, etc.)
-
Here is a link to my build thread on the UKG so you can see how far I've got with the helmet (a bit further than this now, screwing the bolts into the visor this evening to test the fit before I glue the faceplate on). http://www.ukgarrison.co.uk/forum/viewtopic.php?f=127&t=55591
-
Wow. I can't believe you are still sane if that's the case! But seriously, I do appreciate the after sales service and could have made some blunders without it (yeah, don't tell them about the bolts, OK? )
-
I'm building a Chef's Hat right now... I should put some pictures up! Poor Rob is probably quite sick of me messaging him every couple of days whining about how I can't figure out how all the bits line up! However, when it's finished it has the potential to be very close to the real thing. He makes them in the same five section design that the originals had.
-
They're all the same size, although I am going to be using a longer rivet for holding the base of my tank to the backplate because the dome of the surface won't allow the rivets I have to reach all the way through.
-
Thanks guys, satin paint is now applied to the aerator. I see what you mean about the snout ridge, I'll bear that in mind.
-
Well, my armour is from a different maker, so maybe I'm not comparing like with like... but despite mine arriving closely trimmed, I've needed to spend a minimum of half an hour each sanding the edges on bits like forearms, biceps, knees and shoulders. Add another half an hour cutting the slots on each of those pieces, plus the slots on the chest and back plates. Then there's sanding and dremelling said plates, which was probably close to an hour each. Then cutting the edges on the tank to fit nicely against the back plate - it took me about two hours, but someone with more skill than me could probably get it right in about an hour. Add another hour and a half for sanding and slot cutting on the belt and boxes, and another half hour for sanding the holster. Lets say each strap will take ten minutes each, so that's a bit over another hour and a half. Already I think this is up to something like thirteen hours. Being careful with riveting the boots on (including custom making little plastic washers) someone skilled would need about half an hour I think (took me longer!) Making sure the straps are the right length on the drop boxes and armour, unless you're very lucky and they hang right first time, you're gonna need at least half an hour. Then there's fitting the main belt itself and adding the fastenings, which will be another half hour minimum. Add another hour for putting the TD together (including sanding and cutting pipe holes, although I think some armour has the holes already there?) Haven't mentioned another thing that slowed me down at various points - waiting for glue to dry before being able to continue with another part of the build. This was especially true of the TD, and although I haven't got to it yet, will also apply to the bracket which holds the tank on. Then of course there is attaching the topper and painting it. So yeah, maybe you could do it in a weekend... but an exhausting weekend it would be! I agree it's not difficult, it's just the time it took working with the plastic using mostly a dremel and a lot of repetitive sanding which made my arms ache. I guess if you had power sanding tools it would be a lot easier. Also, as you say, other people to help! However, if you're making the helmet as well... now that does add a significant amount of time. The single most complex component! I don't know how long mine has taken me so far, but it would definitely push me out of the weekend timescale.
-
I'm also in full agreement with Chef. My armour supplier (not MC) gave me a very reasonable time estimate (weeks, not months) and when it turned out that there had been a communication difficulty which had delayed work on my order, they turned it round in a very short time from that point. And I did not need to pay until the order was ready to ship out. Furthermore, I can't fault the quality of kit I received. If I'd had to wait upwards of a year, I'd have been demanding a refund.
-
I do feel that this is a somewhat optimistic appraisal of how long it takes to put armour together...
-
Regarding the black areas on the snout (the aerator and the black rim around the edge): are they meant to be matt or glossy or what sort of finish?
-
You can contact him by PM on the UKG site.
-
How about one of each on either knee?
-
I have noticed some differences between the "Level 2" certification specifications on the 501st reference page and this forum's listing of what the Lancer standard requires. For example, the 501st page says knee rivets should be silver. This site says they should be white. The 501st page says a chin cup must be present on the helmet, this site says it's optional. Can someone clue me in on which is correct? And can whoever is responsible for updating whichever one is wrong be given a gentle prod?
-
I already have some acrylic paint of a good colour for this, but it has a matt finish. Should the indent look glossy, or is a matt finish acceptable? Or is it simply easier to use a bit of tape?
-
Do I need a plastic square for the knee elastic rivets too? Just wondered as there's not much room to put them...
-
Not the Hasbro Scout-O-Matic? I'm mildly disappointed.
-
Just wanted to check, because I see a lot of variation (even in the movie) - what's the "official" position up the forearm for the armour pieces? I've seen some wearing it down overlapping the gloves, others tucked up almost on the elbow. Mine tend to wobble about a bit because I have spindly arms, so I was thinking of adding some velcro inside the front end to hold them steady, but that then means they have to remain in one position on the arm.
-
Has anyone made a flight suit from scratch?
bugdozer replied to kiel814's topic in ROTJ Biker Scout HQ
I know there have been issues with him, largely related to postage, but I believe Cucblack has made flightsuits from scratch. And he's in Bolivia, so maybe easier to post to another South American country. However, treat his services with caution and get advice from others before using him. -
I'm about to start glueing bits of my armour together. I have seen recommendations for plastic weld glue and E6000, which seem to only be available online, but nobody talking about epoxy resin glues which are more widely available and are generally pretty good. Is there a reason not to use epoxy (like it will melt the plastic?) and if I get E6000 do I then not need to bother with the plastic weld glue, or should I get both? (I am aware plastic weld will not work on fabric etc.) NB: I am in the UK so please do not recommend Bondo, or Sticko, or Tak-U-Like etc.
-
I've got these clips with my kit, but am unsure of the best way to attach them to the pipe... there is a screw hole but that doesn't look all that sturdy, so maybe glue as well? How do the rest of you do it?
-
This is fascinating. Earlier in the thread you refer to your original bucks being cast from an existing helmet you had - can I ask what type of helmet that was?
