Mr.Mike
-
Posts
70 -
Joined
-
Last visited
Everything posted by Mr.Mike
-
I'll get a medium regular then and give it a go. For the price mistakes can be made. Thanks for the input!
-
Strider, do you have a website or another place these pictures are? This build sounds awesome, I just wish I could see it *raises a fist at photobucket*
-
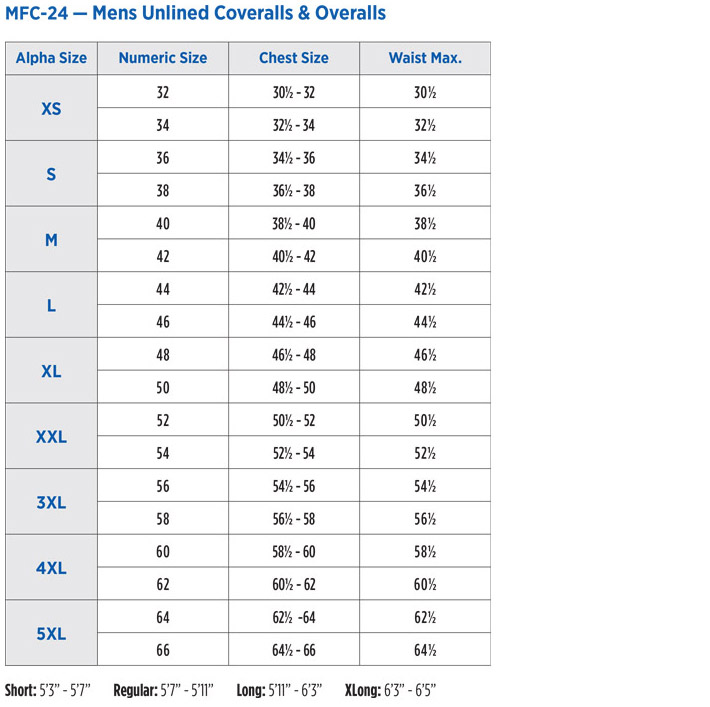
I'm looking at these Red Kap coveralls and in looking at their size chart it seems that things run big? I normally wear a large in most anything these days but according to their size chart I am a medium regular or even a small (5' 9" 38 chest, 36 waist). Have you guys who have used these Red Kap coveralls found they run true to your size or did you go by their chart?

-
I was looking though the pics of the original armor and I KNOW I have seen those clips before. I think it might have been in my Coast Guard days but I could be wrong. I have thought about these until my nose bleeds and it still hasnt come to me. Great job making up the new ones!
-
Opticsplanet has a ton of scopes for under 80 bucks if you cant find some thing plastic in the toy department.
-
I just love this! I have 4 kiddos ages 4 to 10 and can only imagine the fun they would have with this.
-
AWESOME!!!!
-
ROFLMAO I love the socks!!!!!!!
-
awesome!
-
This is so cool to watch!!
-
The issue you had with soft paint was caused by too thick coats or not enough drytime between coats or both with out a doubt. Also the sun drying you did may have played a part drying the surface before the rest of the paint had a chance to outgas. Acetone is the solvent typically used in fiberglass work. You need to be careful not to let it pool or remain on the glass too long as it will soften the resin and become tacky. Wipe it on and wipe it off. I would contact the maker of the helmet and find out what type of resin he used in the glass work, poly vinal, vinal ester, polystyrine or what have you, then google up how to prep and work with that particular product. different solvents will react differently as will different paint types. With paint thin layers are key one coat at a time. If you paint layers are too thick the surface will flash off traping the solvents inside. This can cause a couple issues. One being what you have already found, a "dry" surface but soft below. The other issue is called porosity. This is the appearance of tiny pinholes through out the paint. No matter how much you wetsand and polish you'll always be fighting them. Helmet looks really nice, I cant wait to get one!
-
1000 grit will polish hard, I always go 2000 wet or more before I hand polish (on automotive paint). Also as the paint outgasses any scratches will be more profound. Let get good and dry before wet sanding. Just my 2 cents. I have yet to paint a scout helmet but I have painted cars for 10 years.
-
Love watching this build, thanks so much for taking the time to take and post the pics! Keep up the good work.
-
HAHA! Thats awesome!!
-
I'm pretty new here but have spent the past few weeks deciding what to start with for a helmet and what my price range is. In doing my research I have come up with a few things. 1. As with any thing in life, you get what you pay for. 2. Almost no helmets are "ready to go", they all need some thing, some more then others. 3. Be prepared to wait for it to come in the mail unless you are buying a used helmet from some one and its ready to ship. 4. ALL helmets need something, some more then others. Be prepared to spend some time finding that mix of what works and whats accurate. Personally I have decided to go with the MLC v.3 (or what ever his latest build is), my personel choices for this helmet are: 1.) Its fiberglass, I have worked alot with fiberglass in the past boat building for a high end yacht company so I am comfortable working with the substrate, its fillers and top coatings. 2.) From what I read the MLCs run on the smaller side which is good, I have tiny bean on my shoulders. 3.) The price seems to acceptable for the quality of the helmet and customer service seems to be good. MLC responded to my info request with in a couple hours. I'm not sure what you'll find for 150 bucks. The helmet and armor seem to be the most expensive single items for this build. I budgeted 300 for my helmet not including extra stuff like the lens, sticker kit, fillers, paint and primer. Probably looking at another 100 bucks of little stuff to get the raw fiberglass helmet finished off give or take. But again this is for "my" build, every ones milage may very. One thing about this type of hobby to keep in mind is its 90% research, 10% building. Read, read, read. Watch the movies over and over, browse screen shots and pics of other folks stuff, learn from their mistakes. This is good read I thought. http://forum.bikersc...?showtopic=9501 Here is another thread I found about modding a Rubies http://forum.bikersc...?showtopic=9372 So dont give up on your rubies yet, it might just work out for you with some blood, sweat and tears. And on the birght side, you have already given the blood so all thats left is sweat and tears Hope this helps, I'm sure some of the regulars will post here as well. Again, I'm as new to this as you are, so take what I say with a pound of salt.
-
Awesome!