

kathgruben
-
Posts
66 -
Joined
-
Last visited
-
Days Won
2
Everything posted by kathgruben
-
LOL this was just a test fitting before purchase See the previous post above to see submission pics, knee armour included
-

Little help with rubies helmet
kathgruben replied to bonnox's topic in ROTJ Biker Scout Armor/Helmet
My bucket is a modified Rubies, and I used that PDF as a guide to modify it. My build thread with details is here: http://forum.bikerscout.net/index.php?showtopic=11767&st=0 I would agree, the helmet is still too flared out and needs to be made more narrow. -
I found making my own custom fit set of coveralls easier than trying to tailor men's coveralls, there was just too many fitting issues for my liking. I'd like to make a set of top and pants as well for the reasons M.J mentions above. One solution to keeping the top tucked in is to attach a bikini-type bottom that has snaps at the crotch.
-
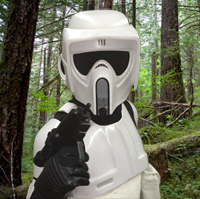
The initial feedback upon first submission for approval was that my pouches were on reversed (whoops!), the forearm armour needs to be on top of the gloves, and there shouldn't be a gap between the cummerbund and the belt in the back. Fixed, resubmitted and approved! I love wearing this suit!! I have wanted a TB for ages and have so much fun wearing this, it`ll probably be my go-to for troops for a while
-
OMG I have pic envy...
-
Just use lots of pins, make sure you try it on and confirm the placement before you sew, and don't go too fast through the sewing machine.
-
... heh, merkin... heh...
-
I know all about the challenges of a rubies helmet mod first hand. Just finished working on mine a couple of weeks ago. Thus, the kudos callout
-
That helmet is lookin' saweet!
-
So finally, here is everything all together, ready for approval I hope .... except I've got my pouches on reversed LOL! I'll definitely have to fix that for my approval pics
-
Here's a few more pics of the helmet now that paint and decals are done: Modifying this Don Post helmet has been quite the learning experience, that's for sure!
-
Looking good Mike
-
For the flightsuit, you might want to consider a two-piece instead of a one-piece, since she is a growing little girl who might need to hit the ladies room a few times during an event A black turtleneck/mockneck shirt and black leggings might be easiest.
-
Really loving this idea, as I've been concerned the vinyl will rip eventually because of the weight of the pistol in the holster.
-
So, remember this? Well, I managed to change it into this.
-
Yes, thank you for the suggestion! I was looking at it and knew there was something a bit off...
-
Ohhh, the sins that are revealed with that first coat of paint
-
Cheeks fixed and ready for paint.
-
That moment when you realize you've trimmed just a bit to much vinyl off the sides of the faceplate... yeah, that one *sigh* and *facepalm*
-
My get-up-and-go had got up and went for a while with this, but with the new year comes renewed inspiration and motivation! A bit of progress today on the helmet. Finished gluing down the wire in the visor. First the top part and then the sides. Filled up the hole drilled in the cheek, and also glued the aerator into place for the replacement nose piece. Unfortunately, the replacement hardware sold by KWDesigns doesn't fit this bucket since the vinyl is too thick, so I'm improvising for the bolts by modifying the original ones. And previously, when I had glued the wire into the brow of the bucket to make it more oval, this resulted in the sides coming together too much so the bucket needed reshaping. I used a heatgun to warm up the sides and then placed the bucket around a paint can with some shims to allow the vinyl to cool to the desired shape. So yeah, it's still coming along, little by little.
-
If anyone has tips they want to share about working with MC's decals, feel free to post it up here I'm finally getting back to this project (too many projects! LOL) and tackling the hardest part, the Don Post helmet. Here's what I'm working with: I believe I am the 4th or 5th owner of this helmet, and it has been worked on by its previous owners to some degree to improve it: the lens area was cut out, the shape has been adjusted (with heat?) to be more narrow, and a snap was added to the bottom of the left cheek for some reason (maybe it was sticking out too much?). It has been enough to allow me to try out my suit at a few troops, but obviously not enough for 501st approval. Time to take this baby from sow's ear to silk purse Using HeathrowTrooper’s guide (get it here) as the main starting place for this rebuild, I started by grinding down the logo on the back. Oh how satisfying that was LOL! Next, I removed the bolts at the temples and the various bits of velcro that were holding things in place. Then, cut out the existing lens, carefully drilled out the rivets joining the faceplate to the visor and drilled out the snap on the cheek. To remove the existing decals, I started with rubbing alcohol which worked fine on the fishhook but did nothing to ones on the back or the faceplate. Acetone took care of those easily. Next, I cut out the ear holes. I worked on reshaping the roundness of the main helmet into more of an oval shape by squashing it into the desired shape and then wrapping tape around it. I cut a piece of coathanger wire, shaped it and then epoxied it into place along the brow, as per the guide. I cut out the existing snout and prepared the area for the new MC snout. The snout I have has a wire mesh for the aerator, so I also cut the resin out of that area for airflow. To help the faceplate keep its narrower shape, I shaped another piece of wire using a template in the guide and epoxied it into place. This was a bit trickier and had to be done in stages, first tacking the wire into place with hot glue in the centre, then the right side and then the left side while pulling the faceplate into the correct shape with more tape. One nice thing I've noticed about working with the vinyl is how easy it is to cut and carve and shape as compared to ABS. But it's softness is why all of these reinforcements are needed.
-
Woot!! New snout and helmet decals received from MonCal! I can finally finish the helmet Anyone have experience working with MonCal's decals? Any tips?
-
Just got an email today from MonCal that my snout shipped yesterday! Yay! I'm guessing USPS will take about 2 weeks to get here, so hopefully I'll have something to show you shortly after that
-
Thanks guys I'm in a holding pattern at the moment, waiting to receive a new snout from MonCal for my helmet rebuild. Hopefully it gets here soon!
-
Your pouches look great! Though I would suggest trimming your biceps a touch at the top to give more space between them and the shoulders As for attaching the pouches, mine came with buttons, and I've seen several examples of the pouches being velcro'd to the underside of the chest armour. Regardless, being able to remove them would be important to me for packing, cleaning, etc.
