

Drewid
-
Posts
106 -
Joined
-
Last visited
-
Days Won
1
Everything posted by Drewid
-
Thanks! That's actually a huge help.
-
I would but I just received my multicam fabric from a surplus store I found online. I bought this: http://shop.vtarmynavy.com/multicam-camouflage-ripstop-cloth-p5226.aspx?utm_medium=cse&utm_source=googlebase Does anyone have a good recommendation for the shin armor straps and the material to make the cummberbund? I went looking at Joann's and I didn't see a match for the fabric. Thanks!
-
Kashyyk Cummerbund*update* new pics 4/20/12
Drewid replied to LadySewForUs's topic in Kashyyyk Trooper Soft Parts
E-Mail sent -
I got a confirmation from Mr B and I do not have the buckle. Does anyone have the dimensions of the buckle? I'm checking to see if he has a spare one to sell but I'm probably going to need to scratch build one. I just found Lonescout's closeup of the belt and that helped a ton. I can fab up a part using ABS and a heatgun without too much difficulty. That also answered my question on how the drop box straps worked.
-
Here we go. I took pictures of all the greebs and some more work in progress. Here are the belt pieces: I'm guessing those are supposed to be made into the buckle. Everything else (minus the knee straps and the left bicep silicone strap. I received two sets of the boot greebs, one in silicone and the other in resin. I began sanding and cleaning up the resin ones. I don't have any plans for the silicone set. The last pic has all of the helmet greebs. The snout greebs are fairly uneven on the back and I'm working on sanding those down. I'm going to take a dremel and try and hollow out the section behind the "grate". The visor greebs aren't bad, but even when cleaned up they won't be crisp like the ones on the TB helmet. And now the progress. Not much since last update. One side each of the bicep armor is done and ready for bondo. I have the other side setting now on one of the biceps. The first pic shows before I removed the clamps from the first round and then moving them to the back side in the second:
-
Please! PM sent
-
Sweet! Did you follow any templates or a tutorial from anywhere? I'm going to be starting mine pretty soon so any tips and pointers are appreciated. Danke!
-
Does anyone know of a good tutorial for the belt? I did a search for one and couldn't find one. Also, I'm not sure if I'm missing the buckle or not. My kit came with two rectangular silicone pieces that look like they are the size the buckle should be but they are solid. I'll post a pic later today. Right now I've got the bicep armor clamped on one side each. I tried epoxy on Sunday night and that held for all of 2 seconds. I cut a bigger piece of plastic and used Goop last night. I'll test it in a bit to see if it held. For the helmet shroud greeblies, does anyone have a recommendation for alternate parts? The resin ones I have are uneven enough that I'm not sure I can make them symmetrical. Very cool! I've got a little bit of dremel work to go on mine before I'm ready to start painting it.
-
Awesome! That turned out great. Did you make the DC15?
-
Very nice! What did you use for the boots?
-
The weekend's progress: The shin armor has been trimmed and partially sanded. I removed the return edge at the bottom in order to be able to slip the armor on and off. Fortunately, with that one mod, it fits perfectly. I don't need to adjust the size at all! The bicep armor has been sized, trimmed, and the reinforcement strips are going in. I ran into moderate problem with the tank. When one side flexed, it would peel the bondo away and form a temporary gap. This was caused by the tank not being flush to the back armor on the inside on that side. After sticking some shims in there to try and tighten it up, I had another idea: pour epoxy in there! So far the flex appears to be gone. I'm giving the epoxy another 24 hours to cure before I declare victory. I did have to go in a strip out the bondo in the affected sections so I get to look forward to some more bondo work on the tank. And what do we have here? Looks like we've got some pieces in the drying booth! All in all, it was a very productive weekend. I wish I had a lead for you on the BDUs. The airsoft place I ordered my first set from is sold out of the XL. I can't wear the large pants as those fit a 31" waist. I had to go to a surplus store in England to get a new pair. I did stop in at a specialty fabric store in L.A. over the weekend. All they had in terms of camo was American digital desert, American forest, and American jungle so it wasn't very useful. The only problem I see with the silicone one is reinforcing it. It looks like it would rip pretty easy at the top after some heavy trooping. Maybe a layer of canvas that has been glued on would do the trick.
-
All right... more sanding is scheduled for tonight and hopefully laying down the base coat on some of the smaller pieces like the knee protectors. I still need to size and fit the biceps and shins. I'm probably going to need to use expansion shims for the shins in order to get my feet through. Cool! That will be a blast . Do you know how far they are along?
-
I just ordered a new pair of pants. Hopefully this pair will fit. Airsoft-club is currently out of the XL set so I went to eBay to find the pants. I don't think the colors will match exactly but once they are dyed it shouldn't matter too much. Hopefully. Is there a template or how-to to paint the camo pattern on the armor? I watched some youtube videos on camo techniques but didn't see one that matched this design.
-
Hey Todd! Who else is building it? And absolutely! What parts are you looking for?
-
Progress! I've been working on the armor each weekend while helping a friend with his TK. Armor parties are great places to get work done. I redid the bondo on the tank to fill in the bumps. After much sanding it's a lot better. The seams where the tank meet the armor still need cleaning up. I'm quickly reaching the point where I'm about to say it's good enough. Started the bondo work and detailing of the helmet. Chest piece has been sanded. I need to use a little bondo to fill in some dings right in the middle: I also have nearly every other piece of hard armor sanded at this point and ready for primer. There are only just a few pieces left that need to be cleaned up. And then it's trying to figure out how to paint the camo. And I still need to find pants that fit. I'll be making the pouches out of EPS this weekend and ordering the camo pattern fabric for that today.
-
After a month of spending time upgrading web sites, I finally had a chance to work on my armor. I took a full inventory of the kit. I think I might be missing the buckle plate for the belt. I need to check the tutorials again. I cleaned up the drop boxes and applied the bondo to the tank edges. I need it to cure a little bit more before I can sand it. I'm going to guess that the silicone cod piece fits inside the HIPS shell?
-
Will do! I received my BDUs today. The shirt fits great (maybe just a bit baggy in the arms), the pants not so much. For some reason, size L pants are equivalent to 31 sized jeans. I haven't been able to wear that size in a long while. I'm now on the hunt for something that will fit a 39" waist.
-
I just received word that my BDUs have shipped. They should get here in about a week or two. I've been reading the info on all of the pouches to start acquiring those. Does anyone know if those were a found part or made for the movies? One of my friends thought they were German G3 pouches but I can't tell for sure.
-
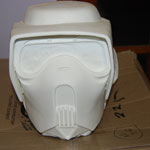
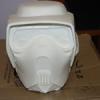
The helmet cleanup is proceeding nicely. The rough work is mostly finished at this point. I need to get into the tiny nooks and crannies to polish it down, sand the surface, and use some bondo to fill in the pits. I joined the CROW62 boot run and have sent him the funds. And the British DPM BDUs have been ordered. What should I use to make the thigh pockets? Are these made from the pockets removed from the back and sides of the pants or should I locate some extra material?
-
Hey all, I'm finally starting my build on the Kashyyyk scout. I bought a MrBungle kit right before buying a house last year and it's since been trapped in the closet. I finally rescued it and now it's time to get it built. I also have a pair of Grumpy's gloves which are great. My plan is to have everything finished by SDCC 2012 at the latest. I'm going to start with the helmet and build out from there, taking as many pics as I can to doc the process. Cheers and wish me luck Drew