Drewid
-
Posts
106 -
Joined
-
Last visited
-
Days Won
1
Everything posted by Drewid
-
Weathering is part of the upgrade process. I'm planning to at least streak some graphite across parts of the armor for carbon scoring and rub some rusty metal across the straps to stain them a bit.
-
And finally approved! I've got a few upgrades planned but as of today I am official. CB4237 reporting for duty! And here it is from Wondercon2013
-
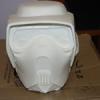
Score and snap works perfect for the armor. For the visor I used a dremel with drill bit to drill and outline then switched to a cutter bit to cutout the visor. I smoothed it out with the sanding drum and finished with a sanding sponge.
-
I used 3/4" black elastic for the two black vertical strips on the front. The rest is 1.5" silver/gray seatbelt webbing. At least that's what I used
-
It's definitely the former. I recommend doing this: Primer Metal - add mask Black - add just a little masking on the edges of your fist mask or where you want "smudges" and carbon scoring Khaki
-
The black square goes on the inside of the left bicep. You can just see in this pic (it's all I got for right now). Click to expand. It's best to attach that and then trim the rubber straps to fit. I used e6k and the rtv to get everything to stick right. Again, scuff the back surface to Mustafar and back and then clean with rubbing alcohol to prime the surface for the adhesive.
-
I haven't found a great way to attach the rubber straps for the forearm armor. I'm using two black elastic strips on each for now. I do plan to print off some housings out of ABS to slide the rubber straps into and lock them down with screws. I just need to do the cad work. It took me several attempts to get the knee straps to adhere. If they fall off again I'm doing the same thing I plan to do for the forearms (build housings). I took my dremel and scuffed the bejeezus out of the sides that I planned to attach to the plastic. Once significantly rough I spread some e6k on the rubber surface and waited about 5 minutes. I then clamped it down onto the plastic as hard as possible. On the third or fourth try it finally stuck. I also got out some RTV caulking and sealed up the edges to add some extra strength to the bond. I did all this after painting.
-
I just picked up my boots from the post office. They also had the gray soles but otherwise look okay. I had no idea they were coming until I saw the source location on the post office note.
-
Long time no update. After practically giving up on the Crow boots I've been moving forward on the last odd-and-ends on the build. I decided against using the boot strap greebs that came with my kit and printed my own. 40 minutes in CAD and a couple hours later yielded some nice parts: I don't have a picture of it but I created a belt buckle with the same method. My kit didn't come with one so until recently I was without. All I have to do is paint it gray now. I tried bleaching the pouches that I wore in the pics above. No dice. Looks like the material is 100% synthetic so I didn't get even the slightest fade. If it becomes an issue I'll remake them with the multicam fabric I have. I've also begun adding fabric paint to dye my secondary boots white. It's not perfect but they are starting to take on a faded white hue. All in all, I should be ready for submission before the end of the weekend.
-
Okay, got in and posted to the thread. Thanks!
-
Nathan, what about those of us who don't have accounts on CTN? Shouldn't we be keeping track of boot orders that were originated through BSN here?
-
From that shot it looks like the camo on the pouches is the same colors as that on the armor. It's hard to tell if there is green on his pouches or not because of the lighting. Considering that the CRL has this to say about the pouches: "pouches are either cloth covered and painted with camo pattern or covered with multi-cam cloth" ...you'd probably be okay. I recommend adding some green on there just to be safe.
-
Which gallery? I'm not seeing it.
-
You may want to shorten the sleeves, too, depending on how tight the gauntlets are. Removing the velcro closure on the cuff and replacing it with elastic is also a good idea. Stuffing the sleeve into the gloves can be a challenge at times.
-
I used 1.5" silver seatbelt webbing for the vertical straps. For the two black vertical straps on the front I used 1" black elastic.
-
I tried dyeing it a second time and it didn't get much darker. Maybe a little, but not much. It's much better to get the mixture right the first time, at least, from my experience.
-
I also ordered a surplus set off of eBay. It didn't dye right. I just wouldn't hold enough dye to get dark enough. I hope you have better luck. You'll want to use one or two packets of dark brown and one packet of black.
-
Found the place I ordered the BDUs from: http://airsoft-club.com/shop/tactical-gear/by-color/british-dpm-camo/british-dpm-desert-camo-bdu-uniform-shirt-pants . The sizes run a little on the small side so when in doubt order big. The pants and shirt come as a set. Adding this to my first post.
-
Thanks Matt! I figure most of the weathering will come with time. I have several coats of silver under the base coat. I might rub a little graphite into the armor here and there to give it some "carbon scoring". Oh, to follow up on the bicep greebs and rubber knee straps. I found that I need to seriously scuff the rubber before it would adhere well. Cleaning it of any trace surface oils was essential. Common sense, maybe, but nobody ever accused me of having any of that . To fill in gaps I used silicone caulking. It's paintable and helps with the adhesion process. One of the knee straps held fine with e6000 but the other one refused. After 3 attempts with the e6000 I moved on to gorilla glue. I recommend to start with that stuff. One note though: e6000 is semi-permanent, gorilla glue is final. Had I more time I would have created some clips on my printer. Oh well. I think I need to replace my shoulder bell straps with a brown elastic. The black straps stand out too much. I will probably do the same on the cummerbund straps when I move them in closer.
-
For most of my webbing I went to Seattle Fabrics. The shin straps are 1.5" cotton webbing. I used this material: http://www.seattlefa..._Cotton_Webbing For the hard armor paint: Base coat: Rust-o-leum American Accents Fossil Brown: Tamiya Color for Aircraft AS-22 Green: Tamiya Color for Aircraft (will edit for exact color) Belt: Plastidip Black Spray paint: The plastidip rubber adheres amazingly well to the rubber belt and is very flexible Cummerbund: I used upholstery fabric for the body. The material didn't dye as well as I thought it would so go darker from the beginning. Don't rely on the dye. I'll check the dimensions I used for the webbing. I think it was 1.25" for the vertical straps. BDUs: http://airsoft-club.com/shop/tactical-gear/by-color/british-dpm-camo/british-dpm-desert-camo-bdu-uniform-shirt-pants As I remember more of the sources I used I'll update this post. I should have kept better records
-
After a little bit of hiatus, I have some progress to report. I took my armor out on a test run at LBCC this past Saturday. I was missing a few greeblies but overall it worked out nicely. I also figured out what adjustments I need make. Things to do: -Build a belt buckle. My 3D printer threw a belt at the last minute otherwise I would have had it -The rubber greebs at the should straps won't sit properly. I'm going to make some out of ABS off the printer. -Attach all shin greebs -Move the cummerbund straps to sit under the armor -Tighten the elastic strap I attached to the belt -Paint my donor boots white -Replace elastic straps on forearm armor with rubber straps. The elastic ones look okay and work out great but the rubber ones would look better. -Try and fade the pouches. I have multicam fabric but Grumpy did an awesome job on these and they look fantastic.
-
I'm not sure what templates those were, but these are still available. Not fantastic but not bad either: http://www.imperial-fleet.com/BBC/mg-34.zip They are missing a few of the parts but enough to get started.
-
Is that set in stone though? The fake leather patches I currently have look nothing like the screen shot. To me the bunching in that pic looks exactly like what I would get on my wetsuit, right down to the creases.
-
No. I eyeballed it from the reference pics. In haste I thought they were two pieces. I just found a screenshot (or at least what I think to be a screen shot) that shows I'm dead wrong. Fortunately I was already planning on redoing it. I was leaning towards goretex although now I'm thinking that 2mm neoprene would look closer.
-
Glad to hear things went okay! I'm digging the progress on the boots. I can't wait!