

78bird85
-
Posts
40 -
Joined
-
Last visited
Everything posted by 78bird85
-
Looks great!!!
-
Awesome! Great Job!
-
Progress on Grimlock's MB KT build
-
here is a project i spent this past weekend working on. I am happy with the results but still have some stuff to add and to make presentable. I am about 80% done and thought i'd share my project and the tutorial as well: http://empireprops.weebly.com/mg-34-tutorial.html
-
 lol.. on the cs-6 i had to watch that same 10 year old on you tube help me piece it back since i didn't take good pics on that gun. i was like, are you kidding me?!?!? he's 10 years old and he is showing me how to re-assemble the gun!
 -
the top 2 pics was the NERF CS-35 ($29.99) and the bottom pic is NERF CS-6 ($19.99). I spent $6.99 on the scope for the CS-6 from wal-mart, 3 cans of primer ($9), 1 can of metallic silver ($3), and 4 cans of flat black ($4) from home depot. it was really fun, i started with sanding the logos off with my dremel/sandpaper, then i took apart the guns and took pics as i did to remember how to piece it back together. then i looked at what parts i wanted painted and what parts i did not to ensure the guns would still work properly. then i primered, then added coat of metallic silver, then flat back.. This way if i slightly scraped the black paint, the silver would shine through like it was real metal. it only took me a day to do both guns. I also added a strap to the cs-6 nerf gun and will be adding one to the cs-35 nerf gun.
-
I thought i share my 2 nerf guns i modified so when i go to Halloween parties i can carry more than just a tiny blaster! both are nerf guns and i'll be working on the weathering soon!
-
I am glad i found this forum! this is my bikerscout.net carbine inspired nerf mod for non-cannon events! its awesome that i can still shoot darts at people, i mean ewoks!
-
First time trooper - Biker Scout w/mods
78bird85 replied to 78bird85's topic in ROTJ Biker Scout Armor/Helmet
I will narrow down the bund flap so it eliminates that camel toe... and good point about the pouch flaps.. i'll make them narrower at the bottom to match closer to other scout troopers. thanks for the advice! this is my first time and never modified anything before but this forum definately gives great advice. -
First time trooper - Biker Scout w/mods
78bird85 replied to 78bird85's topic in ROTJ Biker Scout Armor/Helmet
Thanks! i used electrical tape and a razor to attach 6 rank stripes (which i'm not sure what is the minimum or maximum). i will move the pouches up a bit so they are right under the chest plate. that sewn square for the velcro should have been done before we did the bund flap... i will adjust it accordingly where the stiching is not seen . and yes, the upside down chevron is on the bund flap as well. i just don't think the photo showed it. i will make the last modifications so this way i can be comfortable when i submit. this is really awesome that you been so helpful in making me presentable. I'd hate to go to Comic Con and look like some dork! lol here are the corrections: -
First time trooper - Biker Scout w/mods
78bird85 replied to 78bird85's topic in ROTJ Biker Scout Armor/Helmet
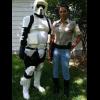
ok.. with the advice i was given, i corrected some items including: -replacing the decals on the back of the helmet -the shoulder bells were same size so i re-took the pic w/the shoulder bells adjusted -i removed the rank stripes on the tank that were on wrong size/side, will be replaced soon w/correct stripes -i had my mother in law do a brand new cumberbund w/instructions i found on this forum. -boots i am not sure if what brand they are, i will have to eventually replace them but i thought they were fine. ok... let me know once i put the rank stripes, what else i need before i submit for 501st? -
First time trooper - Biker Scout w/mods
78bird85 replied to 78bird85's topic in ROTJ Biker Scout Armor/Helmet
Awesome! thanks for the feedback! i will also introduce myself in the correct forum as well. Helmet: i am new to this and the Dremel tool.. so i tried my best, but yeah, it is a little wanky. i have the replacement decals for the back of the helmet which i will change immediately! Armor: i never noticed the shoulder bells being different sizes, i will check and trim where necessary. The rank stripes on the tank will be corrected to the right size/side of tank. The top of the tank details was some sorry ugly little black blob of a tank topper that had no details, it just looked like someone just dropped some black gunk on it.. so i replaced it with a correct one. Soft Armor: i'll switch the pouches, they are just velcroed on... and the camel toe.. lol.. i'll add a longer strip of black so it doesn't fit me that tight! there are 7 vertical stitches there, but they had to be added since the ones before from the costume i bought had 7 horizontal stitches! lol.. horizontal!!! Boots: the boots came with the costume and i plan on making some more accurate ones... plus they are 2 sizes bigger than my size... anyone you can refer me to for more accurate boots, that fit me! i need size 10's thanks again! look forward to making those changes soon! -
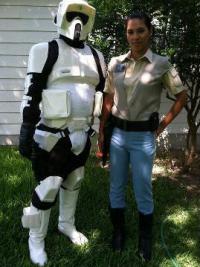
Hi, first of all, thank you all for this wonderful forum. I like how others share ideas, comments, and pictures. This is my first attempt to get some feedback on my Biker Scout armor. I am not sure who the maker is, I bought this on Ebay. I did make some mods to the armor like replacing the top of the back tank to be accurate and re-did the utility belt and thermal detonator. Also, the helmet is a Don Post in which I did the following mods: sanded the back logo down, drilled out the ear holes and placed black mesh in them, replaced the snout, the side bolts to be more accurate, replaced the helmet liner w/baseballhelmet foam, the visor is replaced and that middle thing in the visor was cut off, i also used a dremel to make the face slimmer (my goal was to have the ear holes to be visible from looking at me from the front. I will post pics of the helmet in detail soon. I hope to get 501st approved before my wife and I held down from San Antonio, TX to SDCC. any feedback, comments, or questions would be appreciated.