


Bloodclaws65
-
Posts
94 -
Joined
-
Last visited
Everything posted by Bloodclaws65
-
No just looks cool walking with it . People love when I crank it up makes a wicked sound. ;0)
-
ACE Comic Expo Albuquerque N.M. June 24 - 25 2011 first Troop in Kashyyyk Jeremy Bulloch (Boba Fett)
-
Congrates Brother look's great .
-
Good Luck to you . Great kit .
-
First fitting adjusting see what fits what I need to adjust . What do you think? 1) drop boxes lower 2) order DC-15 from Woodchuck
-
Sweet .
-
Man that looks awesome great job . Can't wait to see it all complete and weathered .
-
Outstanding I bet it feels great getting close to the finish line . I have a couple of lose ends and my cumberbund should arrive next week almost there .
-
Thank you all very much for the props . Coming from this Pathfinders group it means a lot. all the kits that I have seen totally rock and the talent is awesome . I look forward to joining the Pathfinders/ Kashyyyk Brotherhood .
-
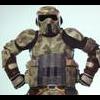
Thanks Grumpy for loaning me your Star Wars stuff so I can use for background I will try to bring Yoda to CVI with me So now I did a little more weathering on all my Armor . I used a kind of acrylic wash . That i mixed up Black , grey Acrylic paint and water making like a soup . Then I will dry sponge it on thick and light then wipe of the excess . Then I use a small paint brush to get to the small cracks and hard to reach area's I like the way the dry sponge give that real weathered look like year of wear . So I have some pics of my armor after weathering .
-
Some pics of my Bucket time for some weathering I use acrylic sticks grey and black to help with scratches and weathering
-
Kashyyk Cummerbund*update* new pics 4/20/12
Bloodclaws65 replied to LadySewForUs's topic in Kashyyyk Trooper Soft Parts
I know she had issues with her E-mail . I will call her tonight and pass on the info . -
Looking great nice Job Grumpy.
-
Had some time so I worked on cleaning up the bucket sanding and my trusty Dremel :dim: Cutting free hand with dermel front visor . all cleaned up now sanding . Cutting out side inlets. Cutting out air inlets with derme l and file . some head way on bucket .
-
Dude freaking sweet . almost at the end .
-
A couple of little lid questions
Bloodclaws65 replied to darren1970's topic in Kashyyyk Trooper Armor/Helmet
Thanks LOl -
A couple of little lid questions
Bloodclaws65 replied to darren1970's topic in Kashyyyk Trooper Armor/Helmet
Joe Who ? -
A couple of little lid questions
Bloodclaws65 replied to darren1970's topic in Kashyyyk Trooper Armor/Helmet
I am this point on my lid does anyone have the measurements for the rectangular slot cut into the top of the visor . Help Thanks -
Looks good I like that set up . The magnets are Neodymium Magnets 3/4 x 1/16 Disc Rare Earth N42
-
Looking great I like the idea of extra plastic for the greebs . What are you using to mount the pouches velcro ? I am going with magnets on the pouches and belt also shoulder bells . the magnets are 3/4 inch disc x 1/16 inch thickness the pull is 6 lbs so they are very strong you have to pull part with both hands.
-
Ok great thanks for the info.
-
I think I will use magnets to attach rubber patches . Does anyone the have the measurements for the boots straps on the shin armor there are 2 slits that the straps run thru on both sides top and bottom Thanks for the help.
-
Had some time so I started to put together some armor. I already measured the the pieces on the troopers arms . so I marked what I need to remove. Made the cuts with my Tin snips cutters they work really well on plastic as well as tin. So i applied the epoxy and cut my shim material to fit both of the surface on the armor. so then I set my clamps and started on the rest of the 3 set's I am doing . So I need to apply my Bondo after all pieces are dry .
-
Thanks for the heads up Colleen , I had received a email the stated you wanted to hook up by me is totally cool you are very attractive women . But to good to be true plus I don't think our spouses would like the Idea unless we were in Vegas
-
Just had one question for now - on the boot armor the shin straps what is the measurements for the slits , I could not find any reference .