

Smitty
-
Posts
231 -
Joined
-
Last visited
-
Days Won
9
Everything posted by Smitty
-
I use loctite 5 minute plastic epoxy. 3200psi tensile strength.
-
SC Helmet Mod - The Noobtastic "Sink or Swim" Thread
Smitty replied to bwattsup's topic in ROTJ Biker Scout Armor/Helmet
you gotta admire the skill you've shown on this build, almost seems like re-inventing the wheel but I can't wait to see it finished. -
Smitty's Helmet Build - identifying helmet help too
Smitty replied to Smitty's topic in ROTJ Biker Scout Armor/Helmet
Got my decals from Trooperbay today and finished her on out. What do you guys think? Also any more clues on the lineage? -
Smitty's Helmet Build - identifying helmet help too
Smitty replied to Smitty's topic in ROTJ Biker Scout Armor/Helmet
done for the day! I got the padding put in, the lens put in and painted the inside black. Also cleaned out the shop, made a set of hovis and finished up Greg's baster kit. Pretty much just waiting on my decals to come in from trooperbay. -
Smitty's Helmet Build - identifying helmet help too
Smitty replied to Smitty's topic in ROTJ Biker Scout Armor/Helmet
Got some more work done today. I still have to touch up the few runs I mentioned earlier but here's some more pics! -
Smitty's Helmet Build - identifying helmet help too
Smitty replied to Smitty's topic in ROTJ Biker Scout Armor/Helmet
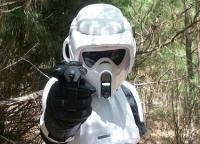
I dont have a side view yet. I just laid the gloss white on it a few minutes ago. I got let that cure up a few days before I go playing with it. I only got 3 runs in the paint so as soon as it cures up, I gotta sand those out and touch em up with a brush. The back vents are a bit soft which is about my only gripe with the helmet. Its smaller than the KS I used to have a few years back because this one tries to rip my ears off when I take it off my head. But at the same time I dont have to open the visor to take it on and off. And on my KS the only way to get it off was to open the visor but the KS left my ears intact. The Rustoleum is a very close match to the ABS plastic so Im gonna try to avoid paining the faceplate and visor but I'll make that call in a few days when I reassemble it. The snout greeblie that came with it is super way cool sharp. I'll have some more pics up in a few days. -
Smitty's Helmet Build - identifying helmet help too
Smitty replied to Smitty's topic in ROTJ Biker Scout Armor/Helmet
Primered white Teenaged Mutant Ninja Turtle. -
Merry Christmas Shaun! glad i could help out!
-
Smitty's Helmet Build - identifying helmet help too
Smitty replied to Smitty's topic in ROTJ Biker Scout Armor/Helmet
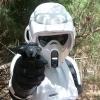
And heres an assembled neck opening shot. Any origin ideas? -
Ok I got this helmet kit from someone who told me it was cast from an Altman. But to me I think it has other origins wanted to see what you guys thought. The main part of the helmet is 2 halves and a dome. It looks quite warped but when the faceplate and visor is taped into place it looks quite good. Anyhoo, here's my first set of build pics.
-
Thanks for the clarification Marcel. I've had a discussion with another trooper who filled me in on a few things so I will be going a different route. Not sure what soft parts I'll be going with now but it won't be swprops.
-
I don't see what the big deal is with it required to be separate from the vest. When suited up its impossible to tell if they are separate or not. This is the route I'm taking with my scout costume wether I get standard clearance or not.
-
http://www.imperial-fleet.com/BBC/community/viewtopic.php?f=4&t=5 The darthvaderfan tutorial is no longer there but the templates are still there.
-
check the blasters builders club. I used that and a heap of pics to build mine. It didn't turn out an exact replica but it looked nice.
-
That is a nice pic! Looks like I will need to remove the top turret cap on my scope when I recast my scope after my current scope mold wears out.
-
Man thats such a magnificent looking helmet kit! Great job so far!
-
Sent you a PM Jeff! Just in case everybody, these are in production and available in the Trade forum Thanks!
-
D-d-d-d-dang! That looks good buddy! Loving the target detail! I'm glad to see how well they fit in the holster too!!!
-
This one is painted a gloss black. I think it might be a bit too glossy. I wish I didn't have to paint them at all since they are cast in black resin but the different textures on the blaster parts require paint to give the blaster a uniform finish. That only pertains to the blaster though since its a sculpt. The Scope doesnt suffer from this effect since its found part and the different textures work out for the better on the scope. According to my bathroom scales the blaster weighs about 1.3 pounds. I think what Im gonna do is go ahead and start production but only offer raw castings kits for the time being. I'll pour you one up for $75 shipped. Shoot me a PM if you dont wanna wait for the production thread.
-
So what do you guys think?
-
Agreed
-
Surprisingly the stuff i have the best luck with is the Colorplace Walmart brand paint. At 97 cents per can the finish is ALWAYS flawless without a single run.
-
Yep, this paintjob is total garbage. I'm gonna pair it up with a scope thats not the best of castings and let it go for practically nothing. I'll assemble it tomorrow and post it in the pre production thread for a the Low-Low.
-
Ugghhhh!!!! I tried out a new satin Black finish today from rustoleum. Stuff was total crap. I think I may have saved the paintjob but only a few hours of drying time will tell. Looks like I'll have another preproduction blaster for sale tomorrow. The good news is, I finally got the hang of working the scope mold and produced a flawless casting of a scope today so thats something to celebrate!
-
Ok here's the first castings out of the molds in black resin. Due to texture issues the blaster gets a coating of black paint to give it a uniform appearance. This one is sprayed with a flat black but I'm gonna test out a satin black next to try to get a closer match to the black resin of the scope. The scope of course is unpainted. These parts on going out to Lonewolf as soon as I give the paint on the blaster a couple more days to cure before packaging it up. What you see here is the typical quality you can expect for me to ship out when production starts.
