Fool Posted January 11, 2012 Share Posted January 11, 2012 So I got my SC armor for Christmas, and I have "started" working on it. So far I have curved the belt a little more to properly fit around my waist. I have also trimmed the chest, back, and belt. And the third thing I have done is look at pictures for 4 to 6 hours. (2 hours just looking at the bicep armor...ug) Just starting a log for what I have done, and I will get some pictures up when there are any to show. Quote Link to comment Share on other sites More sharing options...
Griffin-X Posted January 11, 2012 Share Posted January 11, 2012 Good luck, I'm sure you will do just fine...! Quote Link to comment Share on other sites More sharing options...
Grendel_Blitz Posted January 11, 2012 Share Posted January 11, 2012 Give it HECK Fool! Should be a fun build for you. Also, does anyone know if Jeff pushed out his latest armor set since last year? If so, I have not seen it yet. He mentioned redoing some pieces that will be closer to the film set. Any feedback yet - if yes, how does it compare to the MC set? \m/ Quote Link to comment Share on other sites More sharing options...
Chex Posted January 12, 2012 Share Posted January 12, 2012 Yes, do post pics. And why would the biceps be giving you trouble? Quote Link to comment Share on other sites More sharing options...
Fool Posted January 12, 2012 Author Share Posted January 12, 2012 Yes, do post pics. And why would the biceps be giving you trouble? I had a preconceived notion of how the biceps should look. It just took a little to get my head to accept the fact that they don't look like I thought they did. I will post pictures when I get somethings put together! Thanks all! Quote Link to comment Share on other sites More sharing options...
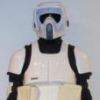
Fool Posted January 27, 2012 Author Share Posted January 27, 2012 Ok, just wanted to get your imput before I go any farther.....What stands out to you? How does it look? (Besides all the blue tape that is) Quote Link to comment Share on other sites More sharing options...
Fool Posted January 27, 2012 Author Share Posted January 27, 2012 Oh, one other thing? Did you use velcro to secure the elastic to the armor? If so what kind of glue did you use to secure the velcro to the armor? Thanks all! Quote Link to comment Share on other sites More sharing options...
Chef Posted January 27, 2012 Share Posted January 27, 2012 E6000 glue. Works a treat. Did you know your 'Fish-hook' detail on your lid is on the wrong side?? It should be on the left? Other that that.... looks exactly as a set of SC should look. Quote Link to comment Share on other sites More sharing options...
4505Marcel Posted January 27, 2012 Share Posted January 27, 2012 Yup helmet decal is wrong side and the corners of the shoulder bells could do with being rounded off a little bro, all the rest looks good bud Quote Link to comment Share on other sites More sharing options...
Arnie Posted January 27, 2012 Share Posted January 27, 2012 Ehm guys... he is using a mirror... Quote Link to comment Share on other sites More sharing options...
Grendel_Blitz Posted January 27, 2012 Share Posted January 27, 2012 Ehm guys... he is using a mirror... Ha HA! I was thinking the same thing... Good stuff! BTW - armo os coming along well - have fun! \m/ Quote Link to comment Share on other sites More sharing options...
Griffin-X Posted January 27, 2012 Share Posted January 27, 2012 Looking good man...! Quote Link to comment Share on other sites More sharing options...
Fool Posted January 27, 2012 Author Share Posted January 27, 2012 Thanks for the info. In the lancer specs #13 it refers to the TK shoulder assembly. Does any one have a picture how TB's attach the shoulder lancer style? I looked into the TK shoulder assembly and they have a strap running from one shoulder to the other. Is that how we should do it? Or is it attached to the cross section of the chest armor? I guess I am a little confused. Thanks Quote Link to comment Share on other sites More sharing options...
Arnie Posted January 30, 2012 Share Posted January 30, 2012 Im no expert, but I think that the elastic strap on the shoulder bell should be mounted a bit higher on the TB than on a TK. I think about between a ½ and 1" from the bottom will do. Quote Link to comment Share on other sites More sharing options...
Fool Posted February 1, 2012 Author Share Posted February 1, 2012 I got my undersuit, still collecting other items though....and next time I'll take pictures in front of something else.. Quote Link to comment Share on other sites More sharing options...
Grendel_Blitz Posted February 2, 2012 Share Posted February 2, 2012 Hey FOOL... You are just jammin' along with that outfit. Lookin' good!!! \m/ Quote Link to comment Share on other sites More sharing options...
Griffin-X Posted February 2, 2012 Share Posted February 2, 2012 Looks really good...almost done?! Quote Link to comment Share on other sites More sharing options...
Fool Posted February 2, 2012 Author Share Posted February 2, 2012 things I still have to do: boots (have items must work on them) suede into thighs and butt flap (have material) vest (have material) belt/drop boxes (very close to being done) thermal detonator greeblies (ordered) knees (very little left to do) holster (must get boots done first) I think that's it.....ufta It sucks they changed the requirements during my build, but that's life I guess. Quote Link to comment Share on other sites More sharing options...
Grendel_Blitz Posted February 2, 2012 Share Posted February 2, 2012 What change are you referring to? I am always behind the 8-Ball on keeping up... \m/ Quote Link to comment Share on other sites More sharing options...
Fool Posted February 2, 2012 Author Share Posted February 2, 2012 Must have a suede or faux suede butt flap attached above the waist hidden by the cummerbund, rectangle in shape. The flap should be slightly narrower than the width of the trooper and stop slightly higher than the bottom of the troopers butt cheeks. Suede or faux suede thigh patches must be present, extending over the flight suit crotch and down the front finishing above the knee armor. The thigh patches must be secured by 50mm (2") black elastic, sewn in under the front and back of the thigh patch. VESTMade out of black matt finish heavy weight cotton fabric. Sleeves should be padded and contain ribbing similar to the front of the cummerbund, the sleeves should end just slightly longer than the bottom edge of the shoulder armor. Must have a much wider neck opening than the flight suit. Secured at the back using 50mm (2") black velcro. Nothing too bad, just extra to do before getting to be a pathfinder At least we know that 4505Marcel is thinking about all the new troopers butt checks Quote Link to comment Share on other sites More sharing options...
Griffin-X Posted February 2, 2012 Share Posted February 2, 2012 Ya, the changes are not too drastic and will make your scout look more accurate. Plus, very much closer to Lancer specs. I got approved in Oct 2011, and have gone back and added the new requirements. All in all, cost me about $30 in material and some time. It's worth it. Quote Link to comment Share on other sites More sharing options...
Grendel_Blitz Posted February 2, 2012 Share Posted February 2, 2012 Thanks folks! Always good to have this info. repeated around the forum too for those that have not gotten around as much! \m/ Quote Link to comment Share on other sites More sharing options...
4505Marcel Posted February 3, 2012 Share Posted February 3, 2012 Your scout is buzzing along mate, I recon you could shorten the shoulders a little and also round off the corners a touch. Whoops school boy mirror error lol sorry Quote Link to comment Share on other sites More sharing options...
Fool Posted February 15, 2012 Author Share Posted February 15, 2012 I got my boots done today. Worst holster for a gun ever......ever. Quote Link to comment Share on other sites More sharing options...
Fool Posted February 24, 2012 Author Share Posted February 24, 2012 Sorry for the poor quality, but I found myself home alone, with a camera I don't really know how to work I still need to take more off the shoulders, finish the tank details, and to finish the vest. I think everything else is done. And here is the reason why it's taken me so long to get done.....yep it's a cats fault! Quote Link to comment Share on other sites More sharing options...

Recommended Posts
Join the conversation
You can post now and register later. If you have an account, sign in now to post with your account.