Bloodclaws65 Posted January 14, 2011 Posted January 14, 2011 Getting ready to order armor . Already ordered BDU working on boots and gloves . Quote
Fettski Posted January 14, 2011 Posted January 14, 2011 Awesome!!!! Great to see another WIP. Do you have any questions? Quote
Bloodclaws65 Posted January 15, 2011 Author Posted January 15, 2011 not right now , But I am sure I will later on Thanks . Quote
Bloodclaws65 Posted January 20, 2011 Author Posted January 20, 2011 Great BDU's Arrived today will start on those this weekend , Looking at gloves . Quote
Bloodclaws65 Posted March 27, 2011 Author Posted March 27, 2011 t has begun ! Unboxed Armor today . :dim: Back armor / Tank Front Armor/ Chest Boot Armor / Shin Armor Knee Armor Shoulder Armor A lot of sanding in my future and bondo :icon_wink: This is the color match will start looking for paint this weekend working out my camo pattern . will have more pics as I inbox Armor . BDU arrived last week slowly coming together have a long road ahead . Quote
mrbungle Posted March 27, 2011 Posted March 27, 2011 glad you got the kit. it is not as much work as it seems............................. Quote
Fettski Posted March 27, 2011 Posted March 27, 2011 The sanding goes super fast and its really not a lot of bondo work. Check my thread if you like my colors that I matched to the colors from MB, i have the H Depot color mix that I used posted. just get 2 sample size of the base coat and 1 each of the green and brown. Quote
Bloodclaws65 Posted March 27, 2011 Author Posted March 27, 2011 mrbungle - Great kit Thanks looking forward to the build . sgtski - The sanding I am helping some good friends with the prep and painting of there kits . They also bought MrBungle kit so we will have 3 Kashyyyk scouts in New Mexico . Just had one question for now - on the boot armor the shin straps what is the measurements for the slits , I could not find any reference . Thanks Quote
Bloodclaws65 Posted April 1, 2011 Author Posted April 1, 2011 Just had one question for now - on the boot armor the shin straps what is the measurements for the slits , I could not find any reference . Quote
mrbungle Posted April 1, 2011 Posted April 1, 2011 i have to dig out my shins, i will have you an answer in the morning.......... Quote
Bloodclaws65 Posted April 9, 2011 Author Posted April 9, 2011 Had some time so I started to put together some armor. I already measured the the pieces on the troopers arms . so I marked what I need to remove. Made the cuts with my Tin snips cutters they work really well on plastic as well as tin. So i applied the epoxy and cut my shim material to fit both of the surface on the armor. so then I set my clamps and started on the rest of the 3 set's I am doing . So I need to apply my Bondo after all pieces are dry . Quote
Bloodclaws65 Posted April 27, 2011 Author Posted April 27, 2011 Had some time so I worked on cleaning up the bucket sanding and my trusty Dremel :dim: Cutting free hand with dermel front visor . all cleaned up now sanding . Cutting out side inlets. Cutting out air inlets with derme l and file . some head way on bucket . Quote
Bloodclaws65 Posted June 8, 2011 Author Posted June 8, 2011 Some pics of my Bucket time for some weathering I use acrylic sticks grey and black to help with scratches and weathering Quote
Jimah Posted June 8, 2011 Posted June 8, 2011 Wow the weathering looks great - what a clever idea with the acrylic sticks - got a great result! Quote
Grumpy Posted June 8, 2011 Posted June 8, 2011 Hey, that's my stuff on the shelves in the background! You have to bring the Yoda to C VI. Weathering looks great! Quote
Bloodclaws65 Posted June 9, 2011 Author Posted June 9, 2011 Thanks Grumpy for loaning me your Star Wars stuff so I can use for background I will try to bring Yoda to CVI with me So now I did a little more weathering on all my Armor . I used a kind of acrylic wash . That i mixed up Black , grey Acrylic paint and water making like a soup . Then I will dry sponge it on thick and light then wipe of the excess . Then I use a small paint brush to get to the small cracks and hard to reach area's I like the way the dry sponge give that real weathered look like year of wear . So I have some pics of my armor after weathering . Quote
LENOX61 Posted June 9, 2011 Posted June 9, 2011 Dude..................FREAKIN' SWEEEEEEEEEEEEET!!!!!! The weathering is awesome (the dirtier the better in my opinion and nicely battle torn.......excellent!)......great idea is with the sticks. All of your armor looks incredible. I am looking forward to looking at a pic of you with the soft and hard armor Keep it up Bro........Keep it up! Quote
darren1970 Posted June 9, 2011 Posted June 9, 2011 I really like the idea with the acrylic sticks Quote
Jimah Posted June 9, 2011 Posted June 9, 2011 Have to admit I have weathered with spray paint misting. Looks good, but doesn't show well in photos. I think you have nailed it here, going to try this myself. Great call! Quote
Bloodclaws65 Posted June 9, 2011 Author Posted June 9, 2011 Thank you all very much for the props . Coming from this Pathfinders group it means a lot. all the kits that I have seen totally rock and the talent is awesome . I look forward to joining the Pathfinders/ Kashyyyk Brotherhood . Quote
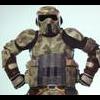
Bloodclaws65 Posted June 19, 2011 Author Posted June 19, 2011 First fitting adjusting see what fits what I need to adjust . What do you think? 1) drop boxes lower 2) order DC-15 from Woodchuck Quote
Boba Leo Posted June 20, 2011 Posted June 20, 2011 Beatiful JOSEPH !!!!!! Congratulations!!!!!!! Leo Quote
Jimah Posted June 20, 2011 Posted June 20, 2011 Looking great! My only suggestion is the rubber straps behind the knee armour need to be black. Otherwise spot on - weathering looks outstanding! Quote
Guest pyro Posted June 21, 2011 Posted June 21, 2011 I can't wait to see this kit this weekend! Quote
mrbungle Posted June 21, 2011 Posted June 21, 2011 looking good to me. you did a good job on the kit!!!! KT incoming!!! Quote

Recommended Posts
Join the conversation
You can post now and register later. If you have an account, sign in now to post with your account.