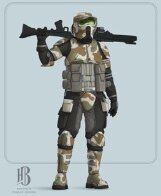
Dark-Saber2023 Posted May 15 Share Posted May 15 hello all. figured its time I actually start a build thread for my kashyyyk. so I've been sitting on the kashyyyk trooper for a little over 2 years now. I originally started back in 2022 when galactic armory released his files. I jumped on it of course and printed off the full suit, and then it sat in a box until January of last year. i kept hitting road block after road block and I didn't realize how much of an investment the build was actually going to be, from the cumber bund to the gloves to the boots, that would have ran me just under 800CAD, not including the price for all the body filler and spray paint I would burn through haha. a list of parts I had to get was as follows: - under suit. I couldn't find for the life of me the milspec camos on the crl in my size (I'm 6'6 in my KT boots, and I'm a bit of a chonker, hence the name sasquatch.), but after digging and digging and digging, I ran across a build thread going up on Flickr, and they image dumped the heck out of it, unfortunately I cant seem to find it now, but they opted to use Tri color desert camo, which while not having as many camo splotches as the gear used in the crl, it was available, and available in my size! after speaking with my gml who gave me the go ahead to use it as a supplement, I purchased a set of that, dyed it brown, threw in a tinge of purple and called it a day. -Gloves. the gloves were a bit on the trickier side. i was on the fence about purchasing the gloves from crowprops, but @ChrisThePropGuy recommended wampawear, and after seeing them I quickly purchased a set, and they arrived the same month! Boots. as far as I know there was only one person who sold replica boots, and of course me being the "do it myself" person I am, I took to amazon to find a work around. after speaking with some other KTs, I found out that combat boots, so long as they have the right shape are perfectly acceptable to use! so i jumped on amazon to try and find an equivalent up here in Canada, and I found a pair of boots called Obcursco Neoprene rubber boots for men and women. and I loved them. they were rubber, went up to just bellow my knee, which meant the shins could be placed over them and act as one giant boot, and had no laces! they were also waterproof and I immediately thought I could get some super cool action photos of me in the local creek when i was finished, and not have to worry about wet feet. after speaking with my gml, I bought a pair and painted them the correct color, and ran into my first issue. paint and rubber don't like each other. so if I cant find a solve to this p[problem ill have to bite the bullet and get tan combat boots. no more creek shots for me haha. -cumberbund. now this part seems to be the bane of my existence, I'm just never happy with it. I used references from the film and followed other peoples builds, and assembled my own cumberbund completer with custom made pouches that took more time then id like to admit. for my V1 of my build, I didn't dive too deep into how the cumberbund actually looks, and just followed the crl model as best as I could. with some help from @Jakeputt, I found out that the long midsection strap that goes across the cumberbund was placed incorrectly on mine, so I had to fix that. for the belt that goes at the bottom of the cumberbund, because I'm so large I opted to use EVA foam straps, which while it worked at the time, after my first convention it had a lot of damage, so I've since upgraded to a leather built that I'm cutting into the correct shape, which was a method I learned from another build thread here. which brings me to how the armor looked once i finished it all, I had applied all the camo, did some weathering, suited up, and submitted my approval pics just in time for the convention! my gml unfortunately turned down my submission and gave me a list of things to change, being: -visible print lines on the helmet. - visible print lines on the chest and back. -shoulders sagging too much. -fix the fraying edges on the drop down pouches. -Eva foam straps while passible needed work. Defeated, but not giving up, I still attended the convention with my friend and had a blast! while I was there I managed to figure out a lot of the issues that i needed to fix myself to make the costume comfortable to wear, while meeting the 501sts changes. so, some changes that i figured out myself while wearing the costume are as follows. - suspender straps for the cumberbund, so it stops sagging. CHECK -elastic straps on the shoulders so they stopped sagging. CHECK -fans added to the helmet so I don't die. CHECK -permanently attach pouches as Velcro isn't working. NEED TO DO. what my gml wants me to fix: -visible print lines on the helmet. CHECK - visible print lines on the chest and back. 1/2 CHECK -shoulders sagging too much, fix with straps. CHECK -fix the fraying edges on the drop down pouches. CHECK -Eva foam straps while passible needed work. fixed by replacing with nylon knee\elbow straps, working on leather belt for cumberbund. OK now that we are all caught up, time for the juicy stuff! so, after discussing it with my gml, and seeing all the work @ChrisThePropGuy has done with his kashyyyk build, I wanted to try and match that effort that he is putting into his kit, instead of just settling for basic approval, I wanted to try and be accurate with my build, so in coming image dump! so, with these images and the help of @ChrisThePropGuy, I, or more accurately he was able to determine the following: -the pouches are all different shades of tan, and consist of different weathering patterns. I believe @Bolt over from the redback garrison also did a build detailing his pouches being different shades. -the armor has a mixture of solid camo splotches, and splotches that are more "sponge applied" and many other things. with that I pitched the idea to my gmls, and they were on board! with their guidance I'm currently redoing all my armor, and my cumberbund to try and be as close as possible to the best of MY abilities to the movie character, not to one up anyone or anything like that, just for my own satisfaction. currently one of my gmls has been a huge help, and I definitely owe him a beer after this, but he has taken the time to hop on photoshop(I assume that's what he is using) to pull the colors of each camo splotch on each individual pouch, so I can replicate them as best as possible. I've also went ahead and repainted my pouches to be various shades of tan, which was a bit complicated to do while still adhering to the current crl guidelines, but after multiple attempts, I've finally landed on a color set that my gml gave a thumbs up too. I'm going to leave my drop down pouches the way they are, as in the reference they are much more lighter in color then the rest of the pouches. currently almost all my armor is painted tan, with the addition of silver to create scrapes! my backplate still has a tone of work I need to do to it to get it to be smooth, and not as rough as it is, but so far everything else is coming along smoothly. and that brings us up to date with my build! 2 Quote Link to comment Share on other sites More sharing options...
BikerScout007 Posted May 15 Share Posted May 15 Wow that was very thorough! Thanks for sharing! @Jakeputt check it out! Quote Link to comment Share on other sites More sharing options...
CBAspirant9200 Posted May 16 Share Posted May 16 2 hours ago, Dark-Saber2023 said: fans added to the helmet so I don't die. CHECK haha good to know. The build looks really nice man, its inspiring me to get mine going.. Quote Link to comment Share on other sites More sharing options...
Aradun Posted May 16 Share Posted May 16 I concur with Bikerscout007. Great WIP, excellent documentation and very helpful for those considering this build. Great work all around! Quote Link to comment Share on other sites More sharing options...
Jakeputt Posted May 16 Share Posted May 16 I've enjoyed helping you and Chris with both your builds. I look forward to updating the crls and helping potential Kashyyyks get into more accurate kits that are closer to what is seen on screen. You're doing great. I know the feeling of being defeated after taking so much time to work on a kit only to have a list that needs to be changed and I also know how intense every part of this kits build can be. Keep it up and you will get there. Sent from my SM-N986U using Tapatalk Quote Link to comment Share on other sites More sharing options...
Jakeputt Posted May 16 Share Posted May 16 haha good to know. The build looks really nice man, its inspiring me to get mine going..Yeah man, get started. It's fun being in the kashyyyk kit. Sent from my SM-N986U using Tapatalk Quote Link to comment Share on other sites More sharing options...
ferra Posted July 8 Share Posted July 8 Don´t feel defeated, my Kashyyyk took 3 paintjobs to be finished. My Kal Skirata is ongoing for the last 7 years... Eyes on your goal man, and if you can run, walk. 😉 Quote Link to comment Share on other sites More sharing options...
Dark-Saber2023 Posted July 12 Author Share Posted July 12 I have emerged from the woods once more! so after procrastinating for a bit, I went ahead and got back to the build. the first thing I noticed was my right bicep was missing the raised bump greebly. I tried to add it myself using body filler but it just didn’t turn out as well as I hoped it would. so I printed a new one! I also went ahead and printed off the proper greeblies for the left bicep, and some new elbow plates to replace my trashcan cut out ones. The undersuits shirt came in! It’s a little tight in the stomach but that’ll be hidden by the cumberbund. I’m terms of comfort over appearance I don’t care at this point. Finding the shirt was hard. I settled for a 2XL, I would’ve preferred a 3XL but this works. the pants are another issue entirely. No shop I’ve checked seems to have them in a 44inch waist, so I’m still searching. i also went ahead and purchased 6 different fabrics that I will be using to remake the cumberbund and the pouches, as I would like to apply for 41st elite Status! So I’m in the process of making the pouches to the specified measurements in the crl. Reason for the different shades, is due to the clear references showing different shades of pouches. So I’ll be making the pouches to the correct measurements, while keeping for screen accuracy. laatly the boots! I’m going to need to get a pair of size 13us boots off of crowprops, which will be my next purchase but that will run me 250$cad, so saving for that! Haha 1 Quote Link to comment Share on other sites More sharing options...
BikerScout007 Posted August 8 Share Posted August 8 The boots are always the worst part! We look forward to your 41st Elite app! Quote Link to comment Share on other sites More sharing options...
Dark-Saber2023 Posted October 2 Author Share Posted October 2 Sasquatch has resurfaced!A lot has happened since my last post! So firstly I managed to get approved! But not without a LOT of work. So as I said previously I had to redo my entire camo set up. It wasn’t up to crl standard. That took a majority of august to do, but I think I did a bang up job! I ended up going do an entirely different Tan base coat, as well as a Green and brown, that’s a bit closer to what the CRL wanted. I even went as far as making an entirely new cumberbund, and replaced the foam belt with a leather one(that took me HOURS to cut out each individual Indent)I submitted these pics and boom! Approved, with some small wearing adjustments being Recommended to me! CB-20024 reporting for duty! Not even 2 days after my approval I was fresh off the gunship and deployed to Toronto Fan Expo 2024, where I attended my first March! The kit survived for the most part! I lost a boot plate and my shoulder bells kept flipping about, so I’ll need to figure out a better attachment method for both, but otherwise I had a blast!But that’s not all! After a long week of detoxing from the con(it was actually almost 3 weeks) I threw the Armor back on for some cool snazzy photoshoots in the ravine by my house! This was my way of “Shattering a wine bottle” on her so to speak, for completing its first troop, surviving, and getting approved! Thank you all to everyone who’s been with me on the journey, and I’m glad to be apart of the pathfinders family! -SasquatchSent from my iPhone using Tapatalk Quote Link to comment Share on other sites More sharing options...
Jakeputt Posted October 3 Share Posted October 3 Congrats on the approval! The kit looks great!Sent from my SM-N986U using Tapatalk Quote Link to comment Share on other sites More sharing options...

Recommended Posts
Join the conversation
You can post now and register later. If you have an account, sign in now to post with your account.