Gertjan Kool Posted June 3, 2020 Author Posted June 3, 2020 Chest and abdomen are assembled. Kidney armor is sanded smooth. Shins still need some filling and assembling 3 Quote
Gertjan Kool Posted June 15, 2020 Author Posted June 15, 2020 I've worked on sanding the whole thing. I covered it with epoxy resin and then roughly sanded it with 60 grit delta sandpaper by using a sanding machine. Behind the chest, abdomen and kidney armor, I reinforced it with Epoxy resin. This is so that it is more durable and unlikely to break while trooping. Also I've replaced the raised strip for a wider version. And I modelled missing top pieces for the abdomen armor, which the Sean Field's abdomen file didn't have. Anyone who is interested, I provided it on thingiverse: https://www.thingiverse.com/thing:4445080 I ordered a Phrozen Sonic Mini resin 3D printer. This is for the delicate pieces that I want to print, such as: greeblies for the helmet in more detail and most likely less post-processing time. Quote
Gertjan Kool Posted June 19, 2020 Author Posted June 19, 2020 I am working more than 5 hours a day the past 2 weeks to get most of the huge pieces together and sanded smooth. Backbox still need one component namely the computer heat sink. - It's basically spray putty, sanding and repeat untill I'm satisfied with the results. - After majority of the pieces are smooth, I will pretty much soon post more pictures about the final armor part. Starting with the chestplate then shins then abdomen armor and lastly backboxes. 1 1 Quote
TK8271 Rogue Trooper Posted June 19, 2020 Posted June 19, 2020 I would carve the centre double greeblie out a bit more as it’s looking like one piece instead of 2 Sent from my iPad using Tapatalk Quote
Gertjan Kool Posted June 20, 2020 Author Posted June 20, 2020 16 hours ago, TK8271 Rogue Trooper said: I would carve the centre double greeblie out a bit more as it’s looking like one piece instead of 2 Sent from my iPad using Tapatalk Thanks! It's on the to fix list! 1 Quote
TK8271 Rogue Trooper Posted June 20, 2020 Posted June 20, 2020 Nice work there mate , very nice Sent from my iPad using Tapatalk Quote
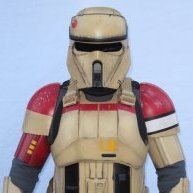
Gertjan Kool Posted June 24, 2020 Author Posted June 24, 2020 Sahara Beige was sprayed on. I'm pretty happy and proud with todays work. A lot of work was done. Quote
Gertjan Kool Posted June 24, 2020 Author Posted June 24, 2020 Daylight was still present so I did my last thing for today which is spray painting some spots black. The front of the chest and the black stripes next to the raised parts of the abdomen has been sprayed. Tomorrow I will be spray painting the yellow emblem of the chest plate and figuring out the placements of the upper red block colors. Quote
Gertjan Kool Posted June 26, 2020 Author Posted June 26, 2020 Now I have to wait for the foam to come in, and add buckles, straps and weathering. 2 Quote
Gertjan Kool Posted July 4, 2020 Author Posted July 4, 2020 Really proud of the progress what I've made so far. Tommorrow I will be adding snaps for the faulds and felcro for the hardcover belt that goes at the back 1 Quote
Gertjan Kool Posted July 4, 2020 Author Posted July 4, 2020 Just now, BikerScout007 said: Looks really good man! Thank you so much! I'm almost done with the whole armor build! Just the back is giving me some set back time. I was wondering how the ammo pouch is attached to the abdomen. Do you know how it is attached? Quote
TK8271 Rogue Trooper Posted July 4, 2020 Posted July 4, 2020 Thank you so much! I'm almost done with the whole armor build! Just the back is giving me some set back time. I was wondering how the ammo pouch is attached to the abdomen. Do you know how it is attached?It’s here http://forum.501stpathfinders.com/index.php?/topic/17207-ammo-pouch-placement-information/Sent from my iPad using Tapatalk 2 Quote
Gertjan Kool Posted July 8, 2020 Author Posted July 8, 2020 Thank you @TK8271 Rogue Trooper Ammo pouch tutorial was really helpful! 1st testfit 2 Quote
TK8271 Rogue Trooper Posted July 8, 2020 Posted July 8, 2020 Looking good Sent from my iPad using Tapatalk 1 Quote
Gertjan Kool Posted July 11, 2020 Author Posted July 11, 2020 More work in progress: Back pack: Greeblies are going to be glued on and some holes needs to be cut Shins: Only Sahara beige needs to be sprayed on. Hand plates: I have them re-done. Chest: It's weathered now Orca Bay Brecon shoes has been weathered as well. According to the reference pictures, it looks well accurate in terms of weathering process.Some good news: Resin 3D printer came, I can now resin print the helmet greeblies Plastezode foam came in for the chest and back. 1 Quote
Gertjan Kool Posted July 12, 2020 Author Posted July 12, 2020 Moving on to the chest again. I added the plastezode material. 1 Quote
Gertjan Kool Posted July 15, 2020 Author Posted July 15, 2020 This awesome build is almost coming to an end. The shins are finally done. It took me ages to finish. The buckles and straps are bought from Mr. Paul.Finished: Shins are done Forearms are re-done since I was not satisfied with the result and it was not accurate. So I modelled a more accurate forearm version. All left to do is: Strapping Back Resin printing helmet greeblies 3D Printing a A280 CFE Blaster since this is my most favourite blaster of all blasters available for the specialist. Quote
TK8271 Rogue Trooper Posted July 15, 2020 Posted July 15, 2020 You are missing the pyramid on your right Shin buddy Sent from my iPad using Tapatalk 1 Quote
Gertjan Kool Posted July 15, 2020 Author Posted July 15, 2020 18 minutes ago, TK8271 Rogue Trooper said: You are missing the pyramid on your right Shin buddy Sent from my iPad using Tapatalk Easy fix mate. I will model a piramide since the Sean fields files doesn't have them. 2 Quote
Gertjan Kool Posted July 25, 2020 Author Posted July 25, 2020 Mouth greeblies, back box greeblies and some blaster parts resin printed at 0.03mm (30 micron) layer height. Quote
Gertjan Kool Posted July 25, 2020 Author Posted July 25, 2020 Moving onto the greeblies. I modelled exactly the proportions and details of the Battlefront 2 screenshot. They're printing right now on the resin printer. 1 Quote
Gertjan Kool Posted August 4, 2020 Author Posted August 4, 2020 Back Boxes processBefore priming and spray painting After priming and spray painting After weathering 1 Quote

Recommended Posts
Join the conversation
You can post now and register later. If you have an account, sign in now to post with your account.