Ryi'nock Posted May 13, 2020 Share Posted May 13, 2020 Hey all. Im Ryi'nock from the UK, currently a member of the MMCC but ive always wanted to build a Biker kit. Im due to move over to Norway sometime later this year so hopefully ill have my kit ready to join the Nordic Garrison Ive had a biker scout for some time but never really had the time nor know how to build it. With the UK being in lockdown i've finally got some time to start work on the kit. For the most part the kit came pre cut but im really not happy with how much was cut off already, and the vacform isnt perfect either. But i'll make do. Here's what ive got so far. The Only part im missing from the kit is the gloves, if anyone has any recomendations for where i could get some that would help a lot. I cant currently find anyone in the UK that sells them. Here's how the softs fit. Onto the helmet. Ive cut and sanded my plate now to fit and then depointed them so to not stabbed myself. As well as cut the slits out for the elastic (pictures to follow when they're done) A question i need to ask however, for the back plate, i know in the films there werent sat flush at all, but how is this looking? do they need to sit closer or be trimmed more at all? i wanted to check before i go ahead and rivet them down. A couple of other questions. [li]For attaching the shoulder bells to the main chest plates most places are saying to use a tie-wrap/cable tie. I was wondering if i could use a strip of 20mm black webbing with a pop-snap either end to attach onto the underside of the shoulder and then the chest plates. Would that be approvable?[/li] [li]For attaching the shoulder bells to the main chest plates most places are saying to use a tie-wrap/cable tie. I was wondering if i could use a strip of 20mm black webbing with a pop-snap either end to attach onto the underside of the shoulder and then the chest plates. Would that be approvable?[/li] [li]With the arm plates, how are they to bit fixed? Sew a strip of velcro onto the flight suit and stick the other side to the inside of the plates? [/li] [li]And finally, i have a rebel A300 sniper from R1 that is inrepairs would that be okay to troop with or am i limited to Empire weapons? [/li] Let me know what you thing, any and all info/constructive criticism is welcome. Ryi. 1 Quote Link to comment Share on other sites More sharing options...
mickeymark34 Posted May 13, 2020 Share Posted May 13, 2020 I know here in the U.S., Wampa Wear makes a nice set of Scout gloves. You will just have to use scissors to remove the clips that come attached to them. It looks like you are well on your way to becoming a Scout. Quote Link to comment Share on other sites More sharing options...
BikerScout007 Posted May 13, 2020 Share Posted May 13, 2020 24 minutes ago, Ryi'nock said: The Only part im missing from the kit is the gloves, if anyone has any recomendations for where i could get some that would help a lot. I cant currently find anyone in the UK that sells them. Ive cut and sanded my plate now to fit and then depointed them so to not stabbed myself. As well as cut the slits out for the elastic (pictures to follow when they're done) A question i need to ask however, for the back plate, i know in the films there werent sat flush at all, but how is this looking? do they need to sit closer or be trimmed more at all? i wanted to check before i go ahead and rivet them down. A couple of other questions. [li]For attaching the shoulder bells to the main chest plates most places are saying to use a tie-wrap/cable tie. I was wondering if i could use a strip of 20mm black webbing with a pop-snap either end to attach onto the underside of the shoulder and then the chest plates. Would that be approvable?[/li] [li]For attaching the shoulder bells to the main chest plates most places are saying to use a tie-wrap/cable tie. I was wondering if i could use a strip of 20mm black webbing with a pop-snap either end to attach onto the underside of the shoulder and then the chest plates. Would that be approvable?[/li] [li]With the arm plates, how are they to bit fixed? Sew a strip of velcro onto the flight suit and stick the other side to the inside of the plates? [/li] [li]And finally, i have a rebel A300 sniper from R1 that is inrepairs would that be okay to troop with or am i limited to Empire weapons? [/li] Let me know what you thing, any and all info/constructive criticism is welcome. Ryi. Okay -- A. Wampa Wear makes a great set of gloves, as mentioned above. Imperial Boots does as well. My experience, WW ships faster, but your mileage may vary. B. Tank looks good. That's about how well it looked in the movie. I think too many folks try to make this armor all neat and tidy, which goes against the spirit of the rough nature of these kits in the film C. You can use a t-strap. That's how plenty of folks used to do it a long time ago before we discovered the zipties. But my experience, the zip ties are better. There's a reason why they used them in the film. And they are easy to do: D. The arm plates are affixed to the arm with velcro straps. All the sizes needed are listed in our CRL: https://databank.501st.com/databank/Costuming:TB_Scout_trooper E. Weapons depend on your Garrison. Some are more strict than others. My Garrison and UKG for example, only allow weapons specifically noted on the CRL. Look on the CRL toward the bottom under "Optional Accessories" for the weapons a Biker Scout is permitted to carry on a troop. F. I think your cummerbund looks a little long and you need to pull your codpiece up. I know folks tend to get fixated on the armor, but the soft goods are what make this costume really look good. Please refer to this post about best practices: 1 Quote Link to comment Share on other sites More sharing options...
BikerScout007 Posted May 13, 2020 Share Posted May 13, 2020 Wait. Sorry I just noticed after looking at this on my PC Your tank has the rank bars and tank detail actually carved into the tank. That will need to be filled in and those replaced with decals. Quote Link to comment Share on other sites More sharing options...
Chopper Posted May 13, 2020 Share Posted May 13, 2020 That looks like one of Chef's older kits. He used to have indents moulded in for the rank and pinstriping, though I believe newer kits have been updated. 1 Quote Link to comment Share on other sites More sharing options...
Ryi'nock Posted May 13, 2020 Author Share Posted May 13, 2020 Cheers all for your replies. I have the decals for the Tank, was waiting for it to come together first before putting them on. So all the indents need to be filled in and flush? I take it then it cant be approved otherwise. Then roughly how much would you say my cummerbund will need to be shorted? or is it worth waiting till i have my chest plates on? Thanks. Ryi. Quote Link to comment Share on other sites More sharing options...
BikerScout007 Posted May 13, 2020 Share Posted May 13, 2020 2 minutes ago, Ryi'nock said: Cheers all for your replies. I have the decals for the Tank, was waiting for it to come together first before putting them on. So all the indents need to be filled in and flush? I take it then it cant be approved otherwise. Then roughly how much would you say my cummerbund will need to be shorted? or is it worth waiting till i have my chest plates on? Thanks. Ryi. The cummerbund should tuck under your chest armor about an inch and then stop right at the belt. For most people that's about 8-9 inches in height, if you wear the belt on your waist. Not your hips as is fashionable these days. You may want to wait until you have everything on first. But refer to that post I linked above. RE: the tank --- the CRL specifies decals for those details. Even for Level 1. Quote Link to comment Share on other sites More sharing options...
Ryi'nock Posted May 14, 2020 Author Share Posted May 14, 2020 21 hours ago, BikerScout007 said: The cummerbund should tuck under your chest armor about an inch and then stop right at the belt. For most people that's about 8-9 inches in height, if you wear the belt on your waist. Not your hips as is fashionable these days. You may want to wait until you have everything on first. But refer to that post I linked above. RE: the tank --- the CRL specifies decals for those details. Even for Level 1. Cheers. My phone didn't register that it was a link to another page. RE the cumba sizing. And I've filled all the indents in, just waiting for paint to dry. I've got a couple of questions as my dyslexic brain is in much confusion and the tutorials I've looked through including the one on Chef's website aren't helping me. When it comes to joining the main chest plates under the arm with the 1.5" webbing, how is that then attached to both the armour and its self to secure the plates together and allowing you to get in and out of kit? If you could possibly provide pictures of how its done or your kit that would be very much appreciated as I'm one of those who kinda needs to see it to understand it Then again with the Belt. i see that the webbing/strap needs riveting at the end of the blastic belt but then how do you get in and out of the belt? Is there a tab of velcro that is hidden somewhere or a clip behind the detonater pack? Larger update to follow. thanks. Ryi. 1 Quote Link to comment Share on other sites More sharing options...
BikerScout007 Posted May 14, 2020 Share Posted May 14, 2020 5 minutes ago, Ryi'nock said: Cheers. My phone didn't register that it was a link to another page. RE the cumba sizing. And I've filled all the indents in, just waiting for paint to dry. I've got a couple of questions as my dyslexic brain is in much confusion and the tutorials I've looked through including the one on Chef's website aren't helping me. When it comes to joining the main chest plates under the arm with the 1.5" webbing, how is that then attached to both the armour and its self to secure the plates together and allowing you to get in and out of kit? If you could possibly provide pictures of how its done or your kit that would be very much appreciated as I'm one of those who kinda needs to see it to understand it Then again with the Belt. i see that the webbing/strap needs riveting at the end of the blastic belt but then how do you get in and out of the belt? Is there a tab of velcro that is hidden somewhere or a clip behind the detonater pack? Please take a look at my build thread. For the chest/back connection I made a "belt" of the 1.5 webbing that goes all the way round on the inside and closes in the front with velcro. The belt closes in the back with two 2 inch straps of nylon or polypro that velcro to each other. The straps are riveted to each end of the plastic belt with ONE rivet on each side. Check out my build thread for a pic that sort of shows this 1 Quote Link to comment Share on other sites More sharing options...
Ryi'nock Posted May 15, 2020 Author Share Posted May 15, 2020 Cheers Mickey, that helps a lot. Little WIP update. Rest of my plates been cut and sanded, and started adding the straps to them all. Regarding the upper arms, i cant tell from the crls or anyones picturs which way round they are to go. Is it the side with the two dots pointing inwards on each other? I hope this is alright, is the tube long enough? its all i was given with the kit. I cut and made the clips, then painted them black When sizing up the holster the scope instantly snapped off, it origanlly had just been superglued on, not really impressed. But its being pached. Assembled the holster, still needs sanding slightly and making pretty. (ill be using rubbing alcohol to clean it up) Lastly the Tank. I filled and sanded it down perfectly but then it turns out my primer had gone bust. Resulting in a nasty paint reaction overnight, any who i refilled and sanded it all back down. Regarding the rank stripes and decals. Ive seen there are two sizes for the Stripes, and then on one set there is a thick centre bar in the middle of the line decal. Can i pick and choose from these or is it for a set type of scout kit only? Cheers all. Ryi Quote Link to comment Share on other sites More sharing options...
Chopper Posted May 16, 2020 Share Posted May 16, 2020 If you're shooting for Level 2/Lancer then the thicker 1/4" horizontal rank bars are for the 4 stripe version, which is the scout that captures Leia. The other variants (1, 6) use the thinner 1/8" horizontal rank bars. The center bar in the middle of the pinstriping was on the 4 stripe version. See example below. If you're only going for basic clearance, then you can have between 0 to 6 stripes. Quote Link to comment Share on other sites More sharing options...
Ryi'nock Posted May 16, 2020 Author Share Posted May 16, 2020 Cheers chopper. So as i cant go for level 2 with the kit i have, am i still able to have the ticker and center bar? or is that a lancer only Spec, so i have to keep to the thinner bars. Got most of my plates now finished today, all that is left is to sew velcro onto webbing for the under arm and belt. Then small patches onto my suit to keep my plates in place and shorten the cumba Also just echoing my last post, please could i get confirmation on which side the upper arm plates go . Re the leg holster, from what ive seen on the CRL's and other WIP's the plate is moderately flat but the one i have been sent has a very distinct curve to it. Ive tried heating it up to flatten the curve but thats the max i can now go without breaking or distorying it. Will this be okay to rivet to the leg? Thanks as always. Ryi. Quote Link to comment Share on other sites More sharing options...
Chopper Posted May 16, 2020 Share Posted May 16, 2020 1 hour ago, Ryi'nock said: Cheers chopper. So as i cant go for level 2 with the kit i have, am i still able to have the ticker and center bar? or is that a lancer only Spec, so i have to keep to the thinner bars. Got most of my plates now finished today, all that is left is to sew velcro onto webbing for the under arm and belt. Then small patches onto my suit to keep my plates in place and shorten the cumba Also just echoing my last post, please could i get confirmation on which side the upper arm plates go . Re the leg holster, from what ive seen on the CRL's and other WIP's the plate is moderately flat but the one i have been sent has a very distinct curve to it. Ive tried heating it up to flatten the curve but thats the max i can now go without breaking or distorying it. Will this be okay to rivet to the leg? Thanks as always. Ryi. Why don't you think you can go level 2 with Chef's kit? There have certainly been many other Lancers who have done so with Chef's gear? You can absolutely have the 4x thicker rank stripes and the center bar at Level 1. I can't imagine any GML would have any issue with it, but if they do, you have that screen cap I posted earlier. For the bicep armor, the armor itself is identical, however, you want the two vertical screws on the bicep greeblies to be facing forwards when worn. The screen used holsters had some curve to them as well, so your holster looks to fit ok on your boot. Quote Link to comment Share on other sites More sharing options...
Ryi'nock Posted June 1, 2020 Author Share Posted June 1, 2020 Cheers Chopper! Quick question. How long should the rank bars and then the centre bar that goes in the middle of the tank strip be? Trying to get the decals straight are more challenging than I though. Gloves turned up today so hopefully I'll have a full kit up soon. Edit: So, here's what ive got so far. I decided to kit up for the first time to see how it all fits together. I still need to fit velcro to the flight suit to keep the knees, biceps and gauntlets in place. The cumbamand ended up dropping a bit so that needs to stay rased up so its just underneath the chest plate. How is the belt looking? Are the side boxes at an okay hight as thats all the matieral i had for them to fit. If not i may have to try and find some more. I will be sewing the chest pouches in tomorrow as well. Just to note. I cant stand stright to save my life, got bad shoulder issues. I need to push the gloves tab in as well, also looks like i could of done a better job at tucking the legs into the boots. Then waiting on how long the ranks need to be before i go to add those up. As always Thanks guys. Ryi. Quote Link to comment Share on other sites More sharing options...
Chopper Posted June 2, 2020 Share Posted June 2, 2020 There's no specific measurement for the rank bars and the center bar in the CRL, but they're about 38mm or approx 1.5". Drop boxes should be around 1.5" below the belt. Your left one looks ok, but the right seems to be drooping more. That might also be because your belt looks a little loose in back though. Watch the cod crunchies == try and flatten out your cod and don't pull the strap so tight. That'll keep it from crumpling. Quote Link to comment Share on other sites More sharing options...
Ryi'nock Posted June 2, 2020 Author Share Posted June 2, 2020 Thanks Chop. So got a load of sewing done today. Attached some velcro so the arm plates wont keep droping. it does seem that i will need to put some velcro the cummerbund d and then the vest to keep it up as at the moment it keeps falling down with each step. It was all nice and kept up from when i was preparing my kit in the mirror but fell by the time i got pictures. Please let me know what i can improve. The granade box isnt sit correctly, so ill tighten the clips up a bit. label in the gloves will be removed as it keeps falling out. Also a close-up of the tank. Ill polish it all up and get ready for some preApp pics within the next day or so hopefully. Thanks Ryi. Quote Link to comment Share on other sites More sharing options...
Chopper Posted June 3, 2020 Share Posted June 3, 2020 Hey Ryi, just a few refinements for basic clearance -- The top edge of your belt should ideally be just under your bellybutton. Your bund might be a bit long, but try and pull it up a bit as well if you can. For basic you can put your belt over the bottom of your bund, if need be. Let that cod lay flat on the front of your body. Try not to let it crunch up like that. The bottom shouldn't be pulled through your legs -- leave it flat. I noticed you have only three stripes on your tank? That's ok for basic, but 1, 4, and 6 are the cannon arrangements. Up to you. Also, you can go ahead and cut the hook connectors on your gloves. Good work! You're really close! Quote Link to comment Share on other sites More sharing options...
Ryi'nock Posted June 3, 2020 Author Share Posted June 3, 2020 Thanks Chopper. I'll address the issues. Hopefully with the Bund sitting higher it should look alright. I think the elastic connecting the bottom under the legs is too shot pulling the whole thing down and then scrunching the cod up. So im okay with having 3 stripes for basic clearance? I originally read it as it was 1 to 4 stripes so my bad on that part. Also thats a lot easier for referencing where the belt needs to sit now, thanks. Ryi. Quote Link to comment Share on other sites More sharing options...
Chopper Posted June 3, 2020 Share Posted June 3, 2020 Yep, for basic clearance the CRL says the following about the rank bars: "Rank bars" present on the right side of the tank can number between 0 to 6 stripes. 1 Quote Link to comment Share on other sites More sharing options...
Chopper Posted June 3, 2020 Share Posted June 3, 2020 Oh also, if your elastic is too short you can always find the spot where the elastic goes under the back of the bund, and then sew a bit more elastic onto the end. That should give you a bit more leeway, so you don't need to pull it so tight. 2 Quote Link to comment Share on other sites More sharing options...
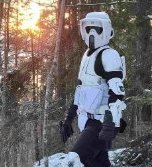
Ryi'nock Posted June 4, 2020 Author Share Posted June 4, 2020 Cheers Chopper. Ive finished Polishing the kit, I shall never go shiny 😆 Okay so hopefully these are all okay. The boot has sagged a little under the weight of the pistol so im going to fit a slap of 3mm Sintra in there which will match the curve to keep it all upright. It also appares the the balaclava that i have is far to small for my face so ive ordered a new one. Thanks for all your help guys. Any thoughts at all please do post away. Ryi. Quote Link to comment Share on other sites More sharing options...
Chopper Posted June 6, 2020 Share Posted June 6, 2020 Hey Ryi, the only thing I see that's still outstanding is your cod crunchies. I don't think it'll be an issue for basic clearance, but you might want to try moving your cod up a bit so it lies flatter on your body? The other option is putting some posterboard behind it, or something else to keep the bottom from crumpling. 1 Quote Link to comment Share on other sites More sharing options...
Ryi'nock Posted June 7, 2020 Author Share Posted June 7, 2020 hoping these will be better. Extended the legth of the elastic and moved the cod up.. still looks like it cruches a bit unfortunetly. Thanks Ryi. Quote Link to comment Share on other sites More sharing options...
Retrofire Posted June 7, 2020 Share Posted June 7, 2020 Looking great Ryi! Looks like you’re still fighting those cod-crunchies a bit though. A possible solution here would be to pull the top of your cod up and loosen the cod strap a smidge. You don’t want the cod going underneath your legs but sitting flat against your front. Take a look at this pic from the CRL model: See how the cod is just bearly rolling under the leg? Chopper also had a good recommendation to add some stiffener at that location as well which helps keep the bottom rigid. Other than that minor nit it looks like you’re ready to submit to the GMLs. You’ve done some really excellent work, especially fighting that tank paint, and should be proud! Quote Link to comment Share on other sites More sharing options...
Ryi'nock Posted June 7, 2020 Author Share Posted June 7, 2020 Cheers Retro! I had a look into using some stiffener but i think its all come down to the length of the elastic. As on my latest picturs you can just see the elastic now at the very end. Ill place an order in and get it remade. Hopefully that will resolve the issue. I had pulled it down a fair emount but it seemed to be still tight through the legs and causing it to bunch up. Ill at some strengthen to the bottem as well. Ryi. 1 Quote Link to comment Share on other sites More sharing options...

Recommended Posts
Join the conversation
You can post now and register later. If you have an account, sign in now to post with your account.