mickeymark34 Posted November 22, 2019 Author Posted November 22, 2019 My wife had some 1/4” Art Tape. I’ll have to play with it until I get the curve right.Sent from my iPhone using Tapatalk Quote
Chopper Posted November 22, 2019 Posted November 22, 2019 Yep. I used artists curve tape. Worked pretty well. https://www.dickblick.com/products/scotch-artist-tape-for-curves/?clickTracking=true&wmcp=pla&wmcid=items&wmckw=24108-1016&gclid=EAIaIQobChMI9Yza_tH-5QIVi5OzCh1suQEWEAQYASABEgLbLfD_BwE 1 Quote
Stroker Posted November 22, 2019 Posted November 22, 2019 I painted mine a 1/3 of the way up around the snout. Not the whole thing. All I had was frog tap I just tapped it up and trimmed it till I got it right. It took awhile,but came out just like I wanted it. Quote
Dart Posted November 25, 2019 Posted November 25, 2019 If you have a circle template or a big coin that fits the radius, you can use that as a guide for a nice, smooth corner. Just pencil in the curve and follow it with your masking tape. 1 Quote
mickeymark34 Posted November 26, 2019 Author Posted November 26, 2019 Haven’t done much work on my kit over the last few days, but I’m hoping to find some time to work on it tomorrow. I got my Snout Greeblie and will be looking for paint for it. I’ve read that the grey should match my decals. I guess I’ll be bringing them with me to get a proper match. Sent from my iPhone using Tapatalk Quote
Chopper Posted November 26, 2019 Posted November 26, 2019 The key is that the snout color generally matches the decal colors. You don't want a dark grey snout with light grey decals, but an exact pantone shade match isn't necessary For the SC decals and trooper bay decals, the testors navy aggressor grey is a good choice. 2 Quote
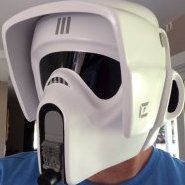
mickeymark34 Posted November 27, 2019 Author Posted November 27, 2019 I painted my snout flat black. Just waiting on it to dry and I’ll peel the tape off. I pray I get good, clean lines. I’m waiting on the Snout Greeblie color to come in from Amazon on December 5th. Sent from my iPhone using Tapatalk Quote
mickeymark34 Posted November 28, 2019 Author Posted November 28, 2019 I peeled the tape off. I’m pretty happy with how it looks.Sent from my iPhone using Tapatalk Quote
mickeymark34 Posted December 3, 2019 Author Posted December 3, 2019 I have ordered a can of Model Master “Navy Aggressor” Spray Paint, by recommendation of other Scouts, to paint my Snout Greeblie. It should be here in the coming days. In the meantime I have taped off the only portion of it that will remain black. Once this is painted, I feel I am ready to move on to the final stages of my helmet assembly. Since I am aiming for Lancer, I will be ordering some Devcon plastic welder so I can fill the seam that will be visible at the point where the dome and back of the helmet connect.Sent from my iPhone using Tapatalk Quote
mickeymark34 Posted December 5, 2019 Author Posted December 5, 2019 The paint came in and I was finally able to paint my Greeble.Sent from my iPhone using Tapatalk Quote
mickeymark34 Posted December 5, 2019 Author Posted December 5, 2019 I noticed there was a spot that was not smooth above the vents. I added a second coat, and it made it worse. Anyone have any recommendations to fix this?Sent from my iPhone using Tapatalk Quote
mickeymark34 Posted December 5, 2019 Author Posted December 5, 2019 I peeled the tape off the mic. I’m pleased with how it looks, besides that little blemish.Sent from my iPhone using Tapatalk Quote
mickeymark34 Posted December 8, 2019 Author Posted December 8, 2019 Some progress today. My friend helped me sew on the Mandarin Collar.Sent from my iPhone using Tapatalk Quote
mickeymark34 Posted December 8, 2019 Author Posted December 8, 2019 Also he helped me make a new cummerbund.Sent from my iPhone using Tapatalk 1 Quote
mickeymark34 Posted December 13, 2019 Author Posted December 13, 2019 I finished my ear holes last night. Sent from my iPhone using Tapatalk Quote
mickeymark34 Posted December 13, 2019 Author Posted December 13, 2019 Sent from my iPhone using Tapatalk Quote
mickeymark34 Posted December 13, 2019 Author Posted December 13, 2019 I just sprayed a first coat of Plastidip inside the helmet. I will let it dry 15 minutes, and add another coat.Sent from my iPhone using Tapatalk Quote
mickeymark34 Posted December 13, 2019 Author Posted December 13, 2019 I’m making some progress on the construction of my helmet. I have CA glued the dome and back together. Next I will be drilling holes to attach the faceplate and visor to the helmet. Sent from my iPhone using Tapatalk Quote
mickeymark34 Posted December 17, 2019 Author Posted December 17, 2019 I’m trying to switch gears a bit and take a break from the helmet. I will be cutting the holes in my knee guards to attach the elastic, so I can start work on my boots. For some reason our local Lowe’s and Home Depot does not have the Rivets used for this build. They have them, but with White Heads instead of the aluminum. It was recommended to sand the color off. Instead, I finally found the right ones on Amazon and ordered a pack along with some washers. I also ordered 3/4 inch. elastic for the knee guards. Hopefully everything will be here just before Christmas, that way I can get other things rolling. Quote
Chopper Posted December 17, 2019 Posted December 17, 2019 Ace hardware typically has the silver 1/8" rivets as well. Quote
Harbinger Posted December 18, 2019 Posted December 18, 2019 I was able to buy them unpainted at Home Depot, I believe they were sold under the Dewalt brand. Quote
The Sleepy Llama Posted December 27, 2019 Posted December 27, 2019 Looking good, Mark. doing some work on mine today. Quote
clayorrnot Posted January 8, 2020 Posted January 8, 2020 Looking good! I've been eyeing a few Scout threads in preparation of my build. Definitely following this one! Quote
mickeymark34 Posted January 17, 2020 Author Posted January 17, 2020 Made a little progress last night. My friend came over with his sewing machine and helped me sew some straps for my Knee Guards, Forearm and Bicep armor. Time was spent to glue the hook side of the Velcro to the inside of the armor. The T-Bit greeblies were glued onto the Bicep armor as well. We also managed to trim the holes in the belt for the webbing, and thermal detonator. Sent from my iPhone using Tapatalk 1 Quote

Recommended Posts
Join the conversation
You can post now and register later. If you have an account, sign in now to post with your account.