mickeymark34 Posted October 16, 2019 Author Posted October 16, 2019 While I wait for my armor, I’ve decided to start prepping my undersuit for modification. Right now I’m using a thread ripper remove the back pockets.Sent from my iPhone using Tapatalk Quote
mickeymark34 Posted October 28, 2019 Author Posted October 28, 2019 I’ve begun making the first cuts to the sole of my boots. I haven’t been this nervous since I’ve made that first cut on my Stormtrooper Armor. I don’t like how the top looks, and will try and clean it up after I am done.Sent from my iPhone using Tapatalk Quote
mickeymark34 Posted October 29, 2019 Author Posted October 29, 2019 Almost have the heel done on one. What do you guys think?Sent from my iPhone using Tapatalk 1 Quote
mickeymark34 Posted October 29, 2019 Author Posted October 29, 2019 I finished the sole of my first boot.Sent from my iPhone using Tapatalk Quote
mickeymark34 Posted October 30, 2019 Author Posted October 30, 2019 Both the soles of my boots are done. Last night, I sustained my first injury on this build, after I somehow managed to drop my X-Acto knife and it hit my leg. Sent from my iPhone using Tapatalk Quote
mickeymark34 Posted November 3, 2019 Author Posted November 3, 2019 Made a list of the different types of elastic using a checklist that includes Lancer requirements.Sent from my iPhone using Tapatalk Quote
mickeymark34 Posted November 16, 2019 Author Posted November 16, 2019 I just received an email confirmation that my armor is on its way. I’m so excited. 3 Quote
mickeymark34 Posted November 18, 2019 Author Posted November 18, 2019 BBB day has arrived.Sent from my iPhone using Tapatalk 2 Quote
Aliaz Posted November 18, 2019 Posted November 18, 2019 Always exciting! Skickat från min iPhone med Tapatalk 1 Quote
mickeymark34 Posted November 19, 2019 Author Posted November 19, 2019 I’d like to start building my helmet today. I’m going to start that by trimming out the eyes using my Dremel.Sent from my iPhone using Tapatalk Quote
mickeymark34 Posted November 19, 2019 Author Posted November 19, 2019 I’m getting there. Somehow I managed to let the sanding drum knick a spot above the eyes. Perhaps a little weathering can hide that. Sent from my iPhone using Tapatalk Quote
mickeymark34 Posted November 19, 2019 Author Posted November 19, 2019 I noticed I knicked right above the snout as well. I still have some area around the lens to remove so it should help remove my mistake, but not all. Sent from my iPhone using Tapatalk Quote
mickeymark34 Posted November 19, 2019 Author Posted November 19, 2019 I taped the green lens in the faceplate to see how it would look. I think I need to fine tune the eyes using regular sandpaper. Sent from my iPhone using Tapatalk Quote
mickeymark34 Posted November 20, 2019 Author Posted November 20, 2019 Last night I attempted to use a heat gun to curve my lens. It worked, but not I do not like the outcome. Right now I have a pot of water on for a medium boil, and I’m going to give it a hot water bath to see if I can’t get more of a slender curve to match the interior of the faceplate. Sent from my iPhone using Tapatalk 1 Quote
BikerScout007 Posted November 20, 2019 Posted November 20, 2019 I didn't use heat on the lens. The Hobart lens is pretty flexible and the hot glue holds it well. Quote
mickeymark34 Posted November 20, 2019 Author Posted November 20, 2019 10 minutes ago, BikerScout007 said: I didn't use heat on the lens. The Hobart lens is pretty flexible and the hot glue holds it well. Does the lens have to sit flush straight across the faceplate? Quote
BikerScout007 Posted November 20, 2019 Posted November 20, 2019 2 minutes ago, mickeymark34 said: Does the lens have to sit flush straight across the faceplate? Not necessarily. It helps to have a little gap above and below for airflow. Best practice is just to hot glue the sides and leave the top and bottom alone. For some helmets, there isn't enough clearance to lift the faceplate up if you glue down the top. This was the case with my RS. Quote
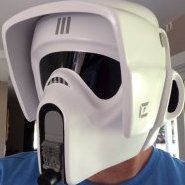
mickeymark34 Posted November 20, 2019 Author Posted November 20, 2019 Well, here is how it stands now, hot glued in. Sent from my iPhone using Tapatalk Quote
mickeymark34 Posted November 20, 2019 Author Posted November 20, 2019 Sent from my iPhone using Tapatalk Quote
mickeymark34 Posted November 20, 2019 Author Posted November 20, 2019 Using 3M Outdoor Mounting Tape, I adhered the Dome and back of the helmet.Sent from my iPhone using Tapatalk Quote
mickeymark34 Posted November 20, 2019 Author Posted November 20, 2019 Sent from my iPhone using Tapatalk Quote
mickeymark34 Posted November 20, 2019 Author Posted November 20, 2019 Sent from my iPhone using Tapatalk Quote
mickeymark34 Posted November 20, 2019 Author Posted November 20, 2019 Sent from my iPhone using Tapatalk Quote
mickeymark34 Posted November 20, 2019 Author Posted November 20, 2019 I realized I need to trim out the ear holes. Quote
mickeymark34 Posted November 22, 2019 Author Posted November 22, 2019 Getting ready to paint my snout with Testors Flat Black. Any recommendations taping the curve at the top of the snout?Sent from my iPhone using Tapatalk Quote

Recommended Posts
Join the conversation
You can post now and register later. If you have an account, sign in now to post with your account.