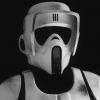
Strider Posted August 31, 2017 Posted August 31, 2017 Just me rambling about the RS Props biker scout helmet (kit and assembled version). http://www.youtube.com/watch?v=XdCxdsu9nRE&feature=youtu.be If you're curious what the original production made (not screen-used) helmet looked like which RS acquired, here's the video from Prop Store: http://www.youtube.com/watch?v=ARK_ZGCsMYw 9 Quote
Cbrant Posted August 31, 2017 Posted August 31, 2017 You have great attention to detail - now the missing vent is gonna drive me crazy. Do you have a link for the lens material you use? The one provided probably has a protective film over each side so it might not be as dark as you think. Quote
Strider Posted August 31, 2017 Author Posted August 31, 2017 I get my lenses from a local shop here, they're grey O'Neal B2 anti fog replacement lenses. Not sure about their availability in the US. No, I actually looked through the lenses of my assembled helmet ;-) They're pretty dark. Quote
3DImpact Posted August 31, 2017 Posted August 31, 2017 Great review with a lot of helpful info - thanks! Can you describe how you'd go about fixing that gap between the face place and the main helmet? I don't have my kit yet so I can't look at the pieces, but for our own self-made kits will it just be an issue of carefully choosing where to make the trim edges? Dan ETA - my kit arrived about 5 minutes after I typed this! Quote
Chopper Posted August 31, 2017 Posted August 31, 2017 This is really helpful. Thanks so much, Strider. 1 Quote
Eyeslave Posted August 31, 2017 Posted August 31, 2017 Nice video, thanks for posting. Noticed the visor joiner ( strip ) is way to big . Some poor mistakes on a screen used pull. Would like to have seen a more accurate hard hat liner. They glued the chin up strap? Doubt it was done like that on the original. And the lense, is that correct to the screen used one? The cut in the visor to allow the faceplate to lift up fully isn't what I'd expect from a screen used pull either. Quote
Stroker Posted August 31, 2017 Posted August 31, 2017 I should have mine today. Nice review and info. BTW you need to put a Deadpool costume together! Quote
Strider Posted August 31, 2017 Author Posted August 31, 2017 Thanks for your comments, guys! To make the differences easier to see I've pulled together some references below. Btw, I'm not trying to put down the RS Props helmet. IMO it's the best that is currently out there. But that is not to say it can't be made better ;-) 4 Quote
BikerScout007 Posted August 31, 2017 Posted August 31, 2017 Great video, Constantin! I removed the hard hat liner, it was giving me headaches and just replaced it with helmet pads. Chin cup is indeed tight and the helmet pads didn't help that. But I haven't fixed it yet. But like you said, still the best helmet out there and I am very glad to troop in it! 4 Quote
Strider Posted August 31, 2017 Author Posted August 31, 2017 Great review with a lot of helpful info - thanks! Can you describe how you'd go about fixing that gap between the face place and the main helmet? I don't have my kit yet so I can't look at the pieces, but for our own self-made kits will it just be an issue of carefully choosing where to make the trim edges? Dan ETA - my kit arrived about 5 minutes after I typed this! I just tried to fix mine but you with the assembled helmets you can only fix it to a certain degree. With the kit you can prevent this by lining up the facemask to the dome properly. Nice video, thanks for posting. Noticed the visor joiner ( strip ) is way to big . Some poor mistakes on a screen used pull. Would like to have seen a more accurate hard hat liner. They glued the chin up strap? Doubt it was done like that on the original. And the lense, is that correct to the screen used one? The cut in the visor to allow the faceplate to lift up fully isn't what I'd expect from a screen used pull either. The joining strip is okay - there were some original helmets that also had a bigger connection strap. For the chin cup strap with the originals the just glued the ends together (to itself) but not to the helmet. But for me this is not a biggie. And yes, the screen used visors had a more evenly cut. I should have mine today. Nice review and info. BTW you need to put a Deadpool costume together! Thanks, dude. Nah, when I troop in my bikerscout costume I do way more nonsense than deadpool ever could, lol. Quote
Strider Posted August 31, 2017 Author Posted August 31, 2017 Great video, Constantin! I removed the hard hat liner, it was giving me headaches and just replaced it with helmet pads. Chin cup is indeed tight and the helmet pads didn't help that. But I haven't fixed it yet. But like you said, still the best helmet out there and I am very glad to troop in it! Thanks, man! Yeah, like the way it came I couldn't troop in it for 5 min. I don't think the liner is really the problem but rather the chin cup which is really pushing up your head into the helmet and making it really uncomfortable to wear. So you should def get a longer strap for the chin cup. The second thing for me was that the lenses were pushing down on my nose but I fixed that by dremmeling out that section. 2 Quote
BikerScout007 Posted August 31, 2017 Posted August 31, 2017 I didn't have that issue with the lens but it is definitely too dark! It's really hard to see when you are inside and at night...forget about it! Quote
Eyeslave Posted August 31, 2017 Posted August 31, 2017 Nice picture break down , very informative. Thanks. The visor join strips I've seen have been smaller, so I must look closer I think. Quote
9934 Posted August 31, 2017 Posted August 31, 2017 Very nice!! Think I'll stick with Altmann's , not to keen one the dome and visor being halved. Quote
Bobik96 Posted August 31, 2017 Posted August 31, 2017 Thank you for the video. I am a little dissatisfied with the pull on my kit. It's slightly warped and has a few dimples. I'm not worried about the helmet liner because, like Mickey, i don't use them. I prefer a foam sponge on top. That lens is too dark for me so I am glad that I have the option to install something different. 1 Quote
762s Posted September 1, 2017 Posted September 1, 2017 I am a little dissatisfied with the pull on my kit. It's slightly warped and has a few dimples. the dimples are from the vacuum form .. they are needed in the mold to get the plastic to form, look carefully around all your parts you will see more of them .. i have the same dimples you show in your pics. those dimples can be fixed with high build primer or even fill it with bondo or similar skim coat material 3 Quote
BikerScout007 Posted September 1, 2017 Posted September 1, 2017 Very nice!! Think I'll stick with Altmann's , not to keen one the dome and visor being halved. It's not the most convenient setup for sure, but if you want screen accurate then that's the way to go Sent from my LG-H830 using Tapatalk 3 Quote
762s Posted September 1, 2017 Posted September 1, 2017 (edited) if i may add a suggestion to the visor .. as i noticed rs penciled a line for the cutout and strider mentioned/shows this at about the 7 minute mark. the penciled line rs gives us .. should not need to be cut out in the form they show to allow the visor to sit up .. the dark line is their cutline .. the lighter line is my penciled in rough line and i also show the donp version wich doesnt have the extra cut out there is a small visor lock on the helmet .. and on my donp it works just fine and the visor sits up and locked in place *dont mind the apoxie sculpt .. its a wip i would suggest not cutting the rs line .. build and test fit and see how it works the visor lock works well on the donp .. and by the looks of the rs, it should be just fine without the extra cutout maybe, even add a bit of apoxie sculpt, fiberglass or similar material to the inside of the visor end to stiffen it up abit .. you could even carry it up the return edge Edited September 1, 2017 by 762s 1 Quote
Bobik96 Posted September 1, 2017 Posted September 1, 2017 the dimples are from the vacuum form .. they are needed in the mold to get the plastic to form, look carefully around all your parts you will see more of them .. i have the same dimples you show in your pics. those dimples can be fixed with high build primer or even fill it with bondo or similar skim coat material Good to know thanks! Quote
Strider Posted September 1, 2017 Author Posted September 1, 2017 Thank you for the video. I am a little dissatisfied with the pull on my kit. It's slightly warped and has a few dimples. I guess you're referring to the lenses section? This will be cut out anyway so no worries. Quote
Bobik96 Posted September 1, 2017 Posted September 1, 2017 I guess you're referring to the lenses section? This will be cut out anyway so no worries. I didn't provide the best photos. Around the snout is not smooth. There is a bump on the right (when worn) vertical area. Quote
Strider Posted September 1, 2017 Author Posted September 1, 2017 I didn't provide the best photos. Around the snout is not smooth. There is a bump on the right (when worn) vertical area. You can get rid of them with a combination of sanding and model filler /putty but it should hardly show anyway once you primed and spraypainted it. That's not to say one should not expect a flawless cast particularly at this price! 1 Quote
Griffin-X Posted September 1, 2017 Posted September 1, 2017 Great video and review Constantin! Many thanks... 1 Quote
Cbrant Posted September 1, 2017 Posted September 1, 2017 Have they posted a how-to anywhere yet? I understand how to do it, but I'd like to see if they make mention of any interesting/helpful tips and tricks. Quote
Chopper Posted September 1, 2017 Posted September 1, 2017 Has anyone tried fixing the return edge on the bottom of the face plate with a heat gun? Too risky? Quote

Recommended Posts
Join the conversation
You can post now and register later. If you have an account, sign in now to post with your account.